Quantcast
Channel: Kit Built Helicopters Archives - Redback Aviation Home Built Helicopters
Viewing all 50 articles
Browse latest View live

Rotorway Exec Helicopter Kit

$
0
0
Rotorway Helicopters Talon 600

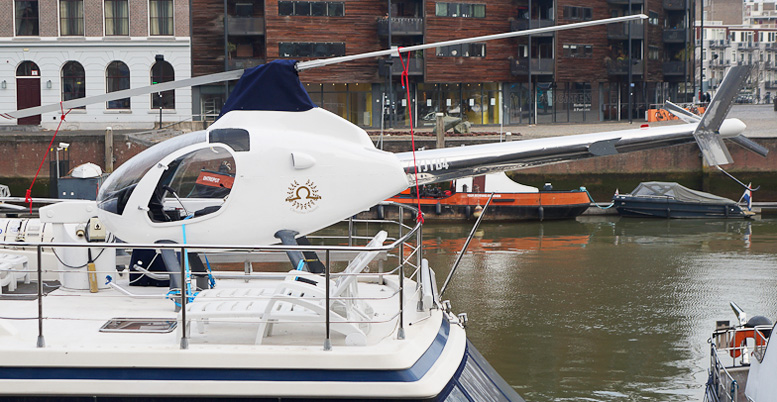
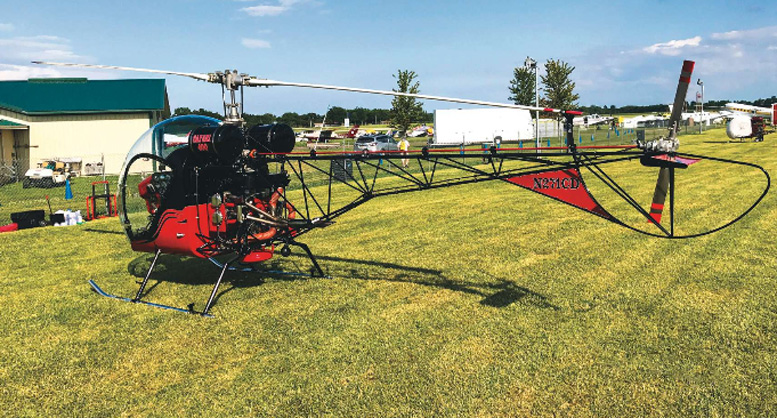
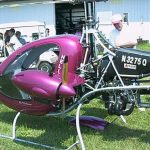
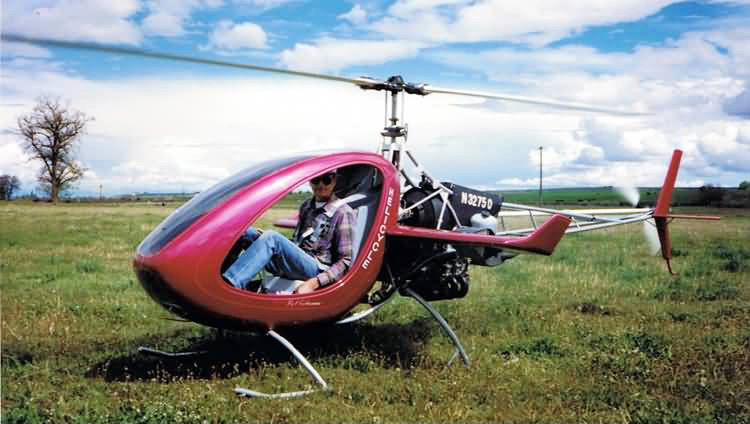
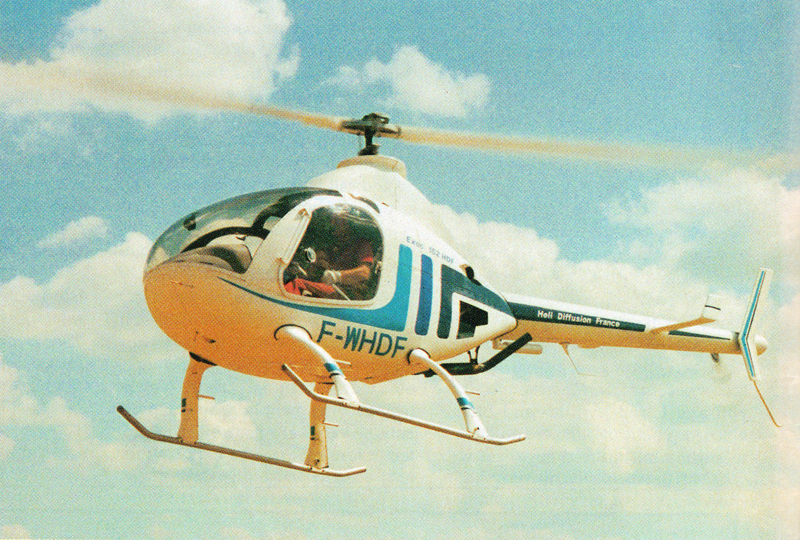
Rotorway Two Seat Exec Kit Helicopter

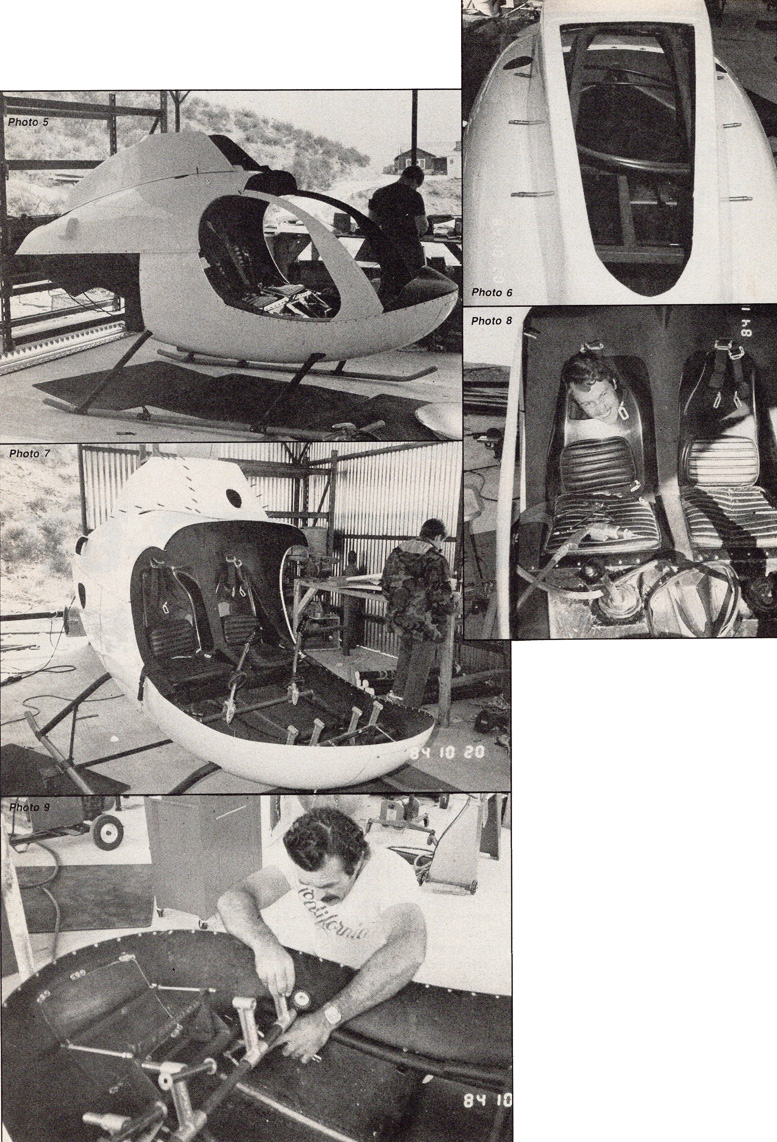
THE EXEC HELICOPTER TAKES SHAPE

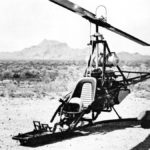
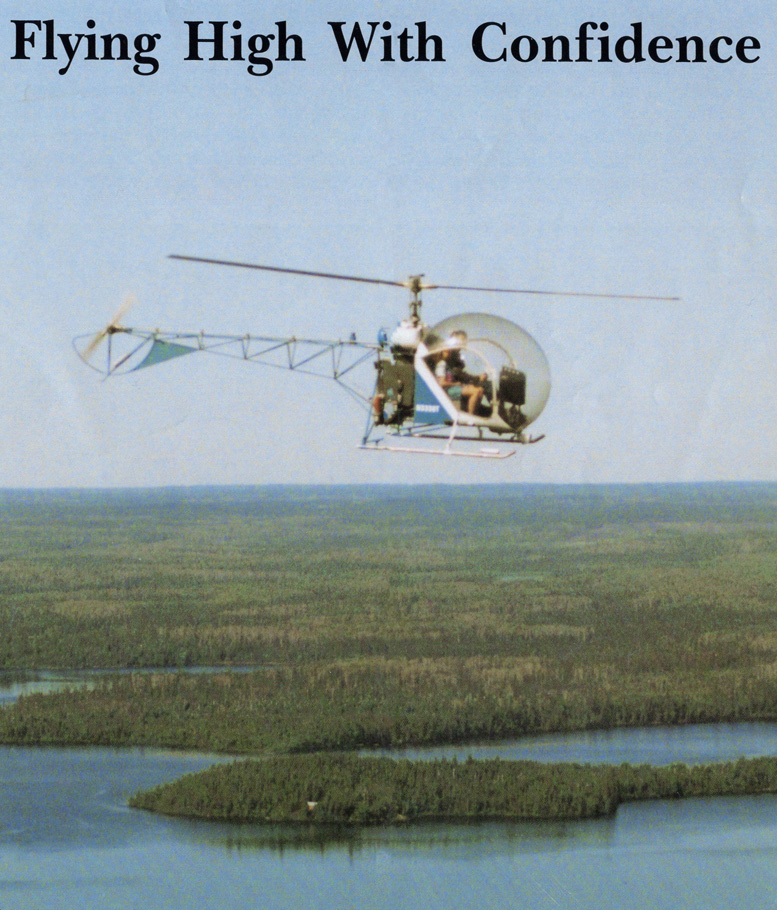
In 1980, it was finally determined that a whole new design of the helicopter was needed, inside and out. An increasing number of customers were purchasing the helicopter for more than just weekend recreation. The more varied utility of this new kit demanded higher performance levels. That is how the Rotorway Exec Helicopter began.

Three years of research and development were undertaken to yield this new Rotorway Exec Helicopter design, but it proved to be well worth it, the end product setting higher standards than ever before for kit aircraft, both fixed-wing and helicopter designs.

Best Rotorway Exec Kit Helicopter

As with any new design aircraft, there were areas of substantial improvement as well as unanticipated difficulties. Less than perfect aerodynamics and a tendency to overheat were some of the issues that were later resolved.

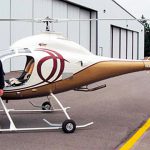
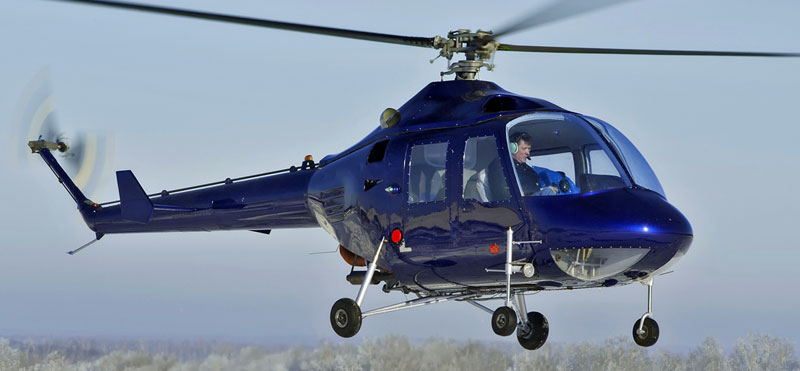
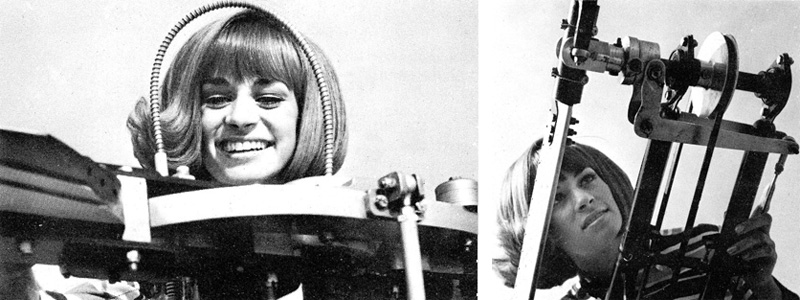
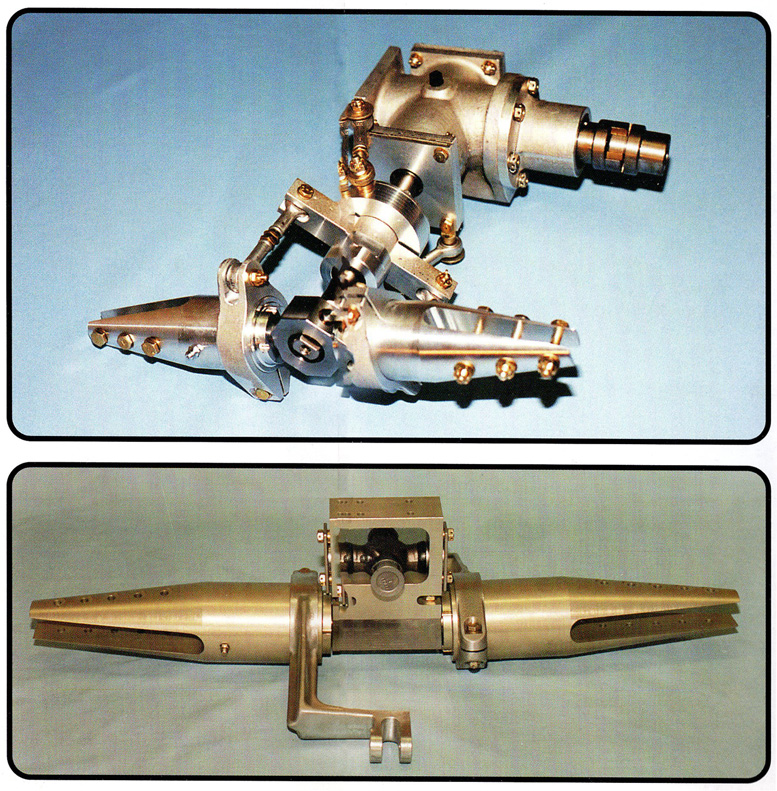
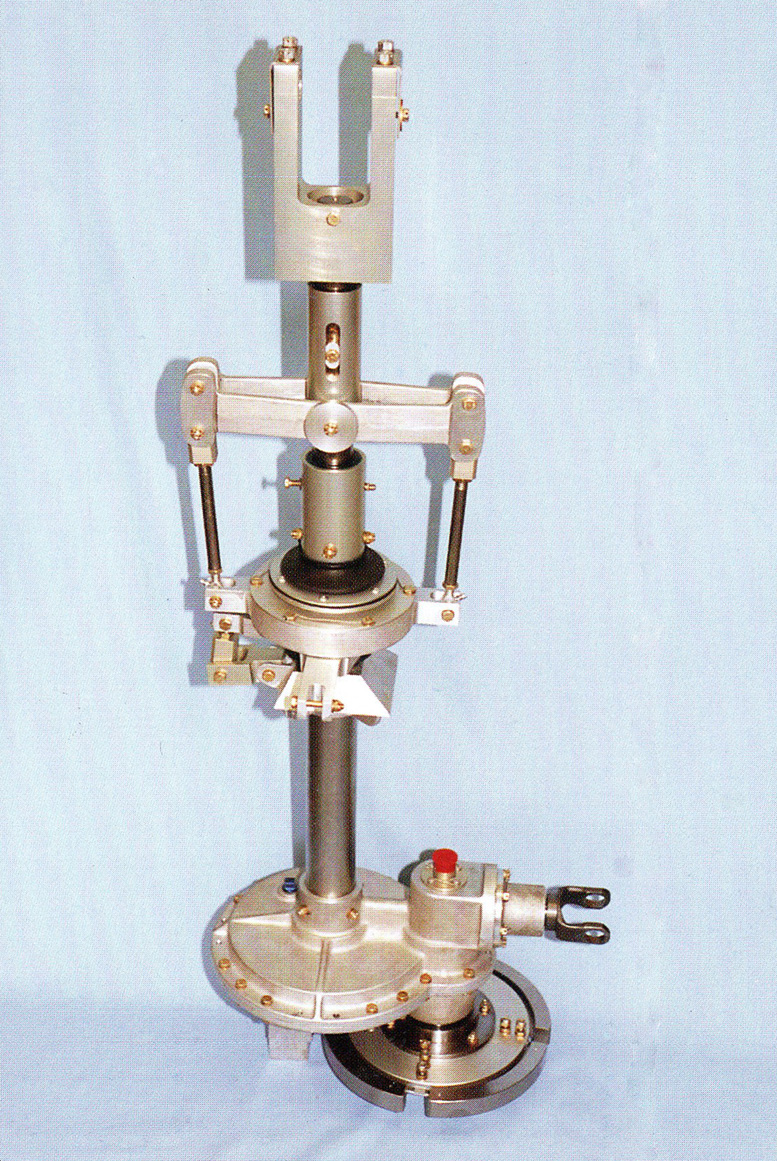
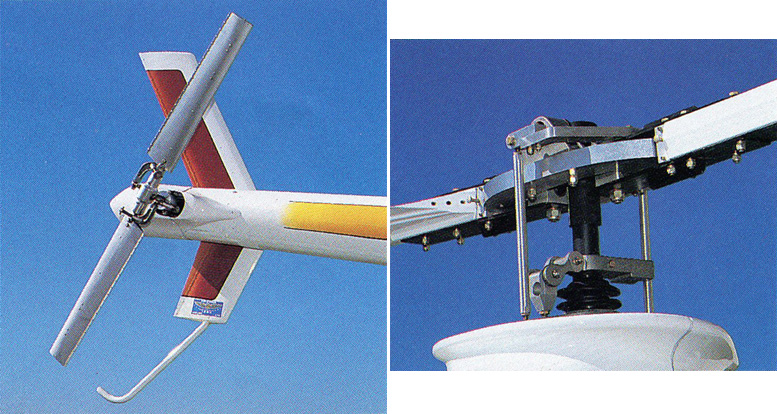
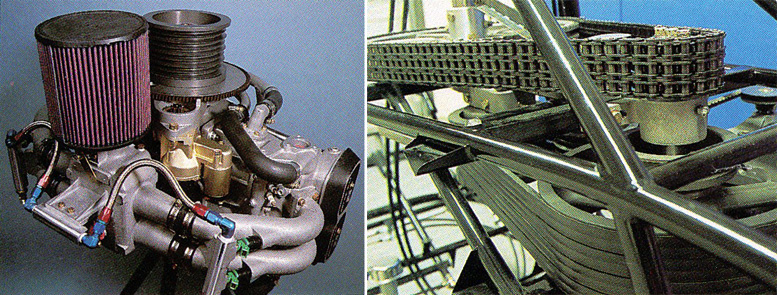
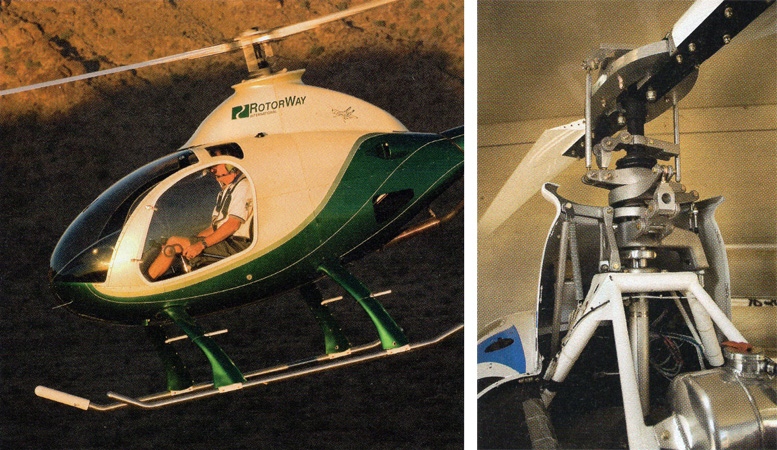
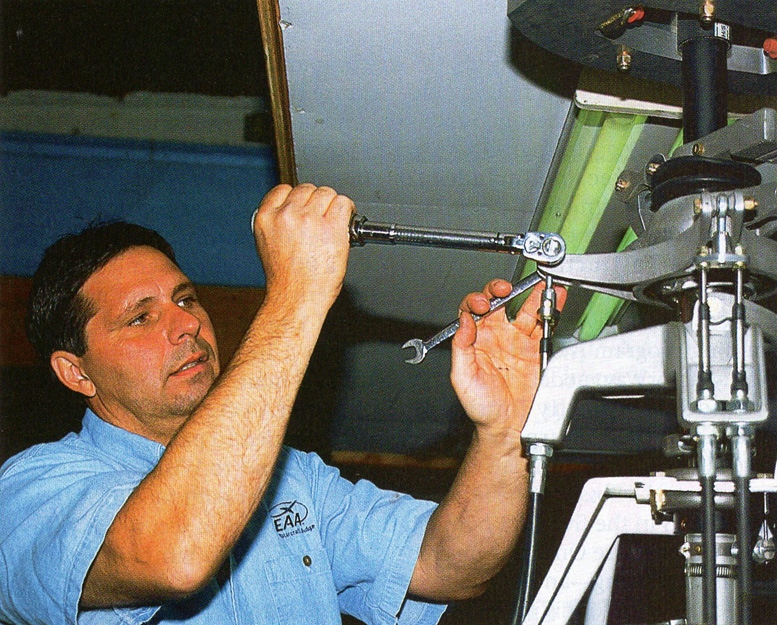
One of the most significant improvements with this model was the elastomeric main rotor system, which improved the “workhorse” capability of the Rotorway Exec Helicopter.

The well-proven elastomeric technology had been used in commercial helicopters up to that time, but would now be adapted to a kit helicopter. The term “elastomeric bearing” refers to a bonded rubber type bearing in which alternate thin layers of rubber and brass shims are bonded together in a pack much resembling a stack of thin washers.

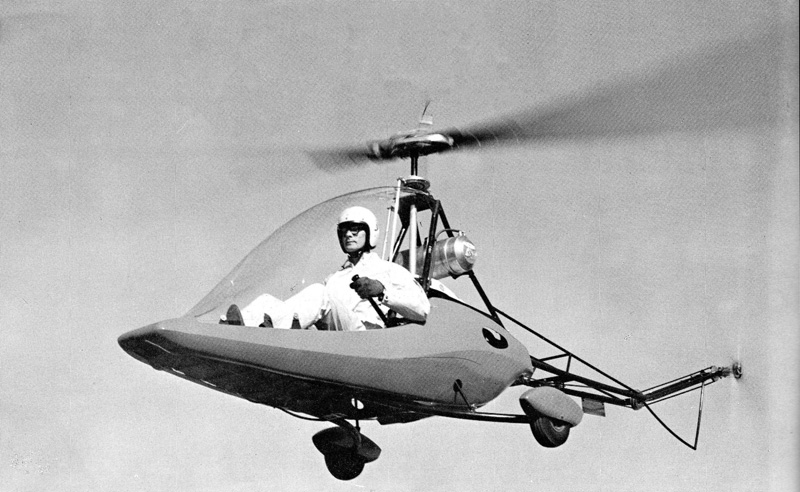
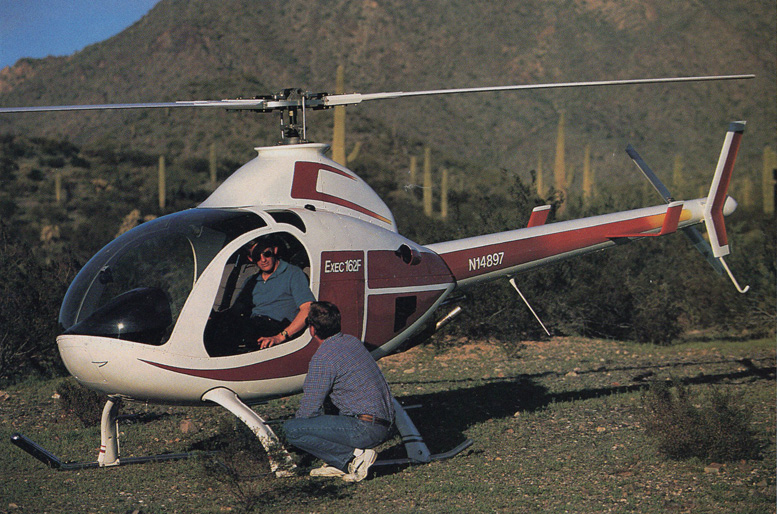
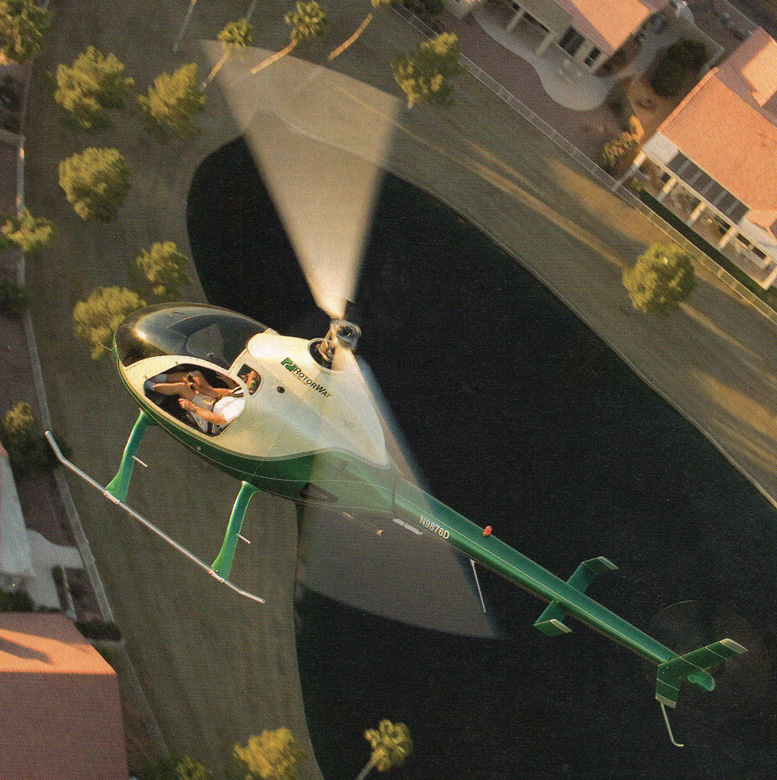
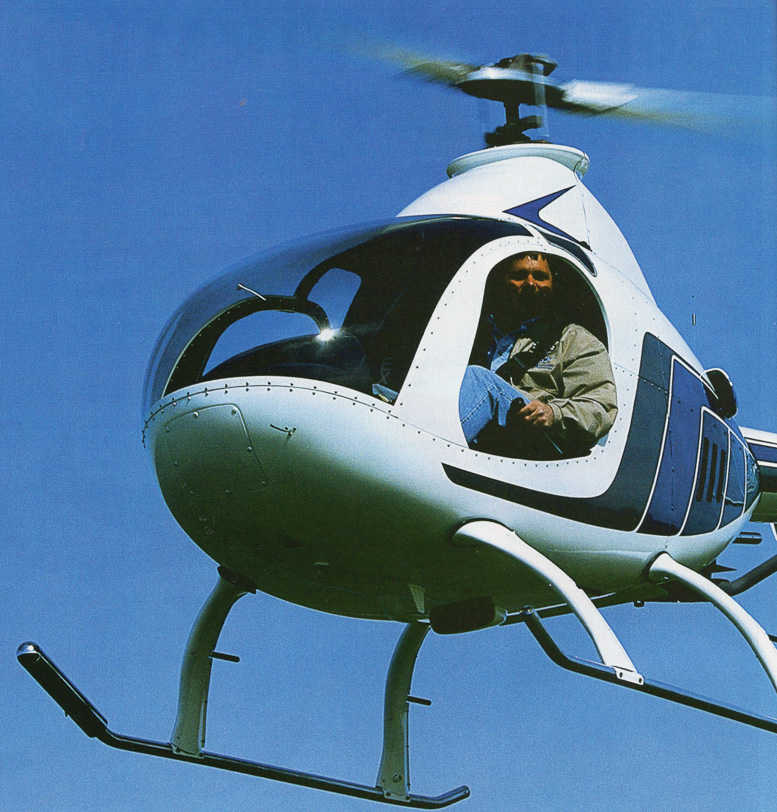
This “sandwich” absorbs the pressures of the main rotorblades centrifugal force and at the same time, due to the flexibility of the rubber, the feathering motion of the blade can occur at a very rapid rate with very low cycling loads being applied to the blade pitch horns. The Rotorway Exec Helicopter with the RW 152 engine carried a pilot and passenger load of 380 pounds and had a normal cruise of 95mph, with maximum speed of 115 mph.

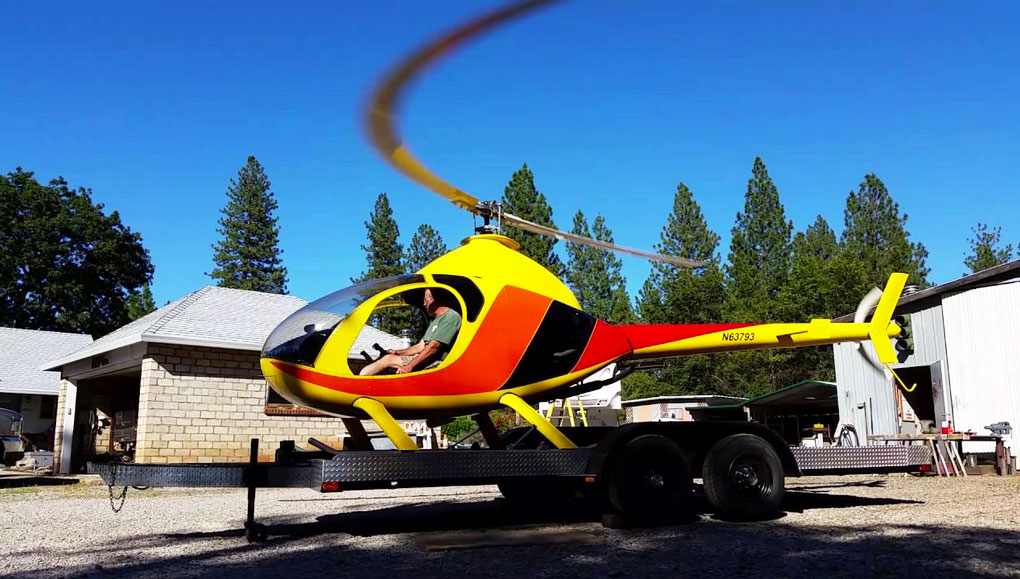
VIDEO: Timelapse Rotorway Exec Helicopter Build

LAST DAYS OF ROTORWAY AIRCRAFT

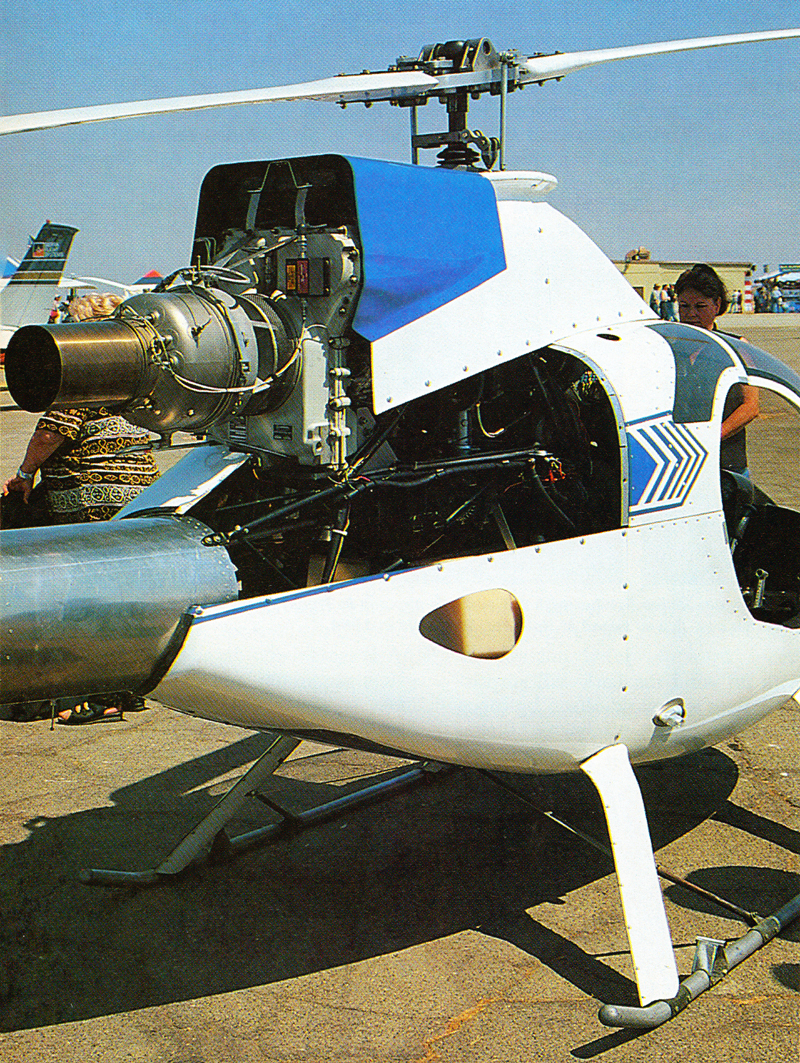
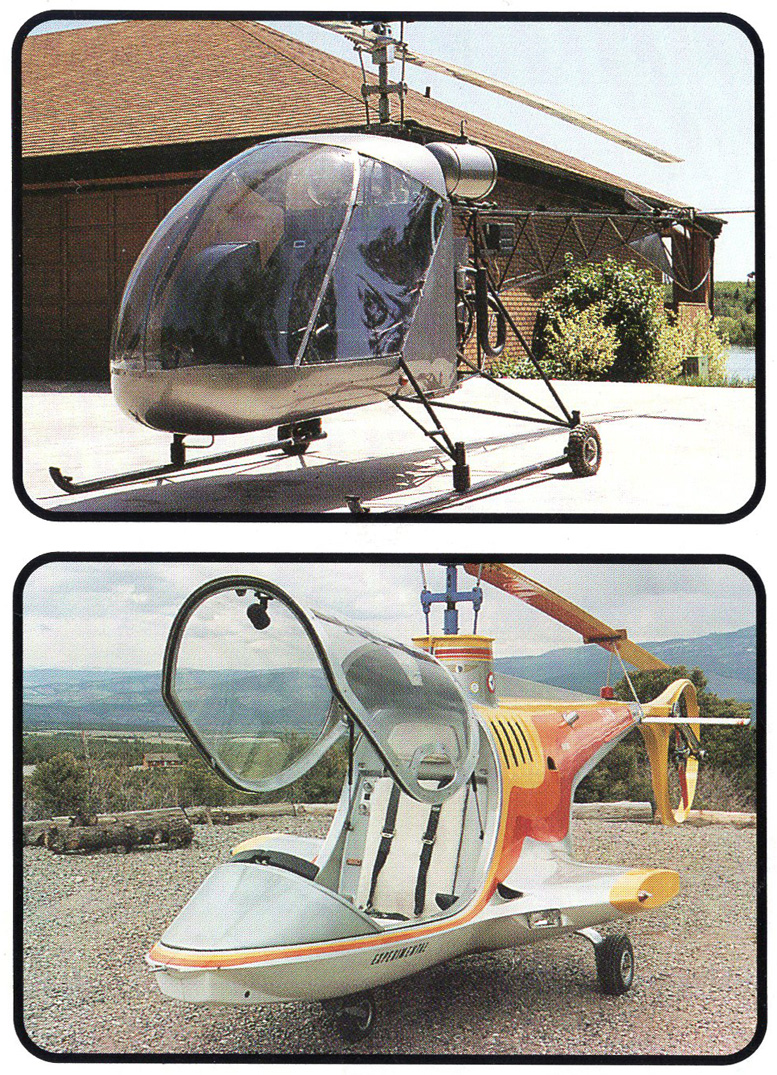
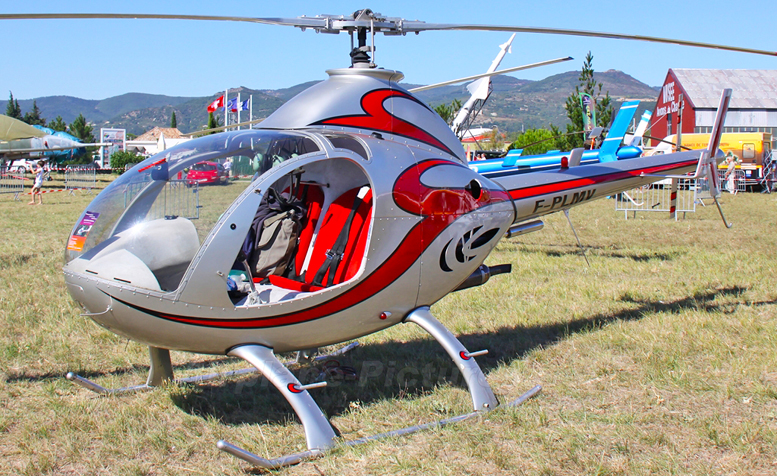
With design concepts evolving again in the late 80’s, RotorWay created another new model named the Elete, a larger, attractive two-place helicopter which showed a lot of promise, yet presented once more the numerous difficulties associated with a new model.

Rotorway announces ELETE kit helicopter

Rotorway Elite helicopter

The new RotorWay ELETE incorporates numerous new features four specific areas Those include aerodynamic improvements, an extended component life and power plant reliably improvements, and some very important builder assist construction improvements.

The prime purpose of the ELETE is speed. In order to increase speed, one of two things must happen. Either you increase power or decrease drag. In our case, it was important we achieve a significant drag reduction, otherwise the result would be a significant increase in cost.

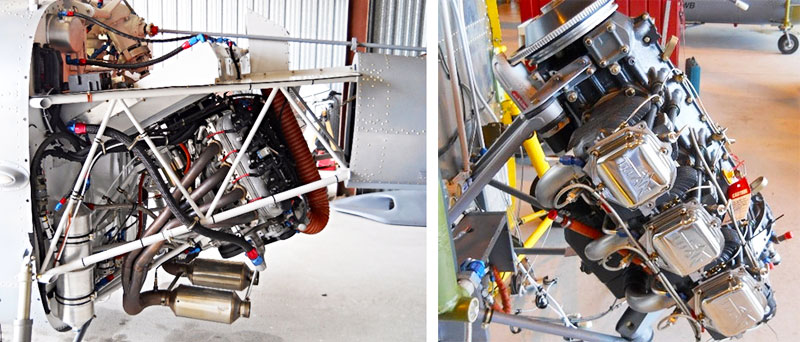
The Elete had an RW 152, water-cooled, dual electronic, 4 stroke engine that provided 152 horsepower with a pilot and passenger payload of 400 pounds. Normal cruise was 113 mph with maximum airspeed of 130 mph.

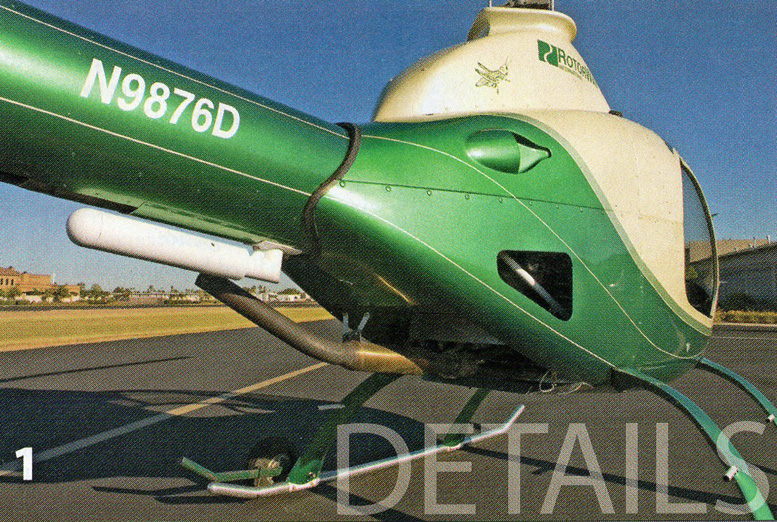
The aerodynamic improvements of the ELETE are outlined here as: two piece windscreen, cabin airflow separator, skid fairings, swashplate fairing, laminar flow air dam, NACA air ducts, NACA engine air inlet, streamlined radiator exhaust, drag reducing muffler fairing, pitch & yaw stabilization improvements.

Cabin comfort features include: improved vision, cabin air flush duct, outside air ON/OFF switch, cabin heat vents, removable cabin engine heat deflector.

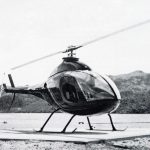
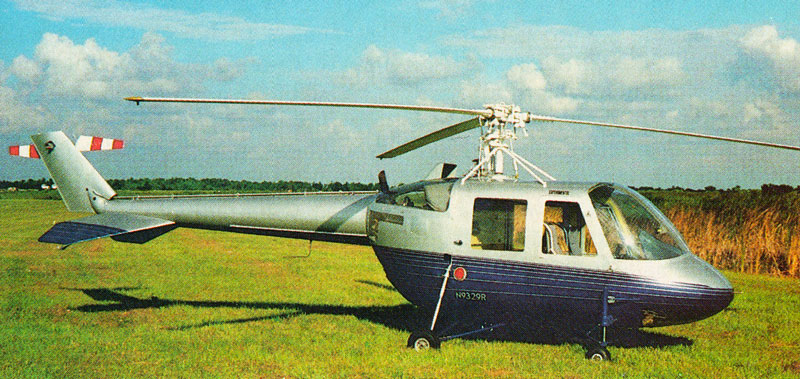
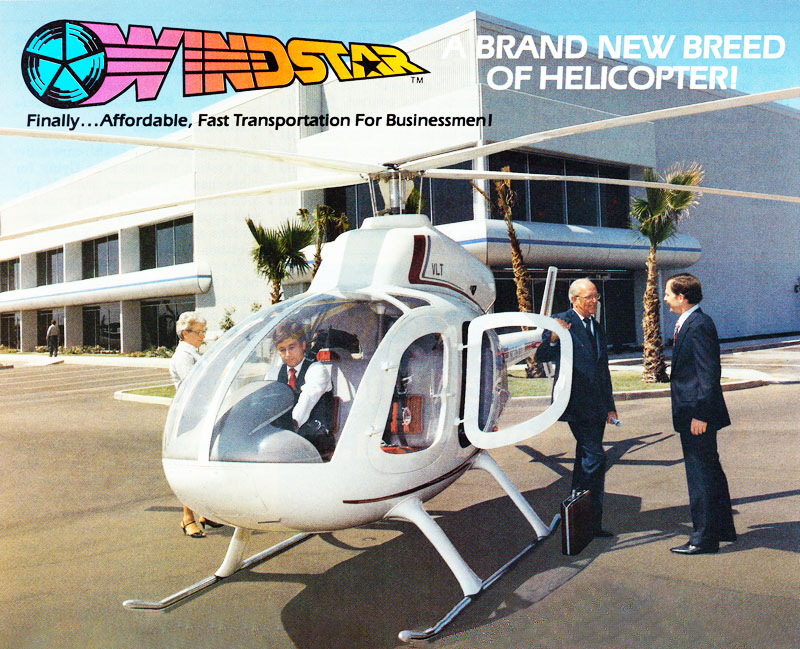
There was also even a prototype development of a four place kit helicopter called the Rotorway Windstar helicopter that simply proved to be far too costly for the kit marketplace.

Rotorway WindStar 4 seat kit helicopter

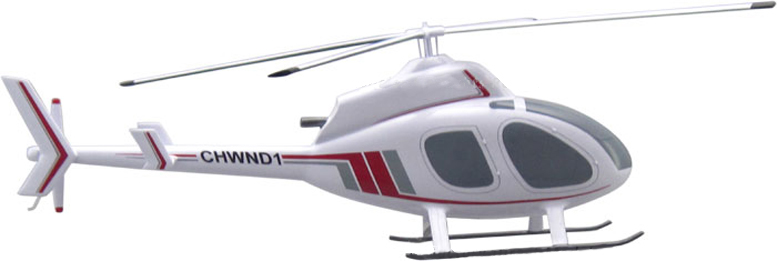
The development costs for further research and testing were also running more expensive than a small company could absorb and the project was soon dropped.

N36VL WindStar helicopter

Chopr1 wrote:

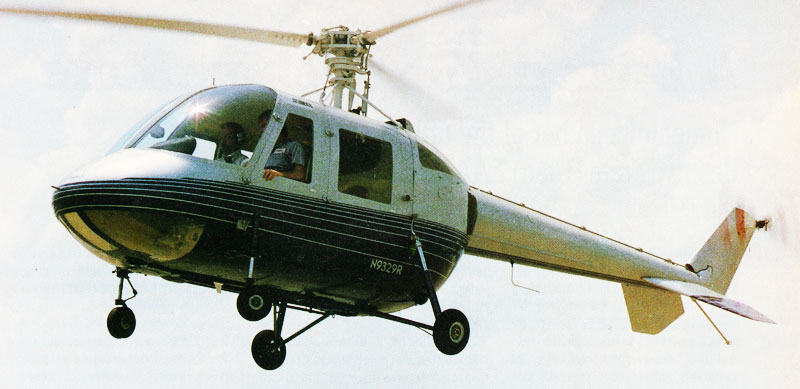
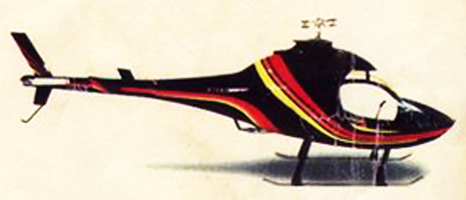
Just happened to come across this site-very interesting. I was hired in 1981 to work for B.J. Schram in the R&D dept. of VLT. Windstar was just on the ground floor when I started. B.J. of course owned Rotorway aircraft but had a idea to build a 4 place commercial piston powered helicopter, thus, came the company VLT. Long story short – all parts and components were built in house-engine, body, gear boxes-blades-etc.

Four seat kit helicopter WindStar

He owned his own metal foundry so we could cast all our own parts – aluminum, stainless steel, copper, etc. The engine was a 6 cylinder, fuel injected, turbo charged, water cooled type. The prototype helicopter was built and flying – this is the one you see in pictures.

In about 1988 the prototype had a incident at Chandler field in Chandler, AZ. that was also a bad time for the economy and money was tight, thus ended Windstar project. I then was moved back to Rotorway to build a replacement for the experimental built Exec helicopter.

This is what is know as the “Elete” One prototype built and flying “factory ship” and two kits were made and shipped before the plant had to close and was later bought by English man John Netherwood. These are quick thoughts I had – sorry for length- lots of history there.

David Hillberg wrote:

I called and tried to acquire the wind star from the ones who now have it, or the one, I think it’s up in Hisperia somewhere now, when Don and I worked on it for the five firemen they were too busy looting the pot they made.

We had it almost done when they pulled the plug, we removed 680 pounds of worthless crap from the airframe, engine (nice workmanship for a BMW styled engine) PAL system, hydraulic pumps, coolers, radiator, the crappy fuel system, flight controls and soon the doors that weighed about twenty pounds each.

Hovering WindStar helicopter

We installed a flat floor with a bladder underneath, crash worthy pilots seat, (it could now seat six if need be, or a stretcher with aft entry doors) a mock up push pull tube flight control was installed, from what I heard one main rotor blade was dissected (mistake of a fool who did it) and they have no clue of what to do or sell it.

WindStar helicopter five rotorblades four seats

Rotorway-WindStar homebuilt helicopter

I figure the crashed one we used as a mock up and the flying intended one are now lawn art, they just jack everyone around who shows the least bit interest in it. I think that they bought if for 90 thousand or put that amount into it?

With all the engineering data lost (some of it had errors) and the tooling in it’s past condition as observed was junk, a lot of work will be needed to certify the new design Don and I did, (the Push-Pull cables prevented the civil certification of the aircraft).

Private executive WindStar helicopter kit

I would like to see it fly yet the owners think otherwise, sad, it is a sexy ship. The revised powerplant would be an off the shelf injected 435 Lycoming lest anyone has a spare C20 to loan…there’s a video of it in the air and it showed the strain of it’s rotundness….I think it would have flown just fine….
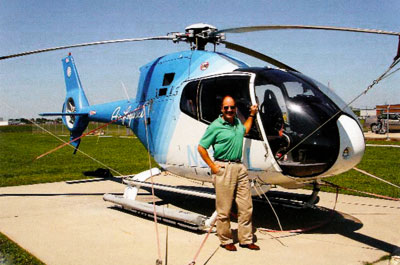
Don Hillberg wrote:

That’s me in that photo ,Lenny Cuzmal, James Gruver & A RotorWay guy, Around 1995? or so we picked it up to convert it to an Allison 250 c20 and remove the engine as the tooling was gone, (German designer possible Porsche modified power plant) VLT? Lenny ran out of $$$$ project sits last I knew at French Valley Air Port California.

WindStar family kit helicopter promotional picture

What took you so long? The Wind Star had a flap pitch coupling effect that required stiffening & repositioning the pitch control link attached on the blades but it was all workable. If they used a Certified engine & conventional controls, it would be a go for US Certification. (I have some data & copies of the FAA directorate Dallas Fort Worth on the issues.)

WindStar helicopter display


COURTESY: http://126840.activeboard.com/t48658247/windstar-helicopter-ad-1970s/


VIDEO: Rotorway TALON 600

After selling three Elete helicopters, the company finally succumbed to financial challenges and was soon purchased by a former customer, John Netherwood, a businessman from England. Netherwood recognized the design hurdles of the Elete and promptly set out to address making the proven Exec model a better aircraft for the new company of RotorWay International to sell.

THE EXEC 90 AND ROTORWAY INTERNATIONAL PREMIERE

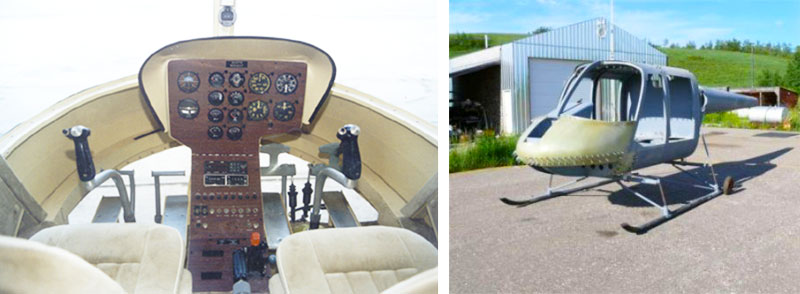
The Exec was reviewed from top to bottom. Any and all suggestions were considered, evaluated and many implemented. Extensive redesigning was done and when all was complete, 21 items were changed or improved including the aerodynamics, drive train, stability and power.

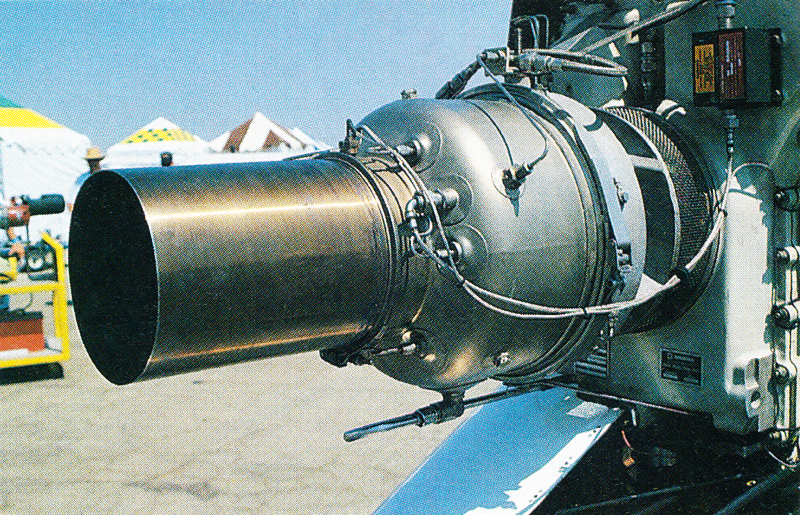
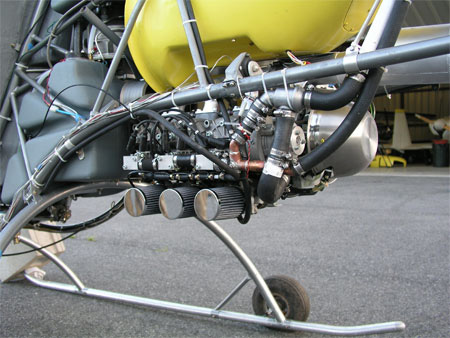
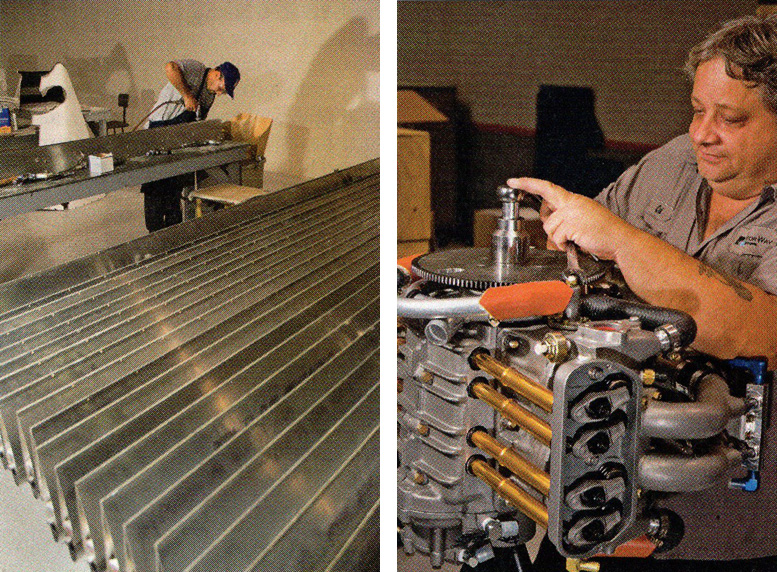
The engine was once more a primary area of improvement, a task made even easier by the fact that RotorWay had been engineering and manufacturing their own engine for years by this time.

The RI 162 cubic inch engine was specifically designed for rotorcraft flight and possessed an incredibly light weight to horsepower ratio. Extended life limits were added to the chains, belts, rotor system and asymmetrical blades.

Rotorway Exec airshow

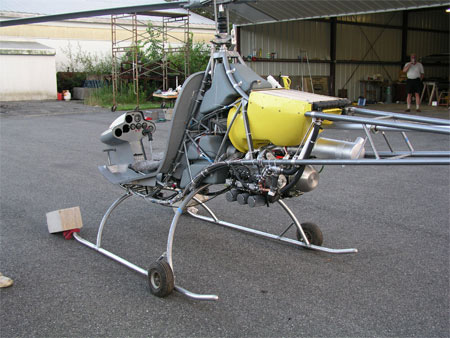
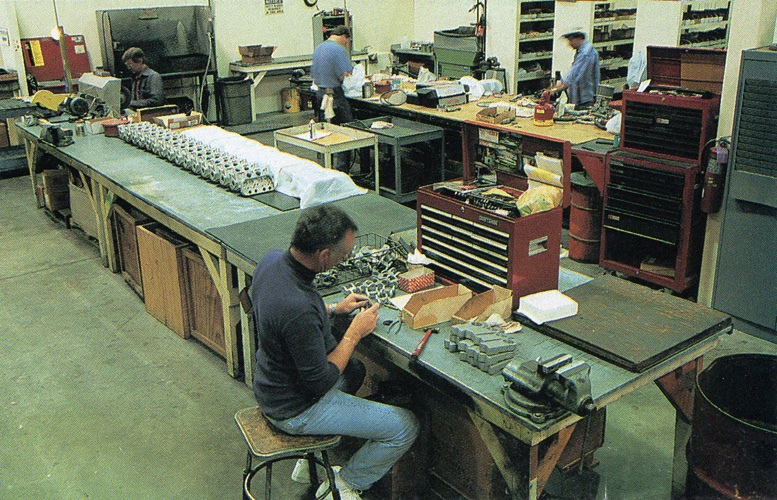
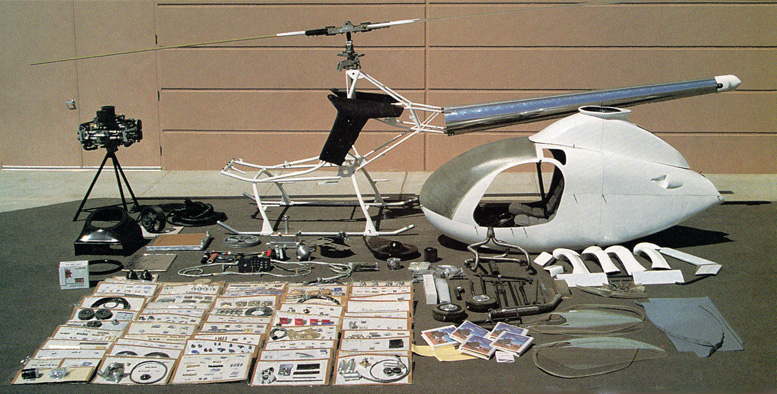
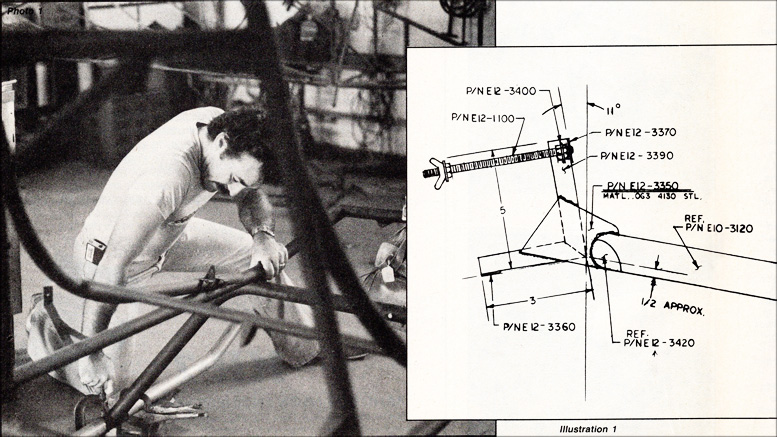
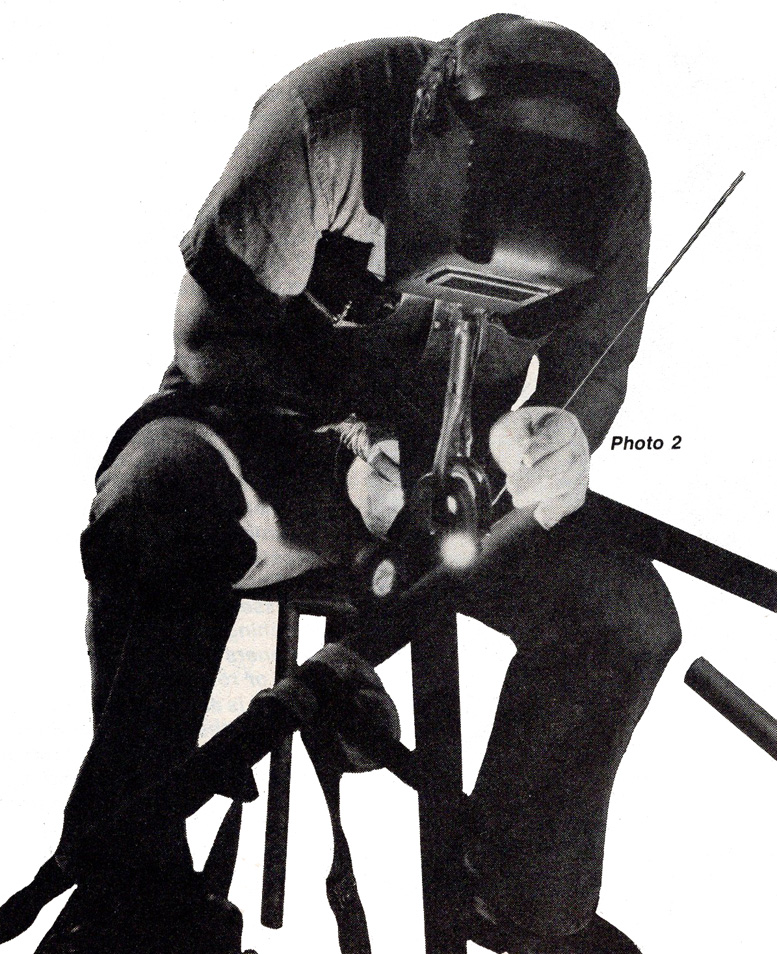
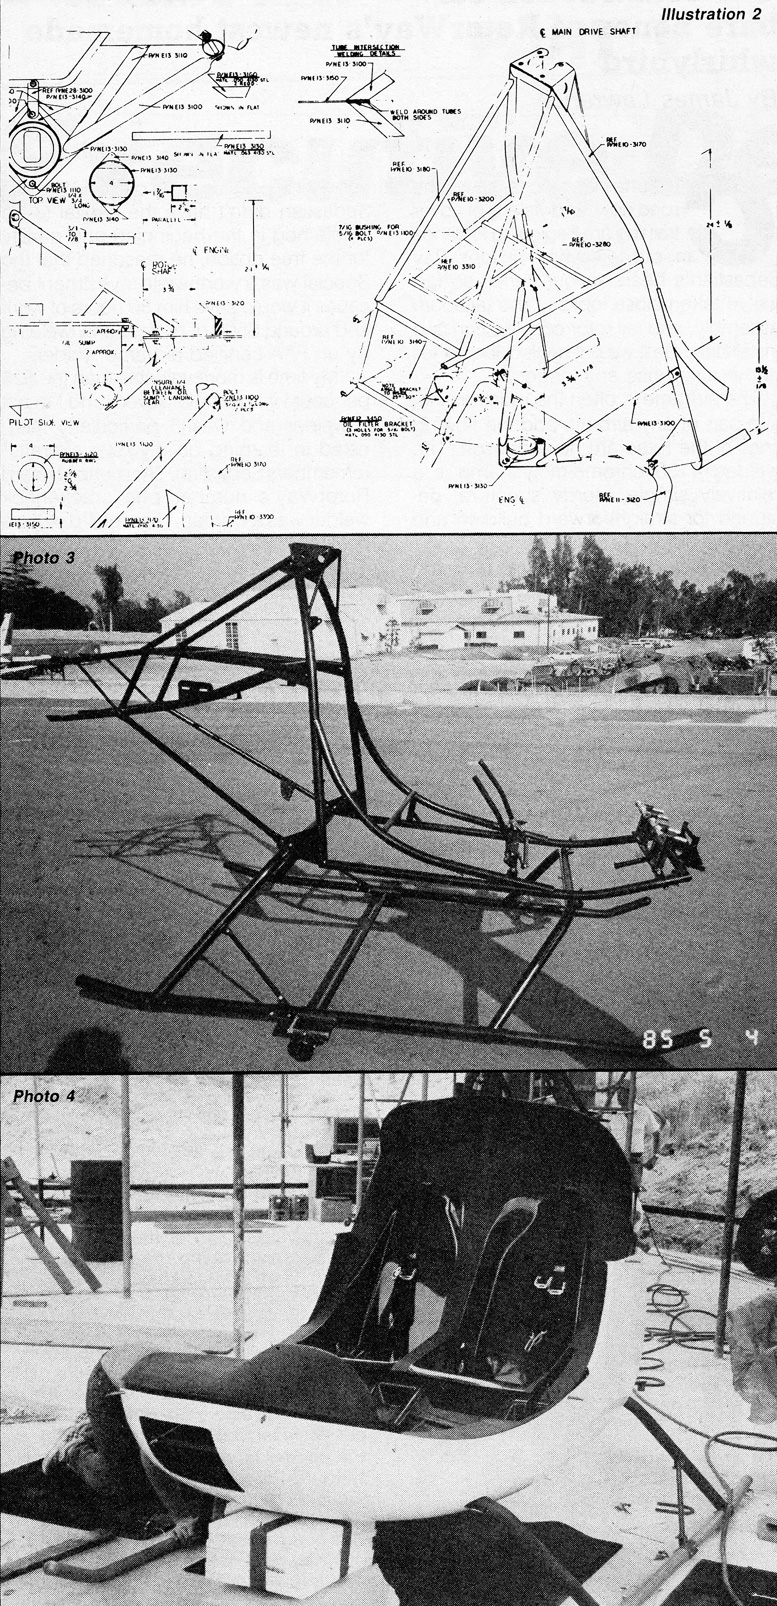
Improvements were made in every aspect of the aircraft including the method of packing and organizing the kit, the manuals, and the customer service program to assist the builder with technical information. Many critical systems were then assembled by RotorWay itself, almost all of the fabrication completed for the builder. All of the welding was now done at the factory as well.

The rotor blades required little more than finishing touches. The tailboom had been formed and riveted and ready for inspection covers to be fitted, then mounted on the airframe. The wiring harness was assembled and tested, coming ready for installation.

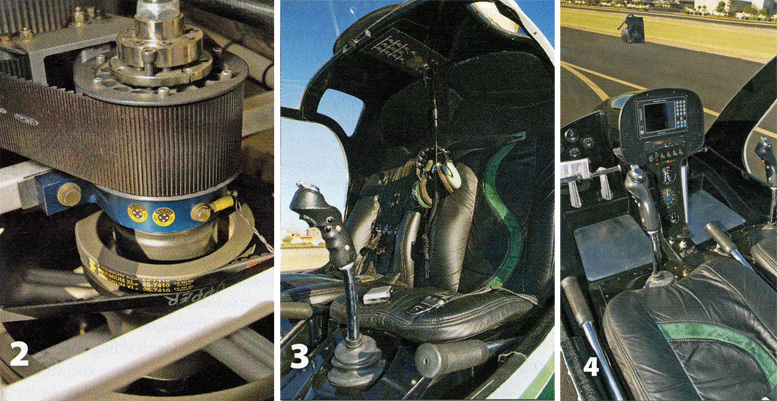
The Exec 90 was the only piston-powered helicopter at the time to utilize an asymmetrical airfoil for improved autorotation characteristics and safety. The Exec 90 also utilized a unique drive system, eliminating an expensive transmission, metal chip detectors and possible in-flight failures.

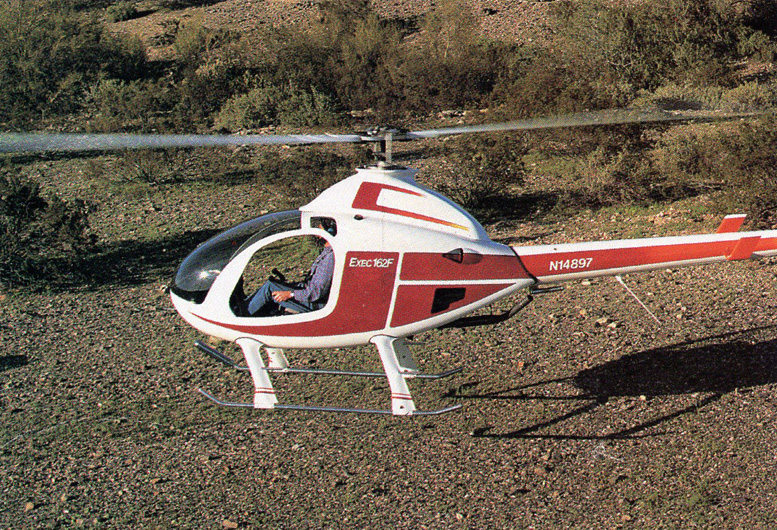
With all of this in place, the expected build time with the standard kit was about 500 hours. A quick build kit was soon offered, cutting that time nearly in half. Eventually, the quick build kit became the only way in which to purchase the helicopter. Pilot and passenger load was 400 pounds with a normal cruise of 95 mph and a maximum airspeed of 115 mph.

JUST KEPT GETTING BETTER AND BETTER

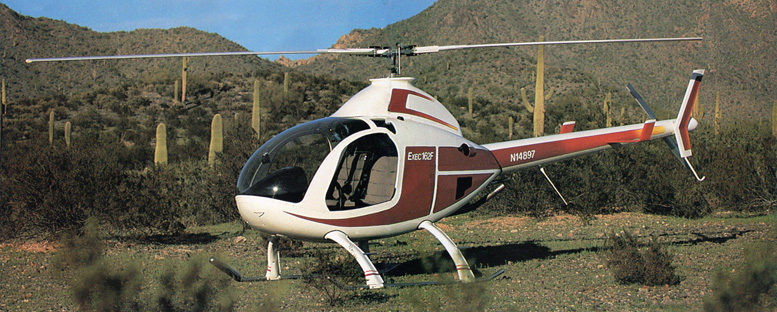
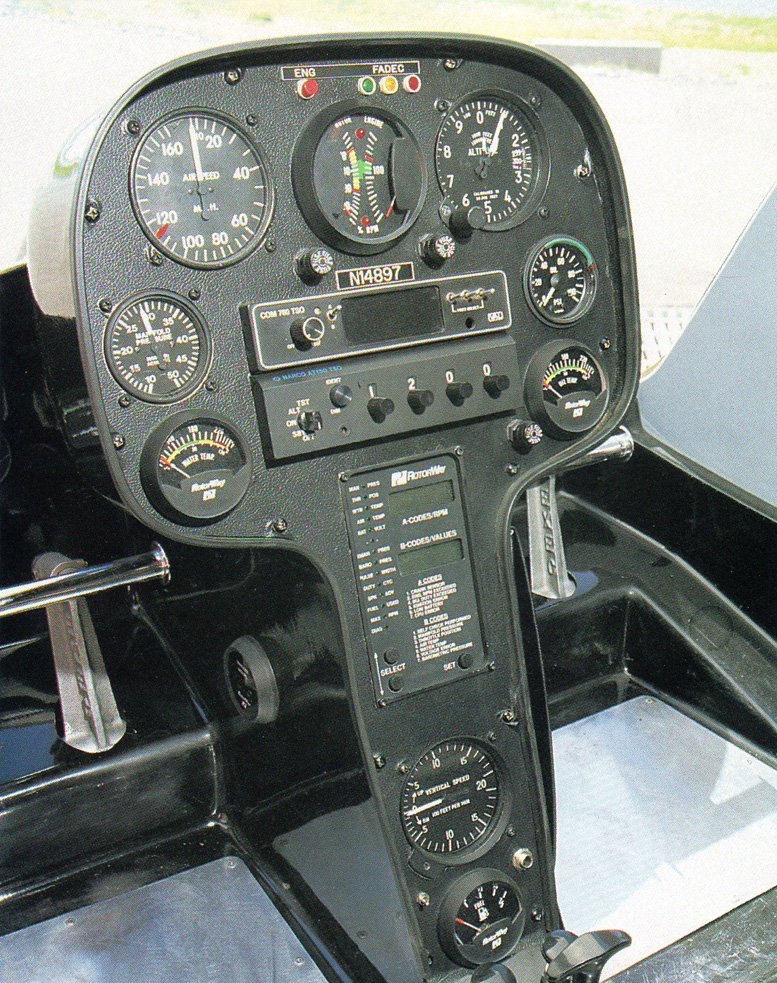
In 1994, the company took a hard look at the carbureted engine used in the Exec 90 and knew they could do better. A fuel injection system with electronic ignition and a computer control (FADEC) was developed. Along with numerous other improvements, the Exec 162F was born.

This latest model represents the culmination of over 30 years of research, development, testing, progress and proven performance. It is the number one choice in the kit helicopter marketplace, having earned that spot by providing a safe, reliable, enduring way to enjoy rotorcraft flight. In 1996, Netherwood opted to retire and go home to England.

Recognizing an opportunity, the employees of the company bought RotorWay International through an Employee Stock Ownership Plan (or ESOP), making the company one of only a handful of kit manufacturers with any kind of employee ownership at all.

Improvements continue to take place, namely in the capabilities of the FADEC system (Fully Automated Digital Electronic Control) of the Exec 162F. Using the latest online technology, the customer is able to connect the FADEC system on his helicopter to a laptop and modem and then directly to the factory in Arizona.

From Arizona, RotorWay technicians can diagnose, tune and adjust FADEC and engine functions for a customer located anywhere in the world. This is a technological development unheard of in the experimental category and practiced only among a few of the certified helicopter companies.

RotorWay International was also the first to provide a complete and detailed construction and maintenance video series for the amateur builder in order to assure the proper construction and maintenance of each customer’s aircraft. These series have met with great reviews by aviation editors and customers alike.

Rotorway Helicopter Engine ACIS

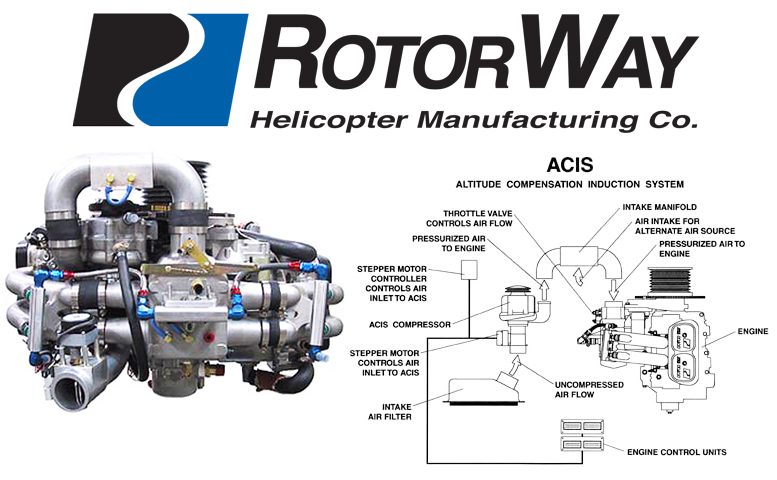
One of the most recent developments also includes the ACIS. This Altitude Compensation Induction System is lightweight and efficient, allowing the RI 162F engine to maintain standard sea level performance up to higher density altitude than ever before. By not demanding any more power at altitude than is produced at sea level, the life of the engine is unaffected, while its performance at higher altitude is enhanced.

Utilizing a belt-driven supercharger concept, cooler outside air is compressed to a set pressure. This method does away with the hotter intake air and lag associated with a turbocharger. The pressurized air from the ACIS is made available to the intake system through the throttle valve. Manifold pressure is limited only by the amount of compressed air available.

Unique to this system is the continued redundancy of the RI 162F engine. The ACIS uses an electro-mechanical inlet gate control and is connected to the FADEC (Fully Automated Digital Electronic Control) which monitors and maintains proper limits. This follows RotorWay’s goal to provide a failsafe system for the Exec162F. The ACIS system is the result of hundreds of hours of research and successful testing, meeting strict standards set by RotorWay International for all new products.

ROTORWAY INDUSTRY RECOGNITION

Helicopters from RotorWay International’s customers have won top EAA Awards almost every year since 1990. Prior to 1990, RotorWay Aircraft also had a continuous stream of awards for their helicopters. These awards not only recognized the individual customer’s workmanship but the quality and design of the helicopter as well.

In addition to these awards, RotorWay International has won other awards from EAA (Experimental Aviation Association) and HAI (Helicopter Association International) for technical advancements and development, particularly for the FADEC (Fully Automated Digital Electronic Control) system in the Exec 162F.

WHATS NEXT FOR ROTORWAY HELICOPTERS

In the RotorWay tradition, the company continues to conduct extensive research and development to bring about improvements to every aspect of the product. As a market leader, RotorWay is committed to providing the most proven, technologically advanced, reliable and safe helicopter kit in the industry. It is with this mission in mind that RotorWay International looks to the 21st century with great excitement about the things yet to come.


RotorWay 300T Eagle Helicopter

RotorWay 300T Eagle Helicopter

From Wikipedia, the free encyclopedia

The RotorWay 300T Eagle is an American helicopter that was under development by RotorWay International of Chandler, Arizona, in 2009-2011. The aircraft was intended to be certified and supplied as a complete ready-to-fly-aircraft for the flight training and aerial work markets.

The aircraft was announced at AirVenture 2009, with a first flight then predicted for 2010. The company started taking US$5,000 customer deposits at that time.

RotorWay 300T Eagle Helicopter Design and development

The 300T Eagle features a single main rotor, a two-seats-in side-by-side configuration enclosed cockpit with a windshield, skid-type landing gear and a 300 hp (224 kW) Rolls-Royce RR300-B1 turboshaft engine.

The aircraft has an empty weight of 950 lb (431 kg) and a gross weight of 2,050 lb (930 kg), giving a useful load of 1,100 lb (499 kg). With full fuel of 80 U.S. gallons (300 L; 67 imp gal) the payload is 580 lb (263 kg).

Since the initial announcement of the aircraft in 2009 no further information has been provided by the company and no announcement of a first flight has been made. The company’s webpage about the aircraft had been removed by the end of 2011 and the project may have been cancelled.

RotorWay 300T Eagle Helicopter Specifications (300T Eagle)

RotorWay 300T Eagle Helicopter General characteristics
  • Crew: one

  • Capacity: one passenger

  • Empty weight: 950 lb (431 kg)

  • Gross weight: 2,050 lb (930 kg)

  • Fuel capacity: 80 U.S. gallons (300 L; 67 imp gal)

  • Powerplant: 1 × Rolls-Royce RR300-B1 turboshaft aircraft engine, 300 hp (220 kW)

RotorWay 300T Eagle Helicopter Performance
  • Cruise speed: 127 mph; 110 kn (204 km/h)

  • Endurance: 2:30

  • Service ceiling: 13,000 ft (4,000 m)

  • Rate of climb: 1,600 ft/min (8 m/s)


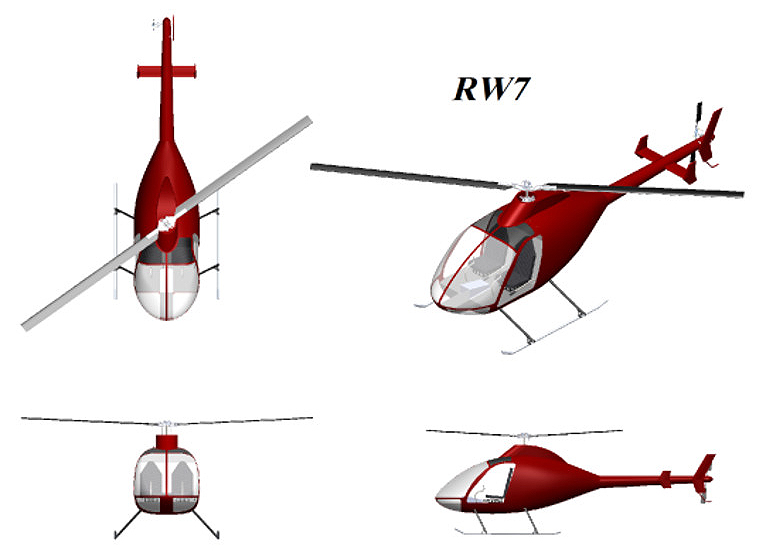
Announcing the new RotorWay RW7 Helicopter

Rotorway Lycoming RW7 helicopter

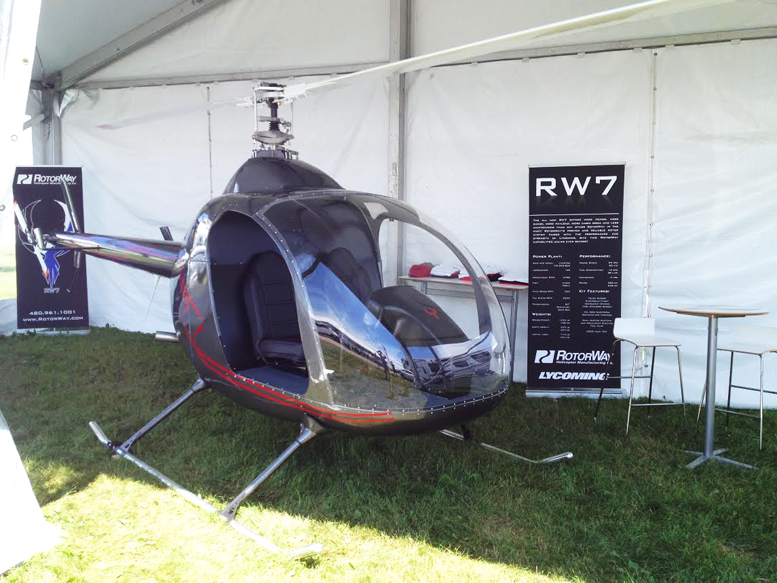
David Donaldson – Monday, July 20, 2015

Today RotorWay gave details of their latest project, the RW7. This aircraft uses the proven RotorWay rotor system and the super-reliable Lycoming IO-320 engine rated at 160hp. The helicopter has a new airframe and drivetrain including a 90 degree main gearbox and eliminating the belts and pulleys of previous models.

RotorWay gave details of their design objectives: “We wanted to produce a helicopter that has more capabilities and still looks and flies like a RotorWay….The new helicopter offers more payload, more cabin space and more range than previous RotorWay models. We also wanted the helicopter to be easier to build and easier to maintain.

The goal was to simplify the assembly by reducing the parts content and to streamline the drive systems….The Lycoming is air cooled so we eliminated the entire liquid cooling system there by saving weight, maintenance time and costs. Also the ignition system is magneto instead of the FADEC system used in previous models saving assembly time.”

Rotorway RW7 helicopter drawings

Other major changes are:
  • Aluminum Firewall and Floor.

  • New redesigned Tail Rotor Blades for increased efficiency.

  • Straight legged landing gear.

  • Gross weight of 1650lbs.

  • Mil – Spec wire harness and switches.

  • 32 gallons fuel capacity.

  • MGL 8.5in Explorer-Lite EFIS.

  • 2000 hour engine TBO

  • Oil cooler

The RW7 continues RotorWay’s commitment to providing safe, reliable and well designed and manufactured helicopters. Our commitment extends to our pricing of the RW7 as well, at US$117,900 for the complete kit, the price is well below that of any other helicopter kit powered by a Lycoming engine.


COURTESY: Rotorway Australia


The post Rotorway Exec Helicopter Kit appeared first on Redback Aviation.


The Rotorway Elete Kit Helicopter

$
0
0
Original Rotorway Elite Helicopter

Rotorway Elete Kit Helicopter

Orv Neisingh - Rotorway Elete

Back around the late ‘80s RotorWay developed a revolutionary adaptation of their famous Exec helicopter and named it the Rotorway Elete. The body was totally redesigned to give the Elete a much improved aerodynamic contour that would dramatically reduce drag at higher airspeeds. RotorWay promoted the Elete as their fifth generation ship and at least four were built before the company fell into bankruptcy.

John Netherwood, the new owner of the former RotorWay Company, renamed it RotorWay International. While production of the Elete was terminated by the new company, some of the mechanical improvements that BJ had designed into the Elete were incorporated into the new RotorWay International model, named the Exec 90. In the Early ‘90s RotorWay International had their first open house and invited enthusiasts from all over the world to attend.

The Sierra Rotorcraft Club in California had somewhere around 30 RotorWay helicopters. They included five Scorpions that were flying, many Exec 152’s, and three of the latest Exec 90’s owned by Jeff Dunham, (the now famous ventriloquist/comedian), Steve Lewis and Phil Verbeck. Several club members decided to fly their RotorWays from California to the factory in Arizona for the grand opening. Ground crews and motor homes provided support for the trip.

Steve Lewis flew his Exec 90, Dan VanDuesen flew his Exec 152 and I few Nathan Fronsman’s Exec 152. We had a great flight with several planned fuel stops along the route. Our ground crew kept the gang at the factory updated on our progress. When we began the last leg of our trip to the factory, around 15 RotorWays, already at the factory were launched to meet us.

We met up with the welcoming committee on the outskirts of Phoenix and then flew in as a large formation of around 18 RotorWays and performed several fly-bys once we arrived at the factory. Soon after we arrived at the Open house, a local pilot arrived in his RotorWay Elete. That helicopter was a show-stopper. Larry W., the builder and still the owner of this Elete, was inundated with questions from the many attendees.

Many asked RotorWay to offer the Rotorway Elete as a kit but the principals at the company made it clear that this model would not again be produced. On the morning of day two at the Factory, I got a chance to fly the Elete in a cross-country flight that many of the RotorWay pilots were going to make to a popular restaurant. When all of the other RotorWays were airborne, I lifted the Elete and began to follow. It immediately became apparent that the Elete was much faster than the other helicopters.

Within a very short time we caught up with the formation and comfortably passed them while cruising at around 120mph. I was absolutely amazed at the way the Elete flew compared to my Exec and I wanted one. On our return to the RotorWay Factory I again tried to encourage their team to once again produce and sell the Elete kit but they were not at all interested in entertaining that idea.

That afternoon, it was arranged that a flight of around 25 RotorWay helicopters would depart the RotorWay Factory and fly around the outskirts of the greater Phoenix area. The single file formation extended for several miles and was led by Jeff Dunham in his Exec 90. I was flying with Nathan in his Exec 152 at the back of the formation. Larry few his Elete but did not join our formation.

One minute we could see the Elete at a very low level chasing wild horses down a ravine, and the next minute Larry had the Elete back up at 1000 feet flying alongside our formation. There was one point in the flight where Larry circled our entire formation several times as we were flying at cruise speed. That little Elete continued to impress every pilot on that flight.

I never forgot the impression that Larry’s Elete made on me. Several years ago I received a call from Larry telling me that he still had the Elete and he was planning on attending a popular RotorWay fly-in. Several months later I received a call from Jeff Bocott, of Gig Harbor, Washington. PHOTO ORV ELETE Jeff had purchased one of the two or three remaining RotorWay Eletes and was planning on attending the same fly-in and could meet both Larry and myself.

Rotorway Elete Jeff Boycott Gig Harbor Washington

At the last minute Larry had to abort the fly-in due to work load, so Jeff and I, meeting at the fly-in, began planning to get his Elete, which had been submerged in a flood at one time, back into an airworthy condition. The process began and progress was made with his 162F fuel injected engine and some of Andrew Burr’s drive train after market pieces. In all I made three separate trips to Gig Harbor while completing the phase one flight testing.

The instruction phase showed the little helicopter to fly quite nicely. It is the body panels, cabin and wind screen that set the Rotorway Elete apart from any other RotorWay. The front of the Elete’s body and wind screen taper to a narrow point, efficiently cutting through the air. RotorWay designed an air flow separator between the wind screen and the lower body panel to separate the air flow over and under the body.

Every body panel aerodynamically flows into the one behind it to dramatically reduce drag as the Elete slices through the air. The winglets on the horizontal stabilizer are larger than other RotorWay models providing more forward flight stability. I have found that both of the RotorWay Eletes that I have flown very easy to hover, they pick up and set down nicely, and accelerate and cruise comfortably at a significantly higher forward airspeed than any model of RotorWay helicopter I have flown.

I feel very privileged to have flown two of the three or four RotorWay Eletes that now exist. There is one in RotorWay mothball storage and one more is rumored to exist somewhere. (Editor’s Note: A RotorWay Elete with Canadian registration C-GRDS was reported down and caught fire in June 1997. This ship was registered to a J.B. Maltais Ltee on Feb 1996. It is not known if the bird was re-built)

It is my personal opinion that if the RotorWay factory should once again offer the Rotorway Elete with all of the present day upgrades, they would have a hard time keeping their production up with their sales. What do you think? I have a lot of photos of the inner workings of the Elete that I could share if the interest is there.


VISIT: Orv Neisingh at Sho-me Helicopters (highly recommended for the Rotorway enthusiast).


The post The Rotorway Elete Kit Helicopter appeared first on Redback Aviation.

Flying the Rotorway Exec 90 Helicopter

$
0
0
Flying Rotorway Exec-90 helicopter

Flying the Rotorway Exec 90 Kit Helicopter

RotorWay International’s kit contains surprisingly significant improvements.

IMAGE ABOVE: Changes to the Exec 90 (foreground) include a new shape above the fuselage, an additional foot of height and more than a dozen improvements that are not as easily seen.

John Netherwood Rotorway International Helicopters

John Netherwood – Rotorway International Helicopters

More than five years ago, I flew and reported in KITPLANES on the Exec kit helicopter by RotorWay Aircraft, Inc., of Chandler, Arizona. Founded by homebuilt helicopter pioneer B J. Schramm, RotorWay produced the two-seat Exec 90 helicopter and offered flight instruction and builder support. RotorWay also manufactured the four-stroke, liquid-cooled engine used in the Exec, with parts cast in its own foundry.

Buford John Schramm’s Exec Helicopter

The Exec was an impressive aircraft: the culmination of more than 20 years Schramm devoted to practical, personal helicopters. Eventually, however, financial problems developed, at least partly because of the boom-and-bust real estate market in the Phoenix area, according to Schramm.

He says a major factor was the need to move the flight training facility and the foundry from Chandler, where previously open land adjacent to RotorWay’s property sprouted buildings that were incompatible with extensive helicopter operations. Including the cost of adding electrical, capacity at a new Phoenix RotorWay facility, moving the foundry cost some $200,000.

Two Personalities

Two of RotorWay’s customers who built Execs and learned to fly them at the Chandler facility and who were to have a profound effect on the future of the project are John Netherwood of Yorkshire, England, and Dale Krog, a former AT&T executive from Illinois. Netherwood ran a large company that rented and sold forklifts, and he became RotorWay’s English dealer as a hobby.

In early 1990, as RotorWay’s creditor banks sought to salvage their investments, Netherwood made a successful bid for the assets and design rights and pledged to continue in the kit helicopter business. He named his new company RotorWay International.

In the meantime, Dale Krog — who had finished his Exec kit in 1983 and flew it extensively until he, sold it in 1986—retired at age 40 from AT&T and was hired by B J. Schramm to work on several helicopter projects.

Krog was one of a dozen longtime RotorWay Aircraft employees who Netherwood asked to join the new company. The result is that Krog is now vice president and general manager of RotorWay International.

After establishing the new company, one of Netherwood’s first acts was to gather together the 12 former RotorWay Aircraft employees, hand them each a blank sheet of paper and ask them to list improvements that should be made to the Exec.

Krog notes that there was considerable similarity between the separately written lists, which were combined into a final list of 18 changes that have been incorporated into RotorWay International’s product — the Exec 90. The first Exec 90 was finished in time to make its debut at Oshkosh last summer.

Significant Changes To The Rotorway Exec 90 Helicopter Kit

Some of the modifications are cosmetic, such as moving the switch console overhead in the cockpit. Some are aerodynamic , like the reshaping of the “doghouse” — the large fairing above the fuselage—for better airflow and higher cruise speed.

Some are mechanical, like improvements to the 162-cubic-inch, dual-electronic-ignition engine: new heads, new water jackets that smooth coolant flow, and larger, sodium-filled exhaust valves. The new main rotorshaft is longer (resulting in better pendulum stability) and beefier.

The updated RotorWay International Exec 90 kit helicopter cruises near 100 mph.

Wall thickness is greater and the diameter is now 1.75 inches, up from 1.625 inches. Netherwood credits the stiffer main rotorshaft with part of the rotor system’s improved performance, which allows cruise speeds of up to 100 mph and easy achievement of the Exec 90’s 115-mph VNE.

From an operational standpoint, however, maybe the most significant change to the helicopter relates to a 25-pound cylindrical weight that is shifted when switching from solo to dual flight. Dale Krog recalls that RotorWay Aircraft sales people didn’t volunteer information on why the original Exec had two battery boxes.

Rotorway exec 90 helicopter kit

The Exec 90 kit comes plastic-wrapped in 13 cartons. The rotor system and engine are factory-built and assembled.

But when he asked before buying his kit, he was told that the battery had to be moved from one box to the other to change from solo to dual flight or vice versa. “I thought, ‘Okay, I’ll live with that.’ But they never told me that you also had to carry 20 pounds of weight on the skid, plus another 50 pounds in the passenger’s seat when flying solo.

“I wouldn’t have bought the Exec (if I had known) because of this problem: How do I fly it over to your place, pick you up, go fly somewhere, drop you off and come back home? What am I going to do? Leave 70 pounds of weight on the ground? And when I drop you off, throw rocks in the cockpit? That is how the original Exec had to be flown.” The new weight-shifting system solves this problem.

To change from dual flight to solo, the pilot removes the safety pin on a 25-pound weight that is attached to an external stub just aft of the engine and reattaches it on the right front skid tip. The process takes about half a minute. Unfortunately, the system is not retrofittable to earlier Execs because considerable structural changes had to be made to the Exec 90 to accommodate this feature.

Other significant changes to the Exec 90 made the 25-pound weight shift system possible. One was moving the location and tilt of the main rotor shaft slightly, a modification that involved redesigning major parts of the helicopter.

Still More Changes To The Rotorway Exec 90 Helicopter

Also included on the 18-point list is a new skid that has smoother curves and spreads stress out along the landing gear rather than concentrating it near the fuselage. Cabin eyebrow windows improve visibility. The new dual rotor/engine tachometer is easier to read than the two separate gauges previously supplied, and the new centered instrument console looks good compared to the old instrument arrangement at the base of the windshield.

The tailcone and rotor blades are now made of 0.025-inch aluminum alloy instead of 0.020-inch material. That change has extended considerably the life of the tailrotor blades, which previously had to be replaced every 250 hours. (RotorWay believes that the new tailrotor life may be more than doubled. Experience with the first prototype will determine the expected life.)

Also in the area of improved durability are secondary drive unit pulleys, which are now anodized. And the exhaust system collector (the pipes from the manifold to the muffler) are now made of stainless steel.

Engine inspection and maintenance are easier on the Exec 90 because of split upper fiberglass cabin panels, which means you no longer have to dismantle the entire fuselage shell to get at the engine.

Another item in the operational/cosmetic category is a nice touch: multi-switch cyclic (stick) grips. There’s no trigger for shooting rockets, but the new grip includes push-buttons for intercom, radio transmitter and engine starter.

A Rotorway Factory Tour

A walk through the factory with Netherwood and Krog offered some insight into the company’s plan for success. The unused foundry is silent, but the rest of the plant is filled with high-tech machinery and the few employees needed to turn castings and billets, steel tubing and fiberglass parts into engines, pulleys, fuselage structures and shells.

A computer-numerically-controlled (CNC) Toyoda four-axis vertical mill, tended by one machinist, was busy turning an aluminum casting into an engine block during my visit. Crankshaft castings were being checked by Magnaflux for imperfections before their turn on the huge CNC lathe in another part of the machine shop.

One welder was at work with an oxy-acetelene torch on a steel-tube fuselage (the fiberglass shell is non-structural), and another was TIG-welding a critical part. Krog noted that TIG-welded parts are stress-relieved. He and Netherwood also mentioned that the Exec 90 builder has to do some welding for himself. Control-system parts, such as the pair of collective pitch arms, require welding by the kitbuilder.

Precision and quality control are critical to the development of a safe helicopter and RotorWay’s shop procedures show it. I was introduced to a technician who was setting up an electronic coordinate-measuring machine used to ensure that first articles produced by each new setup of the CNC machines meet specifications.

Also, every example of some parts, such as mainrotor shafts, is checked by this technique. Some components, such as the sprocket pulleys in the drive system, are subject to a complex series of machining and heat-treating steps that result in lead times of as much as five months, Krog noted.

“We have more complexity in our rotor system alone than most kit airplane manufacturers have in their entire airplane,” he said. Could be. In any case, the complex work is all done at the factory; the entire mainrotor system, including shaft, swashplate parts and linkages, comes assembled.

I looked at the modified dual-throat carburetor, which includes a manifold for carburetor heat that is warmed by engine coolant. The throat walls — not the incoming air—are heated, resulting in none of the usual power reduction from heated-air systems, Netherwood explained.

The factory system for stocking, distributing and packaging everything from the single-piece acrylic windshield to the smallest washer appears neat and efficient. Most small parts are plastic-mounted on cardboard in logical order. Factory-built and matched rotor blades are packed in one of the 13 cartons that comprise an Exec 90 kit.

The cost of crating (included in the price of the kit, incidentally) has gone down, as the old Exec kit used to require 29 cartons. Several Exec 90 kits were in the final stages of being prepared for shipment during my visit.

A total of 29 employees, including Krog, are on the payroll, and production has just been increased from eight to 10 Exec 90 kits per month. Netherwood believes that if sales warrant further changes, as many as 250 units per year could be manufactured by going to a second production shift.

What Do You Get In The Rotorway Exec 90 Helicopter Kit?

Nearly everything to build an Exec 90 comes in those 13 cartons. Exceptions are paint, flight instruments (air-speed, altimeter, compass and VSI) and avionics. Among the few options offered by RotorWay International is a VAL transceiver and an intercom.

Seats, upholstery, engine instruments and every part to build the electrical system are included, unlike many complex aircraft kits. The builder’s manual has been revised recently, expanding the “see – do” section with more photos and descriptions.

Especially helpful will be the new system schematics, such as the electrical layout. Photos show installed equipment, and the wire list describes every wire and connector. The system drawing makes clear where every wire goes. A similar schematic drawing of the engine coolant system should preclude a lot of phone calls from otherwise-confused builders, Krog says.

Finishing the project should be an achievable task. Krog’s Exec, a first-time homebuilt project, took him just over 600 carefully logged hours to complete and prompted him to call the factory three times for help. That may be a record low number of calls, but the new manual and drawings should help considerably.

Once finished with the project, the Exec 90 owner will have a 925 – pound, piston-powered, two-seat helicopter capable of lifting 500 pounds of useful load including 17 gallons of fuel. The machine will hover in ground effect up to 7000 feet (5000 feet out of ground effect), climb from sea level at about 1000 fpm, and cruise 180 miles in 2 hours.

The main rotor system uses a two-blade, semi-rigid rotor with asymmetric metal blades and an elastomeric hub that eliminates the need for lead/lag and flapping hinges. The tail rotor is driven by three V-belts in series that are joined at their ends by pendulum-mounted pulley systems that require a single-point tensioning adjustment.

As in small FAA-certified piston helicopters, power is taken from the engine via parallel V-belts. A single, triple-link chain drive and sprocket system substitute for the more-common geared helicopter transmission.

The chain, which is replaced at 100 – hour intervals, is simpler to inspect and maintain than a gear-type transmission, RotorWay says. The cost of all time-compliance parts—mostly bearings—is so low that Krog is afraid experienced helicopter pilots won’t believe it. But he will share the details with interested potential customers.

Marketing The Rotorway Exec 90 Kit Helicopter

RotorWay International is planning to establish an overseas distribution system, but in the U.S., Exec 90s will be sold direct, allowing the factory to maintain coordination between production and promised delivery—in addition to controlling customer technical support. Decisions regarding direct sales of kits, more efficient packaging, and use of off-the-shelf systems such as the new capacitive fuel gauge, have resulted in keeping the kit price to a minimum, Netherwood says.

Systems formerly listed as options—such as dual controls, the elastomeric rotor head, and the stainless steel exhaust collector — are all standard. After a period of selling the first batch of Exec 90s at come-on prices, RotorWay International has just announced a new price of $42,500 (1991 list price) for the kit.

Rotorway helicopter balance weight shift

LEFT: General manager Dale Krog demonstrates a major operational improvement as he moves a 25-pound weight from aft of the engine (for dual flight)…
RIGHT: …to the right front skid for solo flight. The previous arrangement required moving the battery and adding weights inside.

As of late February, the backlog of orders was about two months. The customer deposits $5000 and is notified to send the balance a week before delivery. Netherwood stressed that parts are not back ordered; complete kits are shipped “on time or early,” he said.

There is some flexibility if a customer wants to postpone delivery briefly and another asks for an earlier delivery position. But Netherwood emphasized that he is not using one customer’s money to finance a previous customer’s kit.

Let’s Go Flying The Rotorway Exec 90 Kit Helicopter

Up front, it’s necessary to say that I am not qualified to evaluate helicopters in great detail because I’m not rated in them. But despite the considerable lapse of time since I last flew in an Exec — more than five years—the memory of the week of RotorWay training remains vivid, and some impressions and comparisons between the Exec and the Exec 90 will be valid.

Currently operating at Glendale Airport west of Phoenix, the RotorWay International training program will be moved near the end of the year—along with the rest of the company—to a 4-acre site already purchased at Stellar Airpark near Chandler.

Training is organized into several phases under chief flight instructor, pilot examiner and customer service head Stretch Wolter, who has been with the Exec program since long before I first trained with him in late 1985. Phase 1 is basic hover training; Phase 2 covers forward flight and the rest of the maneuvers required for a private helicopter license.

Each of these phases—which are organized to take one week—currently costs $1000. Some people require more than one go at one or both training phases. Phase 3 ($500) is preparation for the private pilot check ride — and the flight itself with Wolter.

The successful check ride results in a private helicopter license or helicopter rating add-on for pilots already licensed. Training prices may go up with the beginning of the new season, which starts in late September. Phoenix weather is too hot for training between June 1 and late September.

Wolter interrupted his four-man class to take me flying. A careful pre-flight of an Exec 90 includes a cockpit and external check (including rotor bolts and linkages and the proper placement of the movable weight) plus turning the main rotor blade 90° to the fuselage. Moving the blade accomplishes three things:

It checks the smoothness of the rotor system when moved forward, it verifies the operation of the one-way autorotation sprag clutch when pushed backward gently, and it ensures that you’ve untied the main-rotor from the tail boom.

Startup is as simple as in an airplane and is done only after clearing the area and centering the cyclic (control stick) and raising the collective pitch lever off its stop to about knee level. The rotor begins spinning as soon as the engine starts, even before the manual clutch idler control is engaged.

Getting engine temperatures into their green arcs takes a few minutes. When ready to fly, the pilot rotates the handle on the end of the collective pitch lever outboard — motorcycle style — to run both engine and rotor tachometer needles into their green arcs. The new dual-tach gauge makes it easier to track both rotations at a single glance.

Wolter let me lift off, but he was on the controls if needed. Climbing into a hover a foot or so off the deck, I nudged the controls some, trying to be gentle, but succeeding in flopping around the ramp maybe 5 feet from where I was trying to keep the helicopter. Wolter could tell right away that I was looking too close to the helicopter’s hover point rather than at a more distant point on the ramp.

After he mentioned that, I settled down and more or less stabilized the hover; but he soon noted that I was pressing both pedals when pressure was needed only on the right one to compensate for hovering torque. Fixing that helped too, and he then had me make a pedal turn to the right while maintaining something close to a fixed position on the ramp.

The 2 or 3 minutes of this exercise weren’t enough to allow me to relax completely, but I could see and feel considerable improvement in this time. With regular practice, hovering could again become a natural act.

Wolter called Glendale Tower for a departure across the runway to the east, and I monitored as he accelerated to more than 40 mph before climbing much—staying under the dead man’s curve portion of the height-velocity chart. (To make a safe autorotation landing , a helicopter needs either altitude or airspeed or both.

Climbing steeply or straight up would place the helicopter in a position from which a power failure would cause a sink rate too high to arrest with the power stored in the rotor system, even with immediate reduction of collective pitch.) At 500 feet or so, Wolter demonstrated smooth flight at 80 mph, but noted that my light weight would result in vibrations at faster speeds.

Sure enough, at about 85 mph we could begin to feel low-frequency, mainrotor vibrations. Even at 100 mph, however, the vibration was tolerable. For cross-country flying with only a pilot or a light passenger on board, ballast would be added to allow comfortable flight at a cruising speed of 90-95 mph.

Slowing to 80 mph again, Wolter turned the controls over to me, and I found that a slight amount of forward cyclic pressure — probably because I am lighter than standard — was needed to achieve balanced flight, that is, to keep me nose from rising. As Wolter noted, a yaw string taped to the windshield helps you know which pedal to press for no-yaw flight.

In the Exec 90, with its clockwise-turning mainrotor (as seen from the top), fast flight requires a bit of constant left pedal (don’t call it rudder in a helicopter). At least at our particular flight configuration, the Exec 90 tended to pitch up or down slightly, requiring correct anticipation’ to fly smoothly.

Rotorway Exec-90 cockpit layout

LEFT: The cockpit layout is improved with a new instrument pedestal and multi-switch cyclic grips.
RIGHT: One cosmetic change is movement of switches into this overhead panel.

The trick is to anticipate what the nose will do next and put in a small correction before the undesired motion gets a good start. The situation is not much like the corrections made when flying an airplane. A somewhat better analogy is flying a glider on a towrope behind an airplane.

An experienced glider pilot can anticipate where the glider will want to move next—and preclude the move with tiny pressure corrections on the controls, resulting in what appears to be effortless and perfect positioning behind the towplane. Having flown gliders since the early ’60s, I’ve found those moves are second nature, but helicopter moves are not; I bobbed along and never really relaxed.

With Stretch Wolter on the controls, the helicopter was as steady as my glider on a towrope, proving that my technique—not the helicopter—was the culprit. Helicopter turns are different from turns in airplanes, too. Wolter caught me trying to use the pedals like rudder pedals in an airplane or glider, and that’s wrong.

In a helicopter, there’s usually no need to apply different pedal pressure when entering or rolling out of a turn. (Rudder pedals in an airplane are used mainly to compensate for adverse yaw caused by the downward-moving aileron, and there’s no such device on a helicopter.)

Helicopter pedals are moved or pressured to change the required compensation for main rotor torque, such as when hovering, which requires a lot of torque compensation with the power pedal—under the right foot in an Exec 90. Basically, helicopter controls need to be moved smoothly and early to be done right; jabbing at the controls won’t do. All of this takes practice.

Improved visibility through the new eyebrow windows became apparent in the first turn; there was no longer any need to duck below the edge of the door to look for traffic. Wolter made the airport approach and then let me practice hovering for a few moments.

I then landed rather firmly from a 1 – foot hover, making it a point to keep the cyclic lever moving down after the first skid contact with the ramp. I could have been a bit more gentle. “You gonna log all three landings?” Asked Wolter, who is not one to let small things pass.

Rotorway Exec 90 Kit Helicopter Safety

Wolter’s teaching and check rides are probably one reason that his successful former students have a good record in their Execs. I asked if the training syllabus has been modified over the years in response to the problems people have had. The answer is yes.

Whenever Wolter learns of an Exec accident or incident, he gets details from the pilot and amends his training procedures as appropriate. For example, he noted that the preflight checklist was modified some time back after a pilot let the end of a seat belt get into the collective pitch control slot, causing it to bind.

Rotor Way Exec 90 Helicopter Kit

Rotorway Exec 90 Kit Helicopter Summary

So far, things are looking up for John Netherwood, RotorWay International and the Exec 90. He expects to sell his Phoenix factory and move into the new Stellar Airpark site by year’s end. We’ll use the completed move as an excuse for another visit and a brief report next year. Maybe we’ll even get to do some more flying. Five years between helicopter flights—especially in a product as nice at the Exec 90—is too long.

RotorWay International Exec 90 Helicopter Kit Specifications
Rotorspan 25 ft.
Rotor area 490.8 sq. ft.
Fuselage length 22 ft.
Height 8 ft.
Landing gear type skids
Skid track 5.4 ft.
Seats 2
Gross weight 1425 lb.
Empty weight 925 lb.
Useful load 500 lb.
Disc loading 2.9 Ib./sq. ft.
Power loading 9.5 Ib./hp
Fuel capacity 17 U.S. gallons
Payload (full fuel and oil) 388 lb.
Engine RotorWay 162-cu.-in., four-cylinder, dual ignition, dual-throat
carburetor, liquid-cooled, four-stroke.
Mainrotor Asymmetrical, semi-rigid-rotor, two-blade, teetering metal
rotor system.
Maximum speed (sea level) 115 mph
Cruise speed 90-100 mph
Range 180 s.m.
Rate of climb (sea level) 1000 fpm
Service ceiling 10,000 ft.
Hover in ground effect 7000 ft.
Hover out of ground effect 5000 ft.
Manufacturer RotorWay International
Other pertinent notes Kit is complete except for flight instruments,
paint and avionics.
Price $42,500

COURTESY: Kitplanes Magazine June 1991 – Subscribe here.


Specific Piloting Notes For The Rotorway Exec Helicopters

  • It is possible for the left cyclic to be restricted or obstructed if the user has large thighs.

  • Check that you can reach full left pedal without your leg extending straight or the heel of your shoe catching on the lip of the floor pan.

  • Don’t rush your take off to the hover – always double check that the ballast weight is in the correct position.

  • Stay in a low (2ft) stable hover until you have RRPM at the top of the green and have verified manifold pressure available above what is required in the hover. From this, determine your safest take off profile.

  • If manifold pressure is limited in zero wind conditions, use the pedals to hold the nose in the two o’clock position in relation to your take off line. As you move forward along the line, push in left pedal – this will reduce the power required by the tail rotor and give you that extra half or one inch of MAP to move through transition.


COURTESY: Brumby Helicopters Australia.


The post Flying the Rotorway Exec 90 Helicopter appeared first on Redback Aviation.

Rotorway’s Cross Country Elete Helicopter

$
0
0
Rotorway executive elete kit helicopter history

Rotorway’s Kit Built Elete Helicopter

This new aircraft is the world’s first practical cross-country amateur-built helicopter

When we think of homebuilt helicopters, there’s only one name which comes to mind — RotorWay Aircraft of Phoenix, Arizona. This progressive firm has been in the business of supplying kits for amateur-built helicopters since the 1960s, and it’s now introducing its new Elete helicopter. Probably the most outstanding feature of the Elete is its performance.

While it shares much of the time-proven technology used in RotorWay’s Exec, such as the asymmetrical airfoil rotor blades, elastomeric bearing rotor head and RW-152 engine, RotorWay has made several significant design changes to this rotor system and its relationships to reduce vibration at the high airspeed of which the Elete is capable.

Rotorway elete helicopter cockpit

The RotorWay Elete’s cockpit area is designed for a load of 400 pounds. Its contemporary instrument panel features a modern helicopter layout.

The RW-152 engine which is standard in the Elete has also been redesigned to incorporate a dual spark plug per cylinder, dual direct firing electronic ignition system. This system enhances safety through redundancy and provides greater ease in owner maintenance. As with all RotorWay product improvements, this dual electronic ignition engine is offered as an option to Exec buyers.

You’ll notice that the Elete has a larger and more comfortable cabin than the Exec, and now offers such amenities as cabin heat and fresh air cooling. The elegantly shaped fuselage has been designed with aerodynamic efficiency in mind, which helps to give the Elete some of its airspeed capabilities.

The Elete cruises very comfortably at 113 mph and RotorWay has red-lined it at 130 mph. And of course, with the increased speed, you get increased range as a bonus.

“This is a whole new breed of whirly-bird;” said pilots who were present on a high-speed romp during an air-to-air filming session last summer. They were using an Exec as a camera platform and could not keep up with the Elete. They guessed that it would have taken a Jet Ranger at least, to chase this machine.

After riding in the Elete, they expressed amazement at its stability, quietness and agility. Although they agreed that the Exec is an excellent helicopter, they admitted that the Elete is a breed above.

ROTORWAY HELICOPTER HISTORY

Twenty-five years ago, B.J. Schramm, president of RotorWay Aircraft, wanted to produce an “affordable” helicopter for the private individual, and his dedication and perseverance turned that idea into a long-lasting reality. RotorWay’s history began in the 1960s with the Javelin helicopter which utilized a Mercury outboard powerplant.

This first prototype gradually evolved into the Scorpion One, equipped with a V-4 OMC two-cycle outboard engine. The early 1970s saw the introduction of the Scorpion Two helicopter.

BJ Schramm RotorWay Scorpion One Helicopter Prototype

BJ Schramm testing his RotorWay Scorpion One prototype helicopter

Further development in the mid-1970s produced the Scorpion 133 helicopter, the first model to be powered by its own specially tailored aircraft powerplant, the RotorWay RW-133. The evolved RW-152 engine is manufactured from the crankshaft up by RotorWay Aircraft and is a horizontally opposed, four cylinder, four-stroke liquid-cooled engine which now develops 152 hp (113.3 kw) at 4400 rpm.

The popular Exec helicopter has been produced by RotorWay since 1980 and has been sold in 33 foreign countries as well as the United States. Its streamlined design and high-tech aviation components make it the leader in the amateur-built aircraft category.

RotorWay has also developed a unique flight orientation proficiency program for its buyers. This specialized program began in 1975 and teaches the basics of maintaining the Exec and helicopter flying.

Truly affordable helicopter ownership has now come full-circle with the all-new Rotorway Elete which has the cruise speed necessary to enable it to become the world’s first practical cross-country amateur-built helicopter.

When a homebuilder becomes interested in a helicopter for the first time, there are many questions which need answering. RotorWay has compiled a list of the most requested information:

Why a kit?

RotorWay helicopters are produced in kit form for three very important reasons:

  1. The first is to save the customer money with a lower purchase price and with lower operating cost. This customer is able to achieve this savings because RotorWay machines all of the components itself and also because the customer performs some of the non-precision fabrication and final assembly. By working part-time for one year (approximately 500 hours), the customer can complete the construction.

  2. The second important reason to purchase a kit helicopter is that the builder can do his own maintenance and annual licensing.

  3. The third reason is that the builder can achieve the knowledge, experience and satisfaction he can gain only from this type of project.

Why does RotorWay sell only kits?

Aircraft manufacturers in the United States are required to spend millions of dollars to obtain an FAA type certificate for each design they sell as a fly-away machine. It’s the consumer who must pay for these costs if he buy a ready-made aircraft.

By limiting its involvement to building kits on which the new owner/builder does the final assembly and flight test, the company avoids the extreme certification expense and does not have to pass this cost on to its customers.

Does a person have to be a mechanical genius to build an Elete helicopter?

No, he doesn’t. He should, however, have some mechanical background, and be familiar with the use of ordinary hand tools usually found in the average household. He also needs the desire to learn everything possible about his new helicopter, and education is included with every RotorWay helicopter kit.

Flying the Rotorway Elete Helicopter

Top speed of the new RotorWay Elete Helicopter at sea level is 130 mph. Cruise speed is 113 mph.

The knowledge and understanding of helicopter mechanics and theory of flight are absorbed through the materials provided and the construction and training programs.

How much of a passenger load can RotorWay Elete helicopters carry?

RotorWay helicopters are two-passenger aircraft designed to carry approximately 400 pounds in the cabin. Useful load is two people, plus two to three hours of fuel, depending on passenger weight.

How far will the Elete helicopter fly, and on what kind of fuel?

Helicopters are primarily designed to travel short to medium distances of 250 to 300 miles and RotorWay helicopters are no exception. They use avgas or automotive fuel of 92 octane or above which allows the owner to stop at gas stations along the route of flight, as opposed to stopping only at airports. The RW-152 powerplant consumes approximately eight gallons per hour in cruise.

How much will the RotorWay Elete helicopter cost to fly?

RotorWay helicopters are the most inexpensive helicopters in the world to own and operate. Like any other aircraft, they will require a certain amount of planned expenditures. They can be maintained for as little as $35 an hour, although the owner will probably not set aside this amount every hour he flies.

Most owners log 100 hours or so per year (equivalent to 15 to 20,000 auto miles), so it will probably be several years before they need to replace any significantly expensive parts. Gas and oil will make up most of the owner’s initial cash outlay.

How complete is the Elete helicopter kit?

Every needed part is provided, except for airspeed, altimeter and rate-of-climb instruments, paint and avionics. Clecoes, drill bits and other small tools necessary for construction are provided. The builder will need to buy a protractor level, torque wrench and a dial indicator with magnetic base to enable him to perform the rigging of controls.

Will the new owner/builder need a license to fly an experimental helicopter?

He will need a minimum of a Student Pilot’s license to solo his new helicopter. Thousands of people obtain a Student Pilot’s license each year by taking a physical with an FAA physician. The medical is his student license to begin training.

He must be in good health, have vision which is correctable to 20-3 and not have a history of heart trouble, diabetes or other recurring problems which would require a physician’s care.

Naturally, to get maximum enjoyment from his helicopter, the new builder/owner will want to earn his pilot’s license which consists of taking a written exam and an FAA check ride.

div class=”ad”>

Upon completion of the construction, the new owner will be scheduled to attend an exciting five-day course at RotorWay’s training facility during which time he will go through a review of construction procedures, and will also learn how to hover and perform all of the normal “in ground effect” maneuvers.

Later, after he has practiced at home in his own machine, he will attend the Phase II training course. During Phase II, he will learn the balance of climb-out procedures, plus advanced rotor system tuning and engine maintenance. For the new owner’s convenience, RotorWay has an FAA-designated examiner available to make it convenient for him to go for that all-important check ride at the RotorWay training facility right away.

Rotorway Elete Helicopter hovering

The new RotorWay helicopter (1990) is the world’s least expensive helicopter to own and operate.


RotorWay Elete Helicopter Performance Specifications
Powerplant RW-152 water cooled four stroke engine
Horsepower 152hp/113.3kW)
Seats 2
Gross Weight 1350 pounds (613kg)
Empty Weight 830 pounds (377kg)
Equipped Useful Load 520 pounds (236kg)
Pilot & Passenger Seat Load 400 pounds (182kg)
Fuel Capacity 19 gal/120 pounds (72 L/55 kg)
Rate of Climb 1200 fpm (6.10 m/sec)
Hover In Ground Effect – Single Place (H.I.G.E.) 10,000 feet (3048m)
Hover In Ground Effect – Two Place (H.I.G.E.) 7,500ft (2286m)
Hover Out Of Ground Effect – Single Place (H.O.G.E.) 6,800ft (2072m)
Hover Out Of Ground Effect – Two Place (H.O.G.E.) 4,500ft (1371m)
Service Ceiling 12,000ft (3658m)
Fuel Range Maximum Single Place & 5 Gal. Aux. (IMPERIAL) 340 mi/3 hours
Fuel Range Maximum Single Place & 19 Lt. Aux. (METRIC) 547 km/3 hours
Fuel Range Maximum Two Place & 5 Gal. Aux. (IMPERIAL) 260 mi/2.3 hours
Fuel Range Maximum Two Place & 19 Lt. Aux. (METRIC) 418 km/2.3 hours
Normal Cruise 113mph (181km/hr.)
Max. Airspeed At Sea Level – Standard Day 130 mph (209km/hr.)

COURTESY: Sport Pilot – Hot Kits & Homebuilts Magazine – March 1990 – Norm Goyer.


The post Rotorway’s Cross Country Elete Helicopter appeared first on Redback Aviation.

Javelin Back Yard DIY Helicopter

$
0
0
Schamm Javelin helicopter kit

Back Yard DIY Javelin Helicopter Kit

Its makers, both in their twenties hope to market their one-man DIY helicopter for under $10,000

B.J. SCHRAMM’S FIRST NAME is Buford but, understandably, he insists on “B.J.” He has some other definite ideas, mostly about DIY helicopters.

Rotorway Javelin helicopter

He first started thinking about them in high school and, before finishing college (he still hasn’t), he designed and built one. He moved so fast, in fact, he had his DIY helicopter built before he ever learned to fly one. Now everyone may be flying one.

transporting javelin one man helicopter

SCHRAMM HELICOPTER weighs 500 pounds empty and can easily be handled by one man. Engine is 100 hp and can power it to 100 mph up to a ceiling of about 12,000 feet.

Schramm’s Javelin is a one-man whirly – bird that may lead the long-awaited break – through in back-yard aircraft. He hopes to market it for less than $10,000, about half what the lowest-priced helicopter is selling for now.

Schramm had some help from another college dropout, Robert Everts, an excellent mechanic and designer. They did just about all the work on the bird themselves.

B J Schramm Robert Everts DIY Helicopter

LEFT: B. J. SCHRAMM (left) and Robert Everts, both in late twenties, designed and built the Javelin helicopter themselves.
RIGHT: LIGHTWEIGHT WHIRLYBIRD can be towed home behind a lightweight compact vehicle without any dismantling needed.

“We had three things in mind,” Schramm explains, “low cost, stability and easy maintenance DIY helicopter. We have about 30 percent fewer parts than a standard helicopter, and the design is so simple a shoe clerk could take it apart in an hour and a half.

Simple design one man helicopter

LEFT: DESIGN SIMPLICITY was one aim of Schramm helicopter, reducing cost with fewer initial parts and easier maintenance.
RIGHT: ONE-MAN COCKPIT has standard basic instruments and controls, including a cyclic – control stick and collective pitch throttle.

“Finally, we wanted the Javelin helicopter stable enough so the general public could fly it. We’ve designed it so that it wants to stay level, with an inherent tendency to return to the stable mode.”

Straight up, anyone?


COURTESY: Popular Mechanics – December 1966.

IMAGES: John Boykin


The post Javelin Back Yard DIY Helicopter appeared first on Redback Aviation.

Kiss Aviation JetExec Helicopter Conversion

$
0
0
Kiss Aviation Rotorway JetExec Turbine Powered Helicopter

Turbine Powered Rotorway Exec Helicopter

WHEN I HEARD that there would be some light-weight, turbine-powered “JetExec” helicopters at this year’s EAA Golden West Fly-In, I was eager to go. At my last job I was in charge of the inspection and maintenance of huge turbine-powered helicopters. After years of working on these helicopters, I came to believe that it’s hard to beat the dependability of turbine engines.

Although the fuel consumption of turbines is far greater than that of reciprocals, they’re usually lighter and often much more reliable. That’s the trade-off, and it’s one that an increasingly large number of helicopter owners are willing to make.

One of the first homebuilt helicopters I ever inspected was a Scorpion, a product of the talented aviation designer B.J. Schramm. The Scorpion was eventually developed into the experimental RotorWay Exec series of helicopters.

Today, a person who wants to own a lightweight personal helicopter has a number of choices. Robinson offers two- and four-place models. There’s a re-issue of the Brantley B2-B. You could also choose an Enstrom or maybe a Schweitzer (which was once the Hughes).

Solar T-62 T-32 GPU JetExec Helicopter

Each of these helicopters uses a small Lycoming engine. Also available in this market are a number of Bell 47s and some Hillers. For the past decade, more helicopter buyers have been turning to those powered by turbine engines.

Because they have excellent records of dependability, a long service life and a minimum of downtime, the Hughes 500 series and Bells have dominated the commercial helicopter scene for years. And the main reason for this is because they’re powered with turbine engines. But ever since homebuilt helicopters first appeared on the scene, they have been on the fringes of acceptability.

One notable exception was the RotorWay Exec. Over the years it has earned an excellent reputation and an enviable safety record. The Exec is powered by a small, electronically controlled four-cylinder engine specifically built for it. This sophisticated 162-cubic-inch engine uses the FADEC control system.

RotorWay’s modern 162F is obviously state-of-the-art, so why would anybody want to change the means of powering this aircraft? If you owned a new RotorWay, you probably wouldn’t consider a change, but if you had one of the many hundreds of older Execs still flying today, you might consider upgrading your earlier engine to a turbine.

A Lucky Discovery Of The JetExec

While touring the vendor area at the Golden West Fly-In, I came upon an unusual helicopter on display. It was an older-style RotorWay Exec with a turbine engine conversion. It looked so interesting that I had to stop. I discovered that the work was done by a company called KISS Aviation located in Perris, California, and the company is calling the turbine package the JetExec.

When I got back home, I called and spoke with one of the founders of the company, Dave Domanske. He told me that he started out as a tool and die maker and that he’d been in the business for more than 30 years, calling himself “a dedicated rotorhead.”

When I asked what kind of turbine engine was in his helicopter, he said it was a surplus Solar T-62 T-32 GPU (Ground Power Unit) powerplant that, with a rating of 150 horsepower, is ideal for the small RotorWay. The initial price is between $2000 and $4000, and it costs another $1000 to have each one inspected and thoroughly checked to be sure it’s free of problems.

The kit from KISS, which includes everything needed to convert the Exec to turbine power—except the nuts and bolts—costs $20,000. Most of that cost is for the reduction drive for the primary drive and the special clutch that took KISS more than three years to perfect.

Domanske said he “bent up” two Execs in the course of perfecting the system. One accident happened when a fuel control lever broke; the other occurred when there was an electrical problem. Both accidents were minor, and they served as vital test flights.

In the course of the testing process, KISS searched out and corrected every potential problem area in the JetExec, and the prototype has now logged over 125 hours of turbine time without any further trouble. Domanske told me about the frustrations he faced during the period when he was testing the clutch plates.

Every single type he tried failed — except for the last one, which works perfectly. Now the clutch facing makes it easy for the pilot to start the turbine, and the rotors come right up to speed without any grabbing or slipping.

Domanske explained that you put the clutch in, start the engine and then, when the turbine is turning at the right speed and temperatures register in the right range, you engage the clutch, and the rotors start to spin. This helicopter uses all the other controls of the stock Exec.

Either the 1.500-inch or the newer 1.750-inch shaft may be used. The tail rotor is spun by way of a shaft driven by a timing belt. The frame needs no modifications, except for the replacement of a few minor brackets, but no cutting is necessary.

Converting Rotorway Exec Jet Engine

The conversion can be completed in about 100 man-hours, using ordinary tools. Domanske also said that builders may use the original tailboom, but the company also offers a replacement for that component, which has a slightly thicker skin.

In yet another improvement, one designed to eliminate the possibility of any whipping motion from the turbine, the number of pillow blocks or bearings in which the tail-rotor shaft runs have been increased and placed closer to each other.

Among the many advantages of using turbine power is that, because no warm-up is needed, you can be up in the air within a matter of minutes. Another benefit of turbines is that the engine is good for 6000 flights, and turbine engines are so reliable, the possibility of engine failure is greatly reduced (it’s practically non-existent).

In addition, the gross weight of the helicopter has remained the same. And should any parts be required, they’re all readily available from the company. It can burn Jet A, kerosene, diesel one and two or even automobile fuel.

The JetExec installation replaces a weight of 375 pounds (that of the powertrain) with a much lesser weight of 270 pounds, and we all know that in most aircraft, lighter is better. The engine is actually rated at 9000 cycles, but KISS literature calls it 6000.

One of the greatest advantages of flying this turbine-powered helicopter is that the pilot’s work load is dramatically reduced, because the main rotor and engine rpm are automatically regulated. All you have to do is place the power level at 100 percent—then forget about it.

Each part of this excellent JetExec helicopter, designed and manufactured by KISS, was over-engineered to be sure the pilot would be flying his turbine-powered Exec with complete peace of mind. The turbine-powered KISS helicopter retains the same excellent flight characteristics as those of the original Exec.

JetExec Helicopter by KISS Aviation
Powerplant 150-hp gas turbine
Seats 2
Gross weight 1500 lb*
Empty weight 825 lb*
Useful load 675 lb*
Pilot and passenger 675 lb*
Fuel capacity 50 gal.
Rate of climb 2000 fpm*
Hover in ground effect 8000 ft*
Hover out of
ground effect
7000 ft*
Service ceiling 10,000 ft*
Maximum range 335 s.m*
Normal cruise 125 mph*
Maximum airspeed 130 mph*
These numbers are expected to improve with additional testing.

CREDIT: Design and development assistance for the jet turbine conversion – Don Hillberg.


The post Kiss Aviation JetExec Helicopter Conversion appeared first on Redback Aviation.

Hummingbird Four Seat Kit Helicopter

$
0
0
Vertical Aviation Technologies Hummingbird Kit Helicopter

Vertical Aviation Technologies

Hummingbird Helicopter engine options

The dictionary describes a hummingbird as a tiny, brightly colored bird with narrow wings that is capable of hovering in flight.

It’s a perfect name for a helicopter — it’s surprising someone hadn’t thought of it before… someone before Brad Clark, president of Vertical Aviation Technologies, Inc., that is. The Hummingbird is what he calls his new four-seat, kit-built helicopter.

It’s only about a 30-minute hop from Sanford, Florida, where Vertical Aviation Technologies is located, to Lakeland, so it was no surprise that the Hummingbird made its public debut at Sun ‘n Fun this year. Painted silver and blue, the 30.5-foot-long, 8.5-foot-high helicopter easily dominated the scene in the rotorcraft display area.

Hummingbird Four Seat Kit Helicopter: History and Philosophy

If something about this helicopter looks familiar, you have a pretty good memory, for the Hummingbird is essentially a cleaned-up kit version of the 1949 Sikorsky S-52. With the help of his father (who owns Orlando Helicopter—his latest project was modifying a batch of Sikorsky S-55s to look like Soviet Mil-24 Hind gunships for the U.S. Army), Brad Clark spent years acquiring the world’s largest inventory of new and used S-52 parts. Wanting to do something with his investment, Clark began developing the Hummingbird in 1985.

Built in Sanford, Florida, by Vertical Aviation Technologies, the four-place Hummingbird is basically a modified, updated version of the 1950s-era Sikorsky S-52.

In January, 1988, the first Hummingbird lifted off. A second Hummingbird has since been completed, but has not yet flown as it is being used as the guide for writing building instructions and taking assembly photos for the kit plans.

Clark’s objective in developing the Hummingbird is to “create a new dimension in affordable vertical flight, with particular attention to safety and reliability.”

Hummingbird Four Seat Kit Helicopter

The reason he prefers to produce the Hummingbird as a kit rather than a fully assembled helicopter is to avoid the staggering expense of certification and having to pass it on to his customers, pricing himself right out of the market in the process.

In order to grow steadily from a solid foundation, Clark plans to limit the initial production run to just a few kits. Only when he is satisfied that his concept of kit production is compatible wit h his customers’ requirements (in other words—people are able to finish the kit) will production rates be increased.

Hummingbird Four Seat Kit Helicopter: Nuts and Bolts

The Hummingbird is powered by a 245-hp Aircooled Motors 6V6-245-B16F engine, otherwise known as the Franklin 0-425-1. Although spare parts for these engines are abundant, Clark’s supply of complete engines is not. He plans to sell off the Franklins with the initial production run of kits and has already evaluated replacement engines.

After considering a V-8 auto conversion, he settled on the Lycoming 0-540, the engine for which the Sikorsky S-52 was originally engineered. In the meantime, however, Clark is testing an Allison turbine in the second Hummingbird.

Four seat kit helicopter design

The 420-hp engine will have to be derated to 245 hp, but the excess power will still be available if needed, and besides, the price — $12,000 — was right. Another modification Clark has in the mill is a five-blade rotor system being designed for the Hummingbird by a former Sikorsky engineer.

Clark will sell the Hummingbird minus the engine, which knocks $14,510 off the kit price and allows the builder to choose his own powerplant.

His advice: “Your engine should weigh no more than 450 pounds and develop at least 245 hp. It has to be able to operate at a 60° angle, and if it will have a direct drive connection to the main gearbox, it has to be able to operate at 3275 rpm. Remember, there are various reduction drive units available on the market.”

The transmission system consists of a coupling between the engine and main gearbox, a main driveshaft that extends from the top of the main gearbox to the main rotor head, and a takeoff drive from the main gearbox that drives the tailrotor driveshaft, intermediate gearbox and tailrotor head. The Hummingbird has a three – blade main rotor (33 feet in diameter) and a two-blade tailrotor (5.75 feet in diameter).

Because of its inventory of original Sikorsky parts (complete with all engineering drawings), Clark is able to produce a very complete kit that still qualifies under the FAA’s 51% rule. Many brand – new and zero – timed Sikorsky components are used.

homebuilt hummingbird helicopter kit

The cabin and tailcone are two of the few assemblies manufactured new by Vertical Aviation Technologies. Both of these are made of aluminum and require rivet assembly by the builder.

But the hardpoints where the trans-mission, engine, tailcone and main rotor attach come preassembled. The Hummingbird’s nose is fiberglass and its windshield—look closely, helicopter buffs—is from a Bell Jet Ranger.

Rather than the skids familiar on most homebuilt helicopters, the Hummingbird has a quadricycle-type gear (two nose wheels, two mains) with shock – absorbing struts and hydraulic brakes. The Hummingbird kit is actually sold in 14 separate component-kits. Kit 1 is the lower cabin section; Kit 2 — the upper cabin section—come partially preassembled.

The Hummingbird can carry a 900-pound payload at a cruise speed of 90 mph. The kit is currently selling for $59,000.

After fitting the two cabin sections together, the landing gear (Kit 3) and the windshield and nose section (Kit 4) are added. Kit 5 is the partially assembled tailcone, and Kit 6 consists of the tail gearboxes, hub and blades.

The mainrotor hub and gearbox, flight controls, the engine (optional), fuel system, instruments and electrical system, seats, cowlings, and the mainrotor blades comprise the remaining eight component kits. Not included in the kit are paint, upholstery, instruments, avionics, a battery, and maintenance and flight training from Vertical Aviation Technologies.

Hummingbird Four Seat Kit Helicopter: Let’s Get Specific

With the Franklin 0-425 engine installed, the Hummingbird weighs 1800 pounds empty. Maximum gross weight is 2700 pounds, giving it a useful load of 900 pounds. Fuel capacity is 57 gallons of 100-octane fuel, which the Franklin burns at a rate of 16 gph.

Maximum speed (VNE) is 110 mph and cruise is 90 mph. Range is 250 miles. Rate of climb with a 500-pound payload is 1250 fpm; fully loaded, it is 950 fpm. Hovering ceiling in ground effect for the same weights is 5700 feet and 1300 feet, respectively.

Vertical Aviation Technologies Kit Helicopter

Grand total for the complete Hummingbird kit: $76,010, plus $840 for crating and shipping. “That may seem like a lot of money, and it is,” admits Brad Clark, “but consider what you’re getting for your money: a four-place helicopter with a 900 – pound payload that cruises at 90 mph and has a 250-mile range.” I have to admit — he has a point.

And to make that point even more strongly, Clark recently announced that the price of a Hummingbird ordered from the first production run was being knocked down to $59,000. To get this price, customers must order the entire kit and put down a $2500 deposit (with 50% of the kit cost due once an order is ready to be processed).

Vertical Aviation Technologies’ Hummingbird helicopter is now flying with a Chevy 350 V-8 engine.

AUTO POWER FOR THE HUMMINGBIRD HELICOPTER: The Hummingbird, the four-seat Sikorsky S-52 helicopter offered in kit form by Vertical Aviation Technologies, has flown successfully powered by a liquid-cooled V-8 engine.

The iron-block Chevy 350 replaces the original powerplant — a 245-hp Franklin. Turning at 3275 rpm, the V-8 has shown a 20% increase in available power over the Franklin. It also weighs 45 pounds less than the aircooled Franklin.

If a kit is purchased in stages, the $76,000 price applies. From the looks of the prototype he displayed at Sun ‘n Fun, Clark may be making us an offer we can’t refuse. At least it was for one overseas customer—he just paid $98,000 for the prototype!


FOR MORE INFORMATION on the Hummingbird, contact Vertical Aviation Technologies, Inc. at Orlando Sanford International Airport 1609 Hangar Rd, Sanford, FL 32773, USA.


The post Hummingbird Four Seat Kit Helicopter appeared first on Redback Aviation.

Vertical Lift Technologies WINDSTAR helicopter

$
0
0
WINDSTAR helicopter

Rotorway Four Seat Kit Helicopter

FOR FAST, AFFORDABLE TRANSPORTATION…CONSIDER WINDSTAR – A BRAND NEW BREED OF HELICOPTER!

The WINDSTAR helicopter is a 4-place helicopter with small external dimensions and 150mph speed.

Vertical Lift Technologies WINDSTAR helicopter major features include:

  • A simple hingeless/bearingless composite rotor, nearly zero maintenance with long life.

  • A brand new generation piston powerplant, (designed and built specifically for “WINDSTAR” by Vertical Lift Technologies) with an extremely high power to weight ratio…liquid cooled, turbo-charged, with an advanced combustion system!

  • A “PAL” (Power Assisted Landing System) which provides the WINDSTAR helicopter with auxiliary power of up to 1/3 engine horsepower at the pilot’s command. It’s the first time a single-engine helicopter has come close to providing twin-engine forgiveness in a power-off situation.

  • What if you had a helicopter that could fly you point to point in one sixth the average time you would be spending in your automobile?

    There are several ways to look at this:

  1. Point to point time savings that turns your arrival into minutes from departure, provides more than just satisfaction, necessary trips aren’t put off.

  2. Don’t figure that 2 years of your salary might equal the price of this helicopter, and thus justify it! Consider that in 25 years, by moving around six times as fast, you’re income will be multiplied many times.

  3. In the past, with helicopters costing $400,000, you might not have been able to justify the cost of your personal vertical mobility, but now why not consider the WINDSTAR helicopter!

A machine that can add an hour or more to your day, whose purchase can be planned and saved for over a period of time.. a most interesting alternative, don’t you agree?

A four place helicopter with small external dimensions and 150 mph speed has never existed until now!

HERE’S WHY:

  1. Expensive and complicated rotor systems.

  2. Lack of a suitable powerplant.

  3. Marginal single-engine safety.

WINDSTAR helicopter is the solution!

The compounding effect of the above features has resulted in significantly reduced manufacturing costs, making “WINDSTAR” affordable in first cost and operational cost!

The desire for inexpensive, fast, point-to-point vertical transportation has captivated mans mind since Leonardo De Vinci. The WINDSTAR helicopter finally fulfills this desire!

TIMES HAVE CHANGED! Now that you can afford a WINDSTAR helicopter…You can’t afford to be without one! Finally…Affordable, Fast Transportation For Businessmen FLYING WILL NEVER BE THE SAME AGAIN!

Executive businessmen windstar helicopter

The post Vertical Lift Technologies WINDSTAR helicopter appeared first on Redback Aviation.


Life At Rotorway Helicopters

$
0
0
Rotorway helicopters Scorpion 2 kit

Rotorway International Exec Helicopter Chief Pilot

I left Rotorway Helicopters aka RotorWay International (RWI) a little over five years ago to pursue other adventures including flying the “Big Iron” in the Gulf of Mexico, Grand Canyon and other locations.

I was with RWI almost five years as their Chief Pilot, but I did all kinds of other “jobs” too: Demonstration flight pilot, air show representative, mechanic, new ship builder and R & D fabricator to name a few.

I thought you might enjoy some of my “opinions” and “insight” regarding the company back then. This article will start with my roots and what I was doing before I joined the RWI team. I will discuss my observations of the companies philosophy, the machine itself and include some of the eye opening incidents I had.

RWI has been around for over 40 years now and there are countless individuals building and flying their products. As the result of my involvement with the company, many owner / pilots have become life long friends.

Before RWI: I already had my “Stuck Wing” rating from the mid 70’s. My father, a retired Air Force Colonel (WWII and Korean bomber and fighter pilot) helped me get started. However, I had this urge to fly a helicopter. Dad thought I was nuts. Daily, Huey’s and Cobra’s flew over my parent’s house to and from Fort Lewis Army base near Tacoma, Washington.

helicopter instructor tips

It was at Fort Lewis that I, as a military dependent, could and did join Fort Lewis’s flying club to get my Private fixed wing rating. And, while I was still in high school, back in the early 70’s, I built a Scorpion 2.

Unfortunately $$ ran out half way through the project and the unfinished ship was sold. I really had this helicopter thing in my blood that needed to be addressed…I just didn’t have the funds when only a teenager.

Several years later I was finally in the “financial” position to pursue at least a Private Add-On rating. I had been a civil engineer for almost 15 years in the Seattle area when I marched my butt down to a local flight school (Medium size Part 141 school).

I took the half hour demo flight and was hooked. However, this “instructor” scared me a bit while showing me some cool stuff in the R22.
I was not keen on some of his “High Ego” techniques.

You know that little voice in the back of your head that says, Run!!! So I went down the taxiway at Boeing Field to the com-petition (Small Part 61 school) and took a demo flight with them. Sooooo much better. Safer, safer, oh, did I say safer. I signed right up for instruction.

This would turn out to be a wise choice on my part. The instructor I had on that first demo flight died a couple of years latter. He carried an unsecured large piece of drift wood back from the beach.

When the drift wood shifted into the controls he augured his R22 into a local warehouse. Just one of many sad experiences that sticks with you forever. I went on to complete my Private Add-On, Commercial and initial CFI with this Part 61 flight school.

My instructor for all three of these was nominated for best Instructor several times. I was very lucky and thankful to have him teach me so, so much. Worth at least 100 times what I spent just because of his wealth of knowledge and ability to teach me good safe flying judgment and techniques.

These would all come back to help me immensely while with RWI. I did eventually leave my civil engineering job in 1999 and was hired by the other helicopter company at Boeing Field.

Their main incentive was my initial Instrument and CFI Instrument ratings at cost. The other flight school only had ratings through your initial CFI. Plus this larger school had turbine and other medium sized aircraft.

Rotorway Helicopters Company Philosophy: RWI has so much history I don’t have the space to write it here. Some have told me to write a book. Who knows, could be a best seller!!! When I came aboard in 2000 “Stretch” had just left/retired as President.

I met and talked with him several times when he would stop by on his Harley (I had one too so we could relate on both flying and bikes). Super guy and I wish I could have worked for him.

The “Management” when I was there was a Board of four guys from different departments. Two things got my attention right away. First was that the “Board” was an even number. I had served on several Boards during my career and they were all odd numbered to avoid a dead lock vote. So I saw this as strange.

Second was that not one of them was a pilot, not even a student or fixed wing. Stranger and stranger. A helicopter company run by non-pilots. I supposed it could work, but how well? Several months before I left, Rotorway Helicopters / RWI was in negotiations to sell to its current owner.

RWI was an ESOP (Employee Stock Ownership Plan) company, or employee owned. The employees voted to sell the company and the rest is history. It appears that the Talon is selling well and a certified two seat turbine appears in the possible future. I wish them the best success.

The Machine: I have to admit I was a bit concerned when I first started interviewing with RWI and I had a chance to examine their 162F. Coming out of certified ships to a kit helicopter was humbling to say the least.

To make the decision harder I had two other job offers. When I weighed all the pros and cons I based my decision mainly on the “Family” atmosphere at RWI, the fact that I would be Chief Pilot and finally the location: Phoenix, Arizona.

My wife is a Controller / Accountant and can land a job just about anywhere with her eyes closed. Helicopter jobs were out there but relocation was usually a must. Plus we both were ready to leave our hour plus commutes, the cold or snow and the rain or drizzle of Seattle behind too.

Having most of my 500 flight time hours in the R22 (150 or so in R44, B206, EC 120 and AS350) when I started at RWI was a plus. And I got my entire Private Add-On in an R22 that did NOT have a governor!!! Super big plus given the 162F does not have one either.

The few hours I had in Eurocopter products helped also with the clockwise rotation of the RotorWay. Once I earned my first helicopter license in 1993 I started learning all about the other ships, certified or kit, and kept basic track of all of them, including RotorWay.

So I was quite surprised to see nothing really had changed mechanically from my Rotorway Helicopters Scorpion 2 of the early 70’s to the ship I was going to “Interview fly” in mid 2000. Still had the water cooled engine mounted vertically, still had a chain and oil bath for main rotor drive and of course those three tail rotor drive belts.

I think the focus over the years was to keep the costs down using the current mechanical systems and spruce up the looks with the exterior shell. T believe the sleek appearance of the 162F was a main “close the deal” point of the ship.

This was quite evident after giving demonstration flights. Even though several potential customers could afford a R22 or CB300 they commented how ugly they were compared to the Rotorway Helicopters Exec. You’ve got to admit, the RW is a looker.

The “Incidents” I mentioned earlier included, as I recall: Six full down autos, about 20 hovering autos, two catastrophic tail rotor failures, and …man I forget and need to check my log book.

A few of these “incidents” are directly reflected in RWI’s mandatory and advisory notices. And a few are simply bad luck due to premature metal fatigue or poor design. Again I thank my first instructor that was gifted at teaching me so much.

Rotorway Helicopters exec 90 helicopter run up

The secondary failure issue was well underway before I logged my first flight in a Rotorway Helicopters 162F. Sadly, I got bit twice with the old design. One occurred at altitude, resulting in a full down to pavement. and the other happened in a hover, requiring a hovering auto to pavement. This was a real sore topic at the time and disused openly outside the company.

In one incident, the petcock on top of the engine was spun open when a supercharger (ACIS) belt let go, flooding the ECUs and killing the engine at altitude — full down in the desert, Immediately, the advisory to safety wire the valve came out.

In another, the cup inside the upper engine pulley failed in a hover — hovering auto to gravel. This was because the ship had a re-used cup (unknown to me) from previous crash.

Then the chain broke in a hover — hovering auto to gravel. This was just bad luck, no advisory. I could go on with several others but let’s save those for hanger or camp fire flying.

The two needing mention are the catastrophic tail rotor failures. My first one was in the 162F and happened from about 75 feet on a real steep confined area approach with a Commercial helicopter pilot, transitioning into the RW.

We were well below ETL when, after a 45-degree left yaw, I had the controls and nothing left to do but a modified hovering auto. The ship spiraled three times, with no chance to regain airspeed.

That was a real hard landing on uneven terrain resulting in a roll over. The collective was in my armpit just before impact too. What a result; the Rotorway Helicopters ship destroyed and my back broken (T-12 compression fracture). The student was also injured but not as seriously.

And the Cause was? The Rotorway Helicopters tail rotor belts were miss-installed on the idler pulley. The ship made it to 208 hours (250 hr replacement) and there had been no formal pilot instruction on installation method. No sign of wear or slackness appeared during each pre-post flight either. An advisory followed to check installation.

My second was in a carbureted 162. We were just leaving downwind, heading to base with a Phase 2 student. Suddenly a loud bang sounded in back with an accompanying huge left yaw.

I took controls and entered an auto. I attempted to re-engage the engine to help make it to pavement. The ship had too much yaw without a spinning tail rotor to act as vertical fin. Thankfully, in this case, we had a perfect auto to level dirt.

Speed, flare, stop forward speed, level and pull full collective at end – right out of the manual. Piece of cake right? Whoa!!! Just as suddenly, the engine came back on line big time with full collective, yaw to ground and roll over.

What the @#$%. Luckily, both of us were fine, student had a small cut due to windscreen shatter. My training of roll off throttle completely to detent did that. RW had no detent so it was Pilot error – sort of.

If I had known about the no detent or no full off throttle when raised to full up, I would have reached up during the auto and killed the engine. And advisory followed changing cororlator cam. The real cause was that the secondary had not been inspected after a previous tail rotor strike (unknown to me) and the stub shaft failed.

Conclusion: Yea, I know some of you are saying “Bill, you should expect this because you’re a test pilot”. You’re so right. And you should all expect it too because you’re also test pilots with experimental aircraft. I was logging about 500 hours a year while at RWI. I’m not saying this to brag at all.

The fact is that this amount of flying exposes any kit helicopter pilot to more of that or saying. “It’s not IF something will happen but WHEN”. Why I’m here with you today and able to write this article is due in part, in my opinion, to one of those “good judgment” items my instructor taught me.

Never, never, never, whether flying solo, carrying passengers, giving dual, whatever, let your hands or feet wander too far from the controls. Regarding certified ships, at least from my experience, nothing breaks, ever. But this has never changed how I pre-flight, fly, or monitor the controls at all.

I attended Homer’s one year and was inundated with Rotorway Helicopters secondary shaft questions. The cool part was that everyone there was so excited to see someone show up from RWI. I had to tell them I did this on my own because I just love helicopters so much. Unfortunately, I got in trouble from “management” for attending, go figure.

Thankfully, the new 35mm came out and the problem appeared to be solved. I really appreciate the new RWI for sending company representatives to Homer’s, finally. Ever heard that other saying? “There are bold pilots and there are old pilots, but there no old bold pilots”. I think it’s true.

Complacency can sneak up on any builder / pilot, new or seasoned. Recommendations? Take the extra time to build your ship right, have it inspected by someone very familiar with Rotorway Helicopters, question every part during pre-flight and finally get good instruction. These are just some things to think about.

Hope your enjoyed the article. Fly smart and safe my friends.

The post Life At Rotorway Helicopters appeared first on Redback Aviation.

The Birth Of Rotorway Scorpion Helicopters

$
0
0
B.J.Schramm Rotorway Scorpion helicopter kit

B. J. Schramm Rotorway Scorpion Helicopters

THE PAST DECADE has seen a marked increase in enthusiasm on the part of the layman to become more knowledgeable about the field of rotary-wing aircraft and the possibility of owning a personal-type, rotary-wing Rotorway Scorpion flying vehicle.

Thus far, the seven major helicopter companies have pretty much confined their efforts to the larger utility and commercial-type vehicles with a prime emphasis being placed on design of rotorcraft for military application.

Only in the last few years has the total number of commercial helicopters operated in the United States exceeded more than a mere few-hundred machines. There are many reasons why major companies have not pursued the personal VTOL vehicle.

The most obvious reasons are the difficulty of transferring enough education about the helicopter in a short enough period of time to create a mass market, and the unwillingness on the part of these companies to gamble the financial commitment necessary to produce profitable results over such a long-range endeavor.

original photo bj schramm scorpion one helicopter kit

A truly distinctive and esthetic appearance makes the Scorpion stand out among the light rotary-wing craft.

Due to the vacuum created by the lack of suitable designs, many individuals and small companies have made untold attempts at successfully constructing a personal rotary-wing vehicle and capturing the homebuilt helicopter market.

Attempts by individuals have usually progressed to the point where enough hardware was tested to point out the magnitude of the problems which would be encountered if work were to be continued on the rotary-wing project.

The difficulty of designing, testing, and perfecting a full-service, vertical take-off rotary-wing vehicle can be outlined quite simply. A helicopter is essentially a series of vibrations all of which are being made to function in harmony with one another.

Three major flywheel effects are present:

  • the rotor-blade system,

  • the tail-rotor system and the

  • powerplant system.

All of these must operate in perfect harmony in order to achieve smooth flight. To top it off, it is the pilots job to manage 5 different controls to maintain that balance.

To understand the operation of any helicopter we must first understand the basic design of the different types of classical rotor-hub configurations, For our purposes here, these configurations may be categorized into the teetering or semi-rigid hub, the fully articulated hub, and the completely rigid hub.

The helicopter teetering, semi-rigid, or see-saw hub has its blades affixed rigidly in such a manner that no motion can exist between the hub and blades other than a rotational movement of the blades on a pitching axis (feathering).

Simple homebuilt helicopter inspection

LEFT: An elliptical rotor-hub plate and circular, flexible push-pull cable are the identifying features of the Scorpion hub design.
RIGHT: Simplified tail-rotor design is apparent, where blade construction is a wraparound aluminum skin riveted to a steel spar.

The rotor hub is connected to the drive shaft by means of a universal having one axis pivoting on the shaft and one axis pivoting on the hub. In order to achieve flight control with this type of hub system, designers have used many different types of intermixing linkages. The helicopters semi-rigid hub is limited to two blades.

The universal-joint axis which connects the helicopters hub to the universal serves as the pivot axis which allows one blade to climb and one to dive, or vice versa, hence the teetering hub.

In the fully articulated hub we have a condition where each blade, whether three or more depending on the designers prerogative, may perform three different motions in relation to the hub:

    first, pivoting on its pitch axis (feathering);

    second, advancing or retreating (lead-lag);

    third, vertical movement (flapping).

Control of the articulated hub seems to be the simplest of all as a linkage may be connected from the blade-pitch horn directly to the swash plate with no intermixing of control required. In the rigid hub, the rotor hub is rigidly affixed 90-degrees to the main rotor shaft.

Blades are attached to the hub in the same manner as in the teetering type. They have freedom of pitch change only (feathering). Control of this type of hub has presented great difficulty.

Solutions to the problem of control have been achieved with the use of a small gyro which is controlled by the pilot and, in turn, controls the rotor blades.

Since the rotor blades do not have freedom of vertical movement (flapping), extremely high stress loads are imparted to not only the blades themselves but to the rotor hub.

Only recently has a truly successful light helicopter rigid-rotor hub been perfected, and it has yet to prove itself in mass operation.

The choice of rotor-hub design for the Rotorway Scorpion was dictated by the type of market for which the craft was designed. Since the Scorpion is tailored for the novice sport flyer, it had to meet a far more rigorous set of safety Standards and at the same time be the most economical configuration possible.

1969 diy single seat helicopter promotion

Conventional helicopter controls include Standard cyclic and collective control with coordinated throttle, foot pedal directional control via a push-pull cable, and an over-center cam-locking clutch lever for rotor engagement.

There are many disadvantages inherent in all rotor-hub designs. One of the greatest is found in the fully articulated system. A condition known as ground resonance is very easily set up with this type of hub design – or vortex ring state in a two bladed design.

During take-off or landing, if the helicopter is permitted to linger in the condition where a very small portion of its weight remains on the ground or, if during a landing collective pitch is not reduced properly so as to place the craft firmly on the ground and thus avoiding the momentary minimum-weight condition, it is possible for the rotor-blade system to go out of phase.

Essentially, what happens is that one blade will dip beyond the tip-blade path of another, causing a serious oscillation which can disrupt the entire blade system to the point where self-destruction will occur.

For the novice pilot, therefore, the articulated system becomes difficult to learn to fly as it cannot be bounced around on the ground without the possibility of causing the occurrence of ground resonance.

A rigid-hub system has the basic disadvantage of encountering high stress loads in operation. Therefore, constant attention must be given to the dynamic components to determine that a safe usable lifetime exists. It also becomes susceptible to rotor mast bumping in negative G situations.

Exotic materials must be used in the rotor hub to withstand the very great forces which it encounters. The teetering semi-rigid hub has the disadvantage of having to intermix the cyclic and collective control in order to achieve proper vertical and directional control.

This design is most desirable however, due to the fact that it is difficult, if not impossible, to put into ground resonance regardless of the failure of the helicopter pilot to respond properly at the controls.

The choice of this type of system for the Scorpion dictates the necessity of a breakthrough in control design. In a semi-rigid hub, the collective control changes the blade pitch relative to the hub. Cyclic pitch or directional control is achieved by tilting the rotor hub with respect to the main drive shaft.

Prior control designs for the semi-rigid helicopter rotor hub have encountered difficulties in achieving Separation of the cyclic and directional control because of the fact that a mechanical linkage becomes a design problem when variables in more than one plane are introduced.

Mixing of cyclic and collective control for the semi-rigid hub has resulted in considerable mechanical complexity. In the Scorpion, however, these two controls are kept completely distinct by tilting the hub only with the cyclic control and using a flexible push-pull cable for separate collective control.

A proper collective pitch setting is maintained regardless of the position of the cyclic control. This patented system has thus far proven very successful and, at the same time, has greatly simplified mechanics in this area of vertical flight.

There is more to rotor-hub design than just control and design of the hub itself. Different hub designs require a corresponding difference in blade design. The complexity in the design of a helicopter rotor is due to the high, forces under which it must operate.

The significant forces acting upon a helicopter rotor blade are:

  1. ROTORBLADE CENTRIFUGAL FORCE

    In the Scorpion helicopter, for instance, due to the tip speed and weight of the blade, a centrifugal force of nearly 8000 lbs, or the equivalent weight of two Standard automobiles is placed on the end of the blade while in operation.

    This amazing centrifugal load required that some means of transferring this tremendous stress from the blade to the rotor hub (at the blade root) be employed. The semi-rigid hub has its blade rigidly affixed with freedom of feathering only.

    Therefore careful attention must be given to the blade-retention system on this particular type of hub. In the case of the Rotorway Scorpion, a series of fiberglass doublers is used.

  2. ROTORBLADE TORSIONAL LOAD

    Unlike the autogyro, a helicopter shaft has a considerable torque loading imposed on it in order to rotate a blade system under positive pitch. In the case of the Scorpion, approximately 600 ft. lbs. of torque is applied to the main shaft.

    This high torque loading on a rotor system causes pitch instability on a rotor blade which does not have sufficient stiffness for its application.

  3. ROTORBLADE CONTROL FORCES

    When a movement of the cyclic control is made, a requirement is placed on each blade to respond precisely to the degree of control input. If each blade in the rotor system does not respond in an identical manner to its mate, an out-of-phase condition will occur resulting in severe cyclic stick feedback due to the out-of-track operating condition.

    Helicopter blades must also be balanced properly chordwise in addition to being balanced very closely against one another. It is apparent that the many forces acting on a helicopter rotor blade require that a careful study be made in this area before initiating construction and testing.

    A well-designed helicopter rotorblade must perform acceptably under all operating conditions and yet achieve a reasonable lifetime.

In the Rotorway Scorpion helicopter, three dissimilar materials have been chosen for blade construction which, when assembled, provide most adequately for extended operation under their normal operating load. This patented design is a D-section steel leading edge which is interlocked 10 a V-section aluminum trailing edge.

This assembly is bonded and screwed to a birch main spar which runs the length of the blade. Not only does the steel leading edge provide excellent anti-abrasion characteristics, but it also serves as an I-beam member greatly enhancing the stiffness ratio of this design.

Space here will not permit a complete discussion on all of the fail-safe features of the Rotorway Scorpion helicopter rotor-blade and hub-design concept; however, many significant features are employed making this a very redundant design. Power transmission in a helicopter tends to become a complex task.

A method of transferring power from the helicopters engine to the main rotor and from the main rotor to the tail rotor must be able to transmit capably the load requirement, and at the same time torsional vibration from the engine must be limited as much as possible.

Weight of the helicopters drive train must be watched carefully so that performance of the craft is not impaired. A mechanical right angle gear box and shaft drive are most commonly used in utility and commercial helicopter designs.

Unfortunately, again due to the extremely high torque loading (because of high speed-reduction ratios), this type of power transmission system becomes prohibitively expensive when scaled down for an ultra-light design.

In order to provide for the greatest ease of maintenance and lowest initial cost, the Rotorway Scorpion helicopters drive-train design uses off-the-shelf components, avoiding specialized gearboxes that require advanced maintenance proceedures.

Even though significant savings are achieved, no loss of safety or reliability is incurred in the drive system. Six V belts transfer the power from the engine to a countershaft containing an overrunning clutch for autorotational or power-off operation.

The second stage of this two-stage engine-to-rotor reduction uses an industrial rated dual row chain in an oil bath. A high torque (due to the reduction) and lower speed situation is encountered in the second stage and a chain serves most capably in this function.

Rotorway Scorpion two seat helicopter airframe

Rotorway helicopter airframe of two seat Scorpion using the same drive layout design as the Scorpion single seat (beefed-up).

The higher speed, lower-torque first-stage reduction uses the belt concept which works ideally under these conditions. Homebuilt helicopter designers have experimented with a number of different tail-rotor drive configurations.

Due to the extended length of the tail boom on a single-rotor helicopter, there are a number of disadvantages in using a shaft drive on an ultra-light VTOL. This is especially true in the Scorpion, as a somewhat flexible tail boom is used to reduce cyclic and directional-control cross couple.

The Scorpion kit helicopter uses a multi-stage v-belt drive to the tail rotor. This design has a number of inherent safety features. Belts are not subject to torsional fatigue as is a long drive shaft. Tail-rotor drive gear box overheating is eliminated. The reduced maintenance requirements are obvious.

Since the normal helicopter tail rotor requires approximately ten percent of the engine’s power for operation (much less under cruise condition), the belt design is ideal for the Scorpion helicopter application.

The tail rotor which is necessary in a single-rotor system helicopter has long been a target of discussion among rotary wing designers. Since it is definitely a power-robbing system, many efforts have been made to eliminate it totally – see “NOTAR, tandem and coaxial” designs.

The function of the tail rotor in the helicopter is primarily to counteract the torque of the main rotor shaft. Therefore, if we eliminate the tail rotor other means must be provided for balancing or counteracting shaft torque.

The most common and successful means of doing this has been the use of two separate rotor systems in tandem. Unfortunately, not only do we add a tremendous amount of complexity to our drive train, but we double the number of blades used, in addition to another rotor hub.

At the same time, we encounter a complicated control-system design problem. Directional control becomes complex because of the close and opposed coordination required in the two rotor systems.

Another method of eliminating the tail rotor has been to place two rotor systems on the same shaft and rotate them oppositely – effectively cancelling out equally the torque of each blade against the other.

Here again, not only do we encounter an additional hub and blade system, but the cancellation of our stabilizing gyro which aids us tremendously in directional control when a rotor system operates singly.

In a hover, a counter-rotating or coaxial helicopter system can be easily tilted beyond its degree of controllability by the novice pilot, reducing pilot load and control management.

The use of the single main rotor and tail-rotor design of the Rotorway Scorpion helicopter was carefully premeditated and the simplicity of this entire craft has been greatly enhanced by adhering to this more conventional type of design.

The Scorpion helicopter tail rotor amounts to a very simplified mechanism. A straightforward design is used which consists of a thrust washer-retention system, and simple wrap-around aluminum-skin rotor-blade construction.

This tail rotor blades are teetered at 90-degrees, greatly reducing operating stress loads. Pitch control is achieved by a simple push-pull cable. Due to the power available in the class of powerplant used, the tail-rotor horsepower loss does not significantly affect Performance of this aircraft.

It can be readily seen that the addition of another complex rotor system would be foolhardy for the small amount of efficiency gained by eliminating the tail rotor design.

An aircraft, either fixed wing or rotary wing, should be designed in and of itself for whatever particular performance characteristics the designer requires.

2 seat Rotorway Scorpion two helicopter

LEFT: Replacing the heavy and dirty secondary chain drive with a cog belt is a popular customer modification.
RIGHT: Simple yet sleek fiberglass outer cabin improved the duck-bill design.

Unfortunately, since the time of the Wright brothers, few aircraft designers have found themselves in a position to pick and choose regarding the type of powerplant dictated by their design.

An aircraft, especially a VTOL, must be designed with an idea of powerplant availability in mind. Aircraft engines with a power-to-weight ratio of one horsepower per pound are not to be found in abundance.

The only category of powerplant which can meet this specification to date is the turbine, and turbines are certainly not for the average sport aviation enthusiast. A horsepower-to-weight ratio of one to one is almost a must for the ultra-light helicopter category.

Many commercial helicopter engine designs in the low-horsepower range are available which are capable of producing this kind of horsepower; unfortunately few of them can boast any reasonable lifetime when operated continuously at their maximum horsepower output.

For 20 years now, a formerly cranky unsophisticated putt-putt known as the outboard motor has been quietly developing its potential at producing usable horsepower at relatively low weight. Presently, the outboard motor is in truth the poor man’s gas turbine.

This category of engine is not only mass-produced to a high standard of excellence, but is capable of extended operation at firewall level. Outboard powerplants have gained in horsepower year after year to the point where their application in light aircraft and VTOL usage is ideal.

Initially we might question the use of water as a cooling medium. We must consider that in a helicopter in a hovering condition we require what amounts to a stationary powerplant.

No ram air is available from forward flight and the engine is working its hardest in this flight condition. In this stationary condition, we find that water is a more efficient cooling medium than air.

Less power loss is encountered for the simple reason that we may move a smaller amount of air at a slower rate over a heat exchanger to cool the engine than we would in an air-cooled version – (forced air cooled).

The Rotorway Scorpion helicopter uses an outboard powerplant for these reasons. Adaptability, packaging, and ease of maintenance are additional factors in favor of this choice of power.

The safety of any VTOL design may be judged by two basic factors — the amount of testing to which the dynamic components of the craft have been successfully subjected, and from a pilot-forgiveness standpoint, the autorotation or power-off operating characteristics of the rotorcraft.

Extremely high stress loads are encountered in rotor-blade, hub, and control systems, and also in the extremely high-torque, high-reduction power-transmission drive system.

Design-safety factors for these systems must be in excess of normal safety factors and exhaustive test studies utilizing strain gauges strategically placed must be conducted to determine lifetime reliability. It is just not enough to be content with dismissing the problem of safety with: “I think it will hold.”

Any helicopter must have built into its mechanism the capability of immediate and automatically declutching of the engine from the rotor system should power failure occur or should the pilot reduce engine rpm to an idle in flight.

Any true helicopter is capable of landing safely without power as long as sufficient altitude and/or forward speed is maintained. Autorotation landings may be difficult for the novice pilot to master if the helicopter descends too rapidly in autorotation.

The only way to provide for an easier autorotation landing is to lower the disc loading (rotor-disc area divided by weight of the ship) of the helicopter and slow its descent rate. In addition, a lower disc loading will allow a wider margin for final contro-correction movements just prior to landing.

The Rotorway Scorpion helicopter has a two-pounds per square foot disc loading as compared to the higher disc loadings of three to five pounds for larger commercial VTOL’s. This light disc loading not only makes the Scorpion more docile in autorotation, but measurably contributes to the pilot’s peace of mind in flight.

The helicopter has the dubious reputation of being a difficult machine to learn to fly. The difficulty is not so much in the pilot mastery of the controls as; it is in being able to come up with the hourly rental cost. Solo time in a helicopter can be just as minimal as solo time in a fixed-wing aircraft.

A helicopter requires a little different type of coordination for flying than a fixed-wing aircraft; however, it is no more difficult to learn and, once learned, the technique can be improved.

Just as a fixed-wing pilot can learn aerobatics, a helicopter pilot can improve his proficiency in ground-taxiing maneuvers and in-flight maneuvers as he gains more supervised experience.

Since the helicopter is capable of landing and taking off in a spot just large enough to swing its rotor blades, a pilot really gets a sense of third-dimension maneuverability. The birdlike ability to be able to set down in any spot gives a true sensation of the freedom of flight.

The helicopter is truly a sport flying machine because the fun of being able to make the ship an extension of one’s thought is both a challenging and rewarding experience. A pilot can practice and refine maneuvers of his own choosing, creating his own style as he progresses.

As the pilot’s responses become more adept, the ship will respond in a more agile manner. One need not be an experienced helicopter pilot to thoroughly enjoy flying a helicopter — questioning any helicopter pilot will bear this out.

Past Single-seat helicopter designs have been somewhat difficult to fly, and it was nearly impossible for the novice pilot to learn to fly them due to instability, partially because of their extremely light weight or design imbalances.

In the Rotorway Scorpion helicopter, however, many features have been added to make this ship control in the same manner and with the same degree of stability that is found in larger commercial designs.

These design features include the elimination of control couple between the foot pedals and cyclic control by means of a flexible ladder-type tail boom construction.

simple kit helicopter layout scorpion 1

LEFT: AIl mechanisms and components are tucked away inside the slim-line fuselage constructed of 4130 steel tubing.
RIGHT: Tail-rotor drive is by means of three V belts running from the secondary drive shaft via two idler pulleys to the tail rotor.

The incorporation of a teetering-type rotor which, even though the Scorpion’s gross weight is only 750 lbs. maximum, allows this ship to fly with much the same degree of stability as the larger see-saw-type hub commercial designs.

Complete separation of the collective and cyclic control mechanism also adds to the degree of stability in control. Placement of the tail rotor outside of the rotor-blade disc area is a great advantage in regard to directional stability.

Due to the large diameter of the tail rotor, it also has an extremely low disc loading in comparison to larger commercial designs and therefore is considerably less sensitive than would be expected. Use of a high inertia blade design provides additional pilot forgiveness, especially in autorotation.

At best, the freedom of flight in a helicopter is difficult to describe and can only be truly appreciated by experiencing this exhilarating sensation for yourself.

To build a personal helicopter with your own hands and then experience the excitement of flight in the craft is a rewarding experience which few other projects can compete with.

The Rotorway Scorpion helicopter design was conceived for the sole purpose of adaptability to sport flying. The continuing goal of Rotorway has been to find ways and means of putting together a program in which this design may be shared with all those who desire to participate.

Rotorway Scorpion 2 helicopter kit plans

First release Rotorway Scorpion two seat kit helicopter assembly plans.

The post The Birth Of Rotorway Scorpion Helicopters appeared first on Redback Aviation.

Rotorway Exec Helicopter Cooling Modifications

$
0
0
helicopter cooling fan

Rotorway Helicopter Engine Cooling Problems

The 145 and 152 Rotorway owners experienced a high temperature problem temperatures of water and oil 190 to 215 degrees. It is too close to disaster for a gasoline engine and robs you of a lot of power.

Rotorway has come up with a new modified reverse cooling system which I understand works quite well but somewhat pricey. Most of us have avoided it because of the price, so I set out to look for another solution.

One of the other reasons are the engine compartment builds a tremendous amount of heat and cannot escape. I’m sure that you and I build our ships to cosmetically look great and refuse to cut large enough venting holes in our cowlings. It really helps to cut them a little larger – you’ll be surprised!

My ship is a turbo charged 145 dual ignition and it creates more heat because of the water cooled turbo. I had a severe problem, oil 230 degrees, water at 220. I tried a lot of things; speeding up the fan to opening up more cold air vents, some help but not enough.

I finally, after a lot of research and investigating, found a fan, variable pitched, 12 blade, air foil styled blades that were composite and an aluminum hub made in England. The firm remanufactured the fan to fit my hub and trim to fit the radiator shroud.

The result now is water temperature is stable at 180, oil at 170, and in 20 minutes hover practice, water temperature did come up to 190 and oil 180. These temperatures are with a 165 degree thermostat installed. The blades were set at 30 degree pitch.

They still have 5 degrees more adjustment which I don’t think I will ever need. According to the manufacturer, this is considered a very efficient high temperature cooling fan. Similar fans can be found on the internet with a bit of searching.

private kit helicopter on boat

The post Rotorway Exec Helicopter Cooling Modifications appeared first on Redback Aviation.

Scorpion 2 Helicopter Is Born

$
0
0
scorpion 2 helicopter kit

Rotorway Evolves The Scorpion 2 Seat Helicopter

In 1972, the Scorpion II was introduced with an OMC 125 horsepower (Evinrude outboard), 2 cycle engine which provided the added power to fly two lightweight people in cool, low density altitude environments. But despite all the improvements to the Scorpion 2 helicopter, overhaul times on the major components were still not up to the desired levels.

homer bell scorpion two helicopter

In 1974, the company embarked on a major redesign of the helicopter once more with the end goal of reducing the amount of maintenance time required per every hour of flight. The first, and most important, item to be addressed was the elimination of the inefficient 2 cycle engine – originally used due to its light weight and availability.

The company realized that there would never be a way to sufficiently dampen the excessive vibration and low torque associated with this type of engine. The vibration was found to cause rapid wear in various parts and had a tendency to cause cracks in airframe and drive systems. Early two stroke engines were not specifically designed for aircraft use.

Unable to find an engine manufacturer to make their 4-cycle engine suitable for the Scorpion 2 helicopter, RotorWay set forth on an aspect of the company that is unique to this day – producing their own helicopter engine. A decision which proved to be the success of the company and sales of their product.

Called the RotorWay RW 133, this horizontally opposed 4 cycle, 4-stroke engine now had the added power and torque the company was looking for. The RW 133 helicopter kit had a cruise speed of 80 mph with a range of 120 miles and a useful load of 420 pounds. This was the beginning of a very successful product for Rotorway.

kit helicopter services homer bell

Later versions of the company’s four stroke engines, the RW 145 and RW 152, represented continuous improvements made by RotorWay. These predecessors of the RI 162F engine helped make today’s product possible.

Nearly everything on the Scorpion 2 helicopter engine (and most of the kit) was produced in-house. From the cast rockers to the crankshaft and rod forgings, the RotorWay brand stood for excellence.

With a two-place helicopter available. RotorWay was able to begin instructing customers on how to fly their aircraft. Done at Scorpion Sky Center in Tempe, Arizona, this new program would remain an invaluable customer service tool from that point on.

historical helicopter rotorway scorpion

IMAGES COURTESY: Homer Bell http://www.kitcopterconsult.com/

The post Scorpion 2 Helicopter Is Born appeared first on Redback Aviation.

The Early Days Of Canadian Home Rotors

$
0
0
Safari 400 kit helicopter
Building a safe, useful and reliable helicopter with Canadian Home Rotors Inc. is a rewarding experience

kit helicopter teeter rotor heads

At Canadian Home Rotors, we offer complete and courteous support to anyone interested in helicopters of every make. Skeptical? Ask our builders in your area.

Sign up for our FREE Newsletter which will keep you up-to-date on the happenings with Canadian Home Rotors and the helicopter market.

kit helicopter main rotor transmission

Our builders get an additional Canadian Home Rotors Newsletter to keep them informed with all aspects of safety, construction, maintenance and piloting. We care, making us the best choice.

Quality components are machined to the highest aircraft standards with pride given to the smallest detail. The BABY BELLE components have been perfected during 12 years of development at Canadian Home Rotors.

Excell kit helicopter prototype composite helicopter

We use a LYCOMING aircraft engine powering geared transmissions and driveshafts to give true dependability and low maintenance.

All machined parts are anodized or plated for complete corrosion protection. You can be assured that only high quality aircraft materials and hardware are used.

The Canadian Home Rotors BABY BELLE helicopter kit can accommodate most customer’s requirements.

Canadian Home Rotors Baby Belle Kit Helicoper

Canadian Home Rotors Baby Belle Helicopter Kit Features:
  • Clear Construction Prints

  • Detailed Manuals

  • Free Builders Newsletter

  • Lycoming Aircraft Engine

  • Dual Ignition Standard

  • Air Cooled Engine

  • All Gear Driven

  • Corrosion Protected

  • Aircraft Quality

  • Personal Body Designs Possible

  • Driveshaft Driven

  • Auto Clutch Engagement

  • Carb & Cabin Heat

  • Excellent Autorotation

  • Dual Controls are Standard

  • 4130 Chromemoly Tubing

  • Rugged Design

  • No Belts

  • No Chains

  • Stainless Steel Tailrotor Blades


COURTESY: EAA Sport Aviation – (Feature Image)

Homebuilt Safari Helicopter Today

black red safari helicopter

AUTHOR: Chris Davenport

EAA MEMBER: 883997

LOCATION: Danville, California

IN 2013, I came to Oshkosh with the goal of researching an “airplane” I could build myself. After wandering all the way down to the ultralight vendors, I came upon the aircraft of my dreams. To my surprise, it wasn’t an airplane at all. What I found was the Canadian Home Rotors Safari 400 helicopter. It had a nostalgic look that paid reverence to the old Bell 47, or as we all probably know it better, the M*A*S*H helicopter.

I spoke for probably too long to the owner of Safari Helicopter, Delane Baker, and she couldn’t have been more supportive and informative. I took the specification sheet, signed the interest list, and began to dream of hovering. I hadn’t flown a helicopter since 2009, when I was just weeks away from completing my add-on certificate in a Schweizer 300CBi.

I became distracted when I purchased a Cirrus, and once I was ready to get back to training, the school had closed. Now, when I started to do the math of building and flying my own helicopter and disregarded what I knew my airplane friends would say, this building option made a lot of sense to me.

I spent the next several months taking advantage of EAA resources such as builder videos online, books from its catalog, and even completed EAA sheet metal and electrical workshops and a MIG welding class.

All said and done, it took me almost 18 months to make the commitment to buy the kit, with my biggest fear being that I just spent a small fortune on a bunch of nuts, bolts, wire, and metal that would never form the shape of an aircraft.

Once I placed the order, I had several months before the kits first stage arrived, so I spent time researching a home workshop setup, from the floor material to the various tool and equipment stations. There is so much good advice out there, and I always felt I had resources to calm my insecurities.

Speaking of insecurities, if I’m being honest, the excitement I had on delivery day quickly turned into the sickening feeling I had made a horrible mistake.

I’d never seen so many bags of parts and blank sheets of material. All I could think was, “What have I done?” Luckily, that feeling was only temporary, and soon I decided to view this not as “one” helicopter project, but as 300 small, manageable projects.

I was going to eat this elephant one bite at a time! I set up a builder blog on KitLog Pro and spent the next year and a half documenting every cardboard template made, every nut plate installed, and every electrical circuit ran.

I was amazed when other Canadian Home Rotors builders began e-mailing me with questions and advice. Someone was actually reading these late-night ramblings and small victory reports? It was hard to imagine. Something completely unexpected in the process was meeting someone who turned out to be my best friend. We met in an EAA electrical workshop at AirVenture 2015.

Each student was asked to introduce themselves and state what they were building. What followed was, “RV-6, RV-8, RV-6, RV-10, RV-8,” etc. I was the only odd one in the class building a helicopter, but then there was this grumpy guy from Pennsylvania two tables away also building a Safari.

I cornered him on a break, we hit it off immediately and ended up hanging out together for the rest of the show, and we have talked pretty much every day since! I’ve flown to Pennsylvania to see him and his family on holidays, and he’s flown to California a few times to help me buck some rivets and install the final components that required two people.

Tom completed his Canadian Home Rotors helicopter in time for AirVenture 2016 and won Grand Champion! This year, I drove my helicopter on a trailer from California to Oshkosh where I flew with Tom at the same field where I found this ship years before, and I won Grand Champion for 2017.

Tom and I agreed that I had no choice but to win because if I didn’t, he would never have let me hear the end of it! It’s difficult to summarize the personal significance of my building experience, but what I can say is that it’s been one of the most rewarding challenges of my life.

The sense of accomplishment is tremendous, and winning a Lindy along with the recognition from other homebuilders is more than I could’ve ever hoped for. All I can suggest to those thinking of starting an aircraft project is to simply take the first step and then just take it one day at a time. In this community, you’re never alone.


Tomorrow’s Safari Helicopters Proudly Made In The USA!

Your new Canadian Home Rotors Safari Helicopter will be powered by a proven aircraft engine, with paint and interior colors you choose. Enjoy the benefits of flying with an engine governor, electric cyclic trim, and collective friction lock. Design a custom instrument panel and make the helicopter your very own. Call us today to begin making your dreams a reality.

More Flight Testing of the Safari 500!

Cooling worked out, air conditioning underway, controls tweaked and she’s back in the air. The 500 is performing beyond our expectations.Its a long video, but we couldn’t bring ourselves to cut anything out.


Read more about Canadian Home Rotors here.


The post The Early Days Of Canadian Home Rotors appeared first on Redback Aviation.

Helicycle Compound Kit Helicopter

$
0
0
BJ Schramm compound helicopter kits

BJ Schramm Single Seat Compound Helicopter

Turning and Learning… Rotorcraft Design, According to B.J. Schramm

Few people have the potential to turn the sport rotorcraft world upside down as does the inimitable B.J. Schramm. Long lauded as one of sport aviation’s most talented sport rotorcraft designers (he was responsible for the design of the original Rotorway Scorpion and the Exec) his Helicycle compound kit helicopter is nothing short of spectacular.

Schramm is a soft-spoken engineer of immense talent and great vision… especially now that he is targeting the topsy-turvy single-place helicopter kit market with a craft that promises more performance for half the money of the competition… and far more features to boot.

Helicycle Rotax 618 helicopter engine

Schramm’s efforts are pretty extraordinary when you consider the scope of his Helicycle compound kit helicopter plans. He is endeavoring to produce a truly usable helicopter that offers a minimum of 1500-hour service lives on all critical and/or life-limited components, and true cross-country utility. Yes, this is a pleasure craft, but B.J. wants to make sure that it is no toy.

His latest dream machine can be built and/or flown in two versions. The basic Helicycle compound kit helicopter is a Rotax 618 powered single-seater of 395 lbs. With 277 lbs of load-lifting capability, the Helicycle’s 12-gal fuel capacity has a range of 160 miles (with reserve), a cruise of 90 mph, and a climb rate of 900 fpm.

Its max airspeed is some 105 mph and it has an impressive HIGE (Hover/In Ground Effect) capability of 6500′ and a service ceiling of 9000′. The basic ship is expected to have an entry level price of under $18,000… half that of most of its competition.

But… that ain’t all. The Helicycle helicopter is no ordinary mix-master, no sir. BJ. has engineered the Helicycle helicopter for conversion to a compound mode that turns this bird into something “completely different.” The compound mode calls for the attachment of two stub wings to either side of the helicopter just aft of the cabin section.

The left stub wing has a 45-hp Zenoah engine attached. Additionally, the Rotax 618 can also be turbocharged for compound operations, which boosts total available hp from the Rotax to 70 (mind you, the turbo system is not used on this craft just to boost power, but to provide greater power at higher altitudes).

Helicycle kit helicopter two stroke engine

The compound configured Helicycle compound kit helicopter has a top speed of 135 mph, a cruise of 120 mph, and a range (on 20 gal) of 240 miles (with reserve). The fully configured Helicycle weighs 500 lbs. has a gross weight of 820 lbs, and has a hypoxic service ceiling of 13.000′ (HIGE is an impressive 10,000′).

The combination of both engines produces a significant performance increase… especially as the little Zenoah offers a 30-mph speed boost over the single-place version.

The engine is mounted on the left side to counteract the side thrust by the tail rotor, so there is no need for similar power on the other side. More than simple performance increases, however, the compound version also boasts the unparalleled safety of ample system redundancy and mission reliability.

The amazing thing about the Helicycle compound kit helicopter is that the compound mode offers the ability to continue flight should either engine fail! if the stub-mounted Zenoah fails, the helicopter acts as a simple helicopter, with only the slight drag penalty of the additional engine and stub wings attached.

However, if the Rotax fails, the Zenoah can be used to power the aircraft (with pilot adjustments to collective pitch) in a gyroplane style mode… where the blades would be, in effect, in autorotation, but the stub-wing engine would be playing pusher.

In this mode, the Zenoah apparently can fly the Helicycle compound kit helicopter at speeds similar to those offered by the sole Rotax. Very cool, eh? Among a number of other prime considerations for the Helicycle is its ease of operation.

First and foremost, the aircraft must have good handling and performance capabilities through the asymmetrical low-drag rotor system during total power-out autorotation incidents. B.J. is designing a fair amount of mass inertia into the entire rotor system in order to offer pilots reasonable safety margins in the reaction times needed to avert problems.

The Helicycle helicopter blades will have small tip weights to help with that, but the entire blade will be very stiff and of sufficient mass to avoid Whirl Mode Instabilities associated with blades relying too heavily on tip weighting to provide for greater relative mass inertias.

Further, maximum safety margins are being incorporated into the structural integrity of the cabin under high-impact scenarios, should someone still wind up screwing the aircraft into the ground. The cabin has a “crush sequence” designed to let the fuselage structure take the brunt of the damage before transferring impact loads to the cabin.

The Helicycle helicopter rear landing gear tube is attached to the frame in a pivoting configuration which allows it to straighten out under extreme load and absorb a fair amount of impact energy. Following that, the lower airframe tubes, just behind and below the pilot, crush upwards but away from the pilot.

Helicycle n37250

A 2″ layer of aluminum honeycomb resides in the seat well, which will take a fair amount of the load (and transfer it away from the pilot’s spine), in addition to a temper foam seat pad that can also isolate residual energy.

Finally, B.J. tells me there is some 20″ of airframe structure that will deflect impact energies away from the Helicycle compound kit helicopter cabin area. This is going to be one tough baby…

It will be at least a year before B.J. finishes prototype development and freezes the design in order to start production… but his plans for production are pretty specific and fairly solid after the popular reception he received at Oshkosh.

1995

His goals are clear: higher component reliability than any other sport rotorcraft currently in production, a great deal of system redundancy, and true versatility brought about through performance and cost-effectiveness.

Everything I’ve seen so far of this aircraft is impressive as all get-out, and some of the thought given to various design criteria exceeds any other aircraft ever offered to the kit builder.

If all goes well, hundreds of these things will be flying within a couple of years, and we expect to be one of the first to try it out. Yes, we do plan to fly the Helicycle compound kit helicopter prototype… but not until a second bird is flying. In all things B.J. takes a conservative bent… and we’ll all surely benefit from that. FMI: Eagle Research and Development.

1997

The post Helicycle Compound Kit Helicopter appeared first on Redback Aviation.

Kit Copter Rotorway Helicopter Resurrection

$
0
0
Rotorway exec 162f kit helicopter

From the Valley of the Sun comes a hot copter kit

RotorWay Aircraft is out of business, closed up for good. However, the Rotorway helicopter kit it manufactured, the Exec, lives on—but not in its original state. Confused? I’ll explain.

In 1990, several banks were foreclosing on RotorWay Aircraft. At that time, John Netherwood, an English businessman who had previously built an Exec, sensed an opportunity. From his Exec-building experience he knew the product well; and with many enhancements in mind, he purchased the failed company’s assets.

Netherwdod reopened the company as RotorWay International, rehired 12 key employees, and introduced many improvements to the Exec model, called the Exec 90, included upgrades such as dual electronic ignition, taller stress-absorbing landing gear, an improved bonding and riveting pattern on the main rotor blades, wider cabin, and dual tachometers, to name a few.

Then, at a cost of $1.5 million, Netherwood built a brand new 37,000-square-foot facility at the Stellar Air Park in Chandler, Arizona, just outside Phoenix. But he didn’t stop there. He went back to the drawing board and added a Fadec (Fully Automated Digital Engine Control) to the Exec 90’s powerplant (see “Gaining Authority,” story below).

Netherwood then added more cabin space, redesigned the seats for better comfort, and increased the size of the door openings. Also, a new horizontal fin was added to give the helicopter additional in-flight stability. This newest model Rotorway helicopter is called the Exec 162F, and I was in town to take it for a test flight.

rotorway helicopter factory assembly line

After I arrived at RotorWay International’s new factory, I was introduced to Elbert Wolter, RotorWay’s director of flight operations and an FAA designated examiner. In a friendly Texas drawl, he said, “Don’t worry about my name; just call me Stretch.” We spent some time going over the helicopter’s flight manual and then walked outside to do some flying.

We began a standard preflight, carefully checking the main rotor and tail rotor blades. Unique to the 162F is a movable ballast weight. To carry a passenger, the 162F uses a 25-pound cylindrical weight that slides on a rod where the tail boom connects to the fuselage . For solo flight, the weight must be repositioned to the toe of the right skid.

A spring-loaded locking pin keeps the weight in place. This is another major improvement, because the original Exec required relocating the battery to carry a passenger. Since the 162F has a small center of gravity range, it’s very important to have the weight in the appropriate location.

Case in point: In December 1993, an instructor, without repositioning the ballast, boarded the helicopter after supervising his student doing solo hovering maneuvers. As the helicopter lifted off with both occupants, the center of gravity was so far forward that the nose pitched down, the main rotor blades struck the ground, and the helicopter rolled over.

Rotorway 162 helicopter kit components

Contrasting the 162F’s sophisticated engine control system is a simple drivetrain of belts and chains.

So after double-checking the ballast weight—I climbed into the cockpit. The flight controls were within easy reach. (The nice thing about building a kit is that you can adjust the controls’ height and length for a custom fit.) After performing the standard checks and arming the engine’s Fadec system, I hit the starter switch and the liquid-cooled, 150-horsepower engine sprang to life.

While the helicopter was warming up, Wolter explained that when lifting off into a hover, I would notice that the 162F is more stable than most light helicopters. I must admit that from having flown man y type s of helicopters, and because of the 162F’s size and weight, I was skeptical.

However, as I raised the helicopter off the ground, it hovered as promised. Wolter and I spent an hour hovering around the Stellar Air Park. I did hovering turns, sideways flight, and pick-ups and set-downs. The 162F was predictable and easy to handle.

An interesting exercise was shutting off the primary Fadec system in a hover. Instrument panel warning lights immediately illuminated, and the Rotorway helicopter engine automatically switched over to a completely independent secondary system without power interruption.

If this happens, RotorWay International recommends landing as soon as practical. By then our fuel was getting low, so we headed back in for a break. My next flight was with John O’Neil, a company instructor pilot.

With O’Neil, me, and full fuel (17 gallons), the helicopter was at its maximum gross weight of 1,500 pounds. In a hove I noticed a power setting of 26 inches of manifold pressure. That same power setting while taking off at 65 mph resulted in a 750-feet-per-minute climb rate.

Rotorway helicopter test flight

On our way to a closed airport to try a few autorotations, I performed some steep turns and high-speed flight to get a feel for vibration levels. Indeed, at the 162F’s published maximum speed of 115 miles per hour, it felt as smooth as a production helicopter.

Arriving at the practice site, I performed a couple of normal and steep approaches to get a good control feel before going on to autorotations. Turning from base to final, O’Neil rolled off the throttle and I lowered the collective control to enter autorotation.

I slowed to the recommended airspeed of 65 mph and we stabilized at a descent rate of 1,600 fpm. No surprises as we glided towards the landing area. At the recommended 35 feet, I started a flare to reduce airspeed and descent rate.

I began bringing the power back in and stopped the helicopter in a hover five feet over the runway. I did some more autos and found the 162F to be stable and consistent. Anyone proficient at autorotation in the Robinson R22 will have no problems with this helicopter.

Since the engine has less cubic-inch displacement than the 150-hp Lycoming engine on the Robinson (162 vs 320 cubic inches), and consequently less torque, I thought the 162F might have a problem maintaining rotor rpm under a high power demand. So, on the way back to the factory I brought the helicopter to an out-of-ground-effect hover at 1,000 feet.

The engine and rotor rpm held steady at the top end of the green arc. The Rotorway helicopter 162F uses an asymmetrical main rotor blade that is more efficient than a symmetrical airfoil. This type of blade is subject to higher stresses and twisting forces. Therefore, it is normally not used in helicopter blade design

Rotorway-162-helicopter-review

The Rotorway Exec 162F’s elegant look belies its fast build time and simple systems.
Annunciators alert the pilot to a failure of the Fadec engine control system. Kit components are assembled in Rotorway’s new factory in Chandler, Arizona.

RotorWay had an independent laboratory run fatigue tests in order to determine the expected life of the blades, which are made of aluminum skin bonded and riveted to an aluminum spar. The report showed the blades would last 4,000 hours. Thus, to be conservative, RotorWay lists the replacement time at 1,000 hours.

The engine transmits power to the rotor system through a chain drive instead of the traditional gearbox. The sprockets and chain operate in an oil bath and provide a reduction in revolutions per minute. RotorWay feels that for the average builder this system is advantageous, in that it is simple to monitor and maintain.

According to Netherwood, the system has proved reliable. The chain’s life is limited to 100 hours. The system also provides a pulley that, through a series of three belts, drives the tail rotor. An adjustment at the rear of the tail boom controls the tension on all three belts.

In 1992 there was a tail rotor belt failure because an incorrect adjustment caused a loose belt to roll over in the pulley sleeve.

RotorWay then constructed a test platform to check continually for belt wear and longevity. As a result, the original belts were replaced with aramid fiber cord belts with twice the strength and minimal stretch.

The company claims the new belts will survive a rollover long enough to last between refuelings. The 162F’s cyclic control uses a dual cable system. This design eliminates any slack, allowing instant control inputs to the rotor system.

The cables are easy for the builder to route through the airframe and provide redundancy for safety. The collective control works mechanically through a series of push rods and bellcranks.

The company has made a commitment to constantly improve the safety and performance of its helicopter.

Considering the lack of control the company has over the building process and the experience level of many of the pilots, this is not an easy task. To get a better understanding of the safety record, I ordered the National Transportation Safety Board’s accident reports for the last 10 years.

Not surprisingly, out of the 47 total Rotorway helicopter accidents reported (this includes the Exec model manufactured by the previous owner), the majority — 68 percent – were blamed on pilot error. An interesting fact is that 35 percent of these were committed by pilots who were illegally piloting the helicopter without a rating or a sign-off.

The remaining 32 percent were attributed to some type of mechanical or engine failure. Her e is where it gets sticky. From the reports it is difficult to tell whether the mechanical problem cam e from the factory or the builder.

The only accident that lists the manufacturer as the culprit involved an engine failure in February 1993. A factory-owned research-and-development helicopter had a valve-stem fatigue failure from improper grinding by an outside vendor.

The pilot performed an autorotation (no injuries) and RotorWay immediately instituted stricter quality control. This accident is one of only eight involving helicopters built by the “new” RotorWay International Company. The remaining seven were all attributed to pilot error, and the majority of them were training related.

rotorway kit helicopter cabin

The trend shows that the improvements Netherwood is making are paying off in terms of mechanical reliability. RotorWay lists the kit price as $59,850, not including paint, avionics, and freight. When all is said and done, the price tag will easily go well over $60,000.

This is about the same price that the Aircraft Bluebook-Price Digest lists for a clean, mid-time Robinson R22 Alpha. But, unlike the situation with the certified aircraft, the builder can do all inspections and repairs on the 162F. There is tremendous pride in building your own helicopter.

Because the Rotorway helicopter is an experimental aircraft, the builder has the authority to modify and customize the helicopter. This is evident as you walk the halls of RotorWay, because every wall has picture after picture of proud owners and their machines. I heard that one builder was looking into adding retractable landing gear.

RotorWay International has streamlined the building process by incorporating many prefabricated components and doing all the welding on the kits. It has put together a comprehensive construction manual with sharp photographs and clear, easy-to-read text. The company claims the 162F’s average build time of 300 hours is one of the lowest in the kit industry.

hovering rotorway exec helicopter

The new facility houses a training department for teaching builders to fly and maintain their helicopters. The three-part course costs $3,500. Netherwood knows that most builders are newcomers to aviation, so getting aircraft-specific training is the key to having an excellent safety record.

He has devoted considerable effort to developing a comprehensive orientation program for the 162F, and he even asks builders who are experienced helicopter pilots to attend. RotorWay International’s latest move to make its helicopters more affordable is offering financing for up to 90 percent of the purchase price and terms as long as 20 years.

So now your Rotorway helicopter can not only sit in the garage with the car, but it can have a monthly payment as well.

Tim McAdams, AOPA 925518, a helicopter CFI who accumulated more than 5,000 hours, of which 4,700 are in helicopters.


GAINING AUTHORITY

factory rotorway 162 kit helicopter test flight

Jumping the chasm to the modern aircraft engine

Rotorway International is unique among kit manufacturers in that it doesn’t use an off-the-shelf powerplant. Back in the company’s early days, founder B.J. Schramm decided that none of the existing engines would be ideal for his new helicopter. After perusing several designs, he settled on the long-running Volkswagen flat four.

From that seed he began modifying the engine for aircraft use, eventually replacing most major components. Today, only the basic architecture of the venerable VW engine remains.

Unlike the VW, the Rotorway helicopter engine is liquid cooled and carries a forged crankshaft within its cast-aluminum cases. More important than the 162-cubic-inch engine’s mechanical evolution are the recent electronic advances.

Rotorway calls its system a fully automated digital engine control system (Fadec) — not to be confused with the turbine world’s full authority digital engine controls. For the new Exec 162F, the engine gains a new induction system with long tuned intake runners for good low-end power—it replaces the Exec 90’s two-throat Weber carburetor and coolant-heated plenum chamber.

As before, the 150-horsepower engine uses a dual spark plug ignition setup on the lost-spark scheme; that is, each spark plug fires once each piston stroke. For one of those strokes, only exhaust gases remain in the combustion chamber, so no explosion occurs. This arrangement allows the Rotorway helicopter to use half as many ignition coils and a far simpler set of electronics.

RI162f rotorway helicopter engine

For brains, a computer the size of a dictionary controls the timing of the four main solenoid fuel injectors and manages the electronic ignition system. Rotorway uses what’s called an open-loop arrangement, in that there are no direct measurements of engine performance fed back to the computer.

Instead, the processor samples a number of parameters — coolant and outside-air temperature; manifold; barometric; and fuel pressure; crankshaft and throttle position; and electrical system voltage.

It compares these readings to a performance map burned into a nonvolatile memory. For every combination of variables, the computer determines the ideal amount of fuel to be injected, as well as the spark timing.

While such a system is revolutionary in aircraft, it’s commonplace in modem automobiles and has proven to be extremely reliable. And yet Rotorway has saved for the rainy day. The main system is supposed to work with a number of the sensors inoperative and down to 10 volts.

If the voltage drops to 10 — or some other anomaly pops up—annunciators in the cockpit warn the pilot. If, for example, bus power drops below 9 volts, the main computer will shut down to preserve its circuitry. It can also be taken out of the loop manually. So there’s a backup. In a separate module is a smaller, less-sophisticated computer.

Rotorway exec 162f instrument pod

It monitors engine rpm and throttle position—through a separate throttle-position sensor piggybacked to the main computer’s — and makes an educated guess at the fuel and spark requirements. Rotorway has designed the system to operate between sea level and 3,000 feet; above that, the mixture will become too rich for full power.

To deliver fuel, the backup computer fires a pair of injectors located below the throttle body in the intake plenum; it doesn’t rely upon the main injectors located just upstream of the intake ports. In addition, the spark timing on the auxiliary system is fixed, rather than variable as it is on the main computer.

The engine will continue to run quite well on the backup system, albeit within a narrower range of atmospheric conditions. In the event of a main system shutdown due to low voltage, though, it behooves the pilot to ascertain the cause quickly. Should the system drop to 8 volts or less, ignition ceases and the little four-banger will go silent.

Fortunately, the Rotorway helicopter gives the pilot plenty of warnings – bright red lights on the panel — before the autorotation fun begins. If Rotorway’s Fadec proves to be as reliable as the integrated automotive engine computers, a duff alternator will probably be the only cause of a computer shutdown.

Marc E. Cook


Rotorway Exec 162F Kit Helicopter

helicopter kit parts exec

RotorWay International Exec 162F Specifications
Powerplant RI162F
Horsepower 150hp
Recommended TBO 1,000hrs
Main rotor diameter 25ft
Tail rotor diameter 4ft
Recommended rotor blade TBO 1,000hrs
Length 22ft
Height 8ft
Skid width 5ft 3inches
Seats 2
Empty weight 975lbs
Gross weight 1,500lbs
Useful load 525lbs
Fuel capacity, std 17Gal/102lbs
Rotorway Helicopter Performance
Service ceiling 10,000ft
Hover in ground effect 7,000ft
Hover out of ground effect 5,000ft
Limiting and Recommended Airspeeds
Normal cruise speed 95mph
Rate of Climb 1,000fpm
Fuel burn 8.5 gal/hr
Maximum airspeed 115 mph
Range 180 miles
Endurance 2 hours
Kit price: $59,850 (1995 price)
Reprinted from the August 1995 issue of AOPA Pilot – Copyright © 1995 AIRCRAFT OWNERS & PILOTS ASSOCIATION.

Read more about Rotorway’s early days here.

The post Kit Copter Rotorway Helicopter Resurrection appeared first on Redback Aviation.


The Mosquito Ultralight Helicopter

$
0
0
Ultralight mosquito air helicopter

Ultimate Ultralight Kit Built Helicopter

THE ULTIMATE FREEDOM MACHINE!

From: Innovator Technologies (2002)

It’s the Ultimate Ultralight!

Ultralights have a maximum speed set by law, so why have a minimum speed? Why not be able to hover and take off from your own back yard! With the Mosquito Ultralight Helicopter you can do it all!

single seat kit helicopter design

Mosquito Ultralight Helicopter Specifications
Dimensions
Overall 20 ft
Height 83 in
Length
Frame 16 ft
Overall 83 in
Width 68 in
Rotor Diameter
Main 18 ft
Tail 40 in
Weight
Empty Weight 254 lbs *
Gross Weight 550 lbs
Useful (Pilot) Weight 270 lbs
Power
Engine Hirth 2706 2C, 2 cylinder, 2 stroke
Rating 65 HP (49 k W)
Performance
Max Speed 63 MPH *
Cruise Speed 63 MPH
Main Rotor Speed 500 RPM
Tail Rotor Speed 2600 RPM
Fuel Capacity 5 US Gallons *
*(as required by FAA Part 103, Ultralight Regulations)

Kit Helicopter General Description

Mosquito Ultralight Helicopter Materials

The frame is constructed almost entirely from 6061-T6 aircraft structural aluminum. This provides the high strength to weight ratio and reliability required in an ultralight helicopter. All solid shafts in the drive system including the tail rotor shaft are high strength heat treated 4041 steel.

Drive tubing is 4130 steel and the main rotor shaft is 4130 heat treated steel. The tail rotor drive shaft is 6061-T6 tubing. The main rotor and tail rotor blades are made entirely from 6061-T6 aluminum.

Mosquito Ultralight Helicopter Controls

The Mosquito is equipped with all the controls of a conventional helicopter including collective, cyclic and foot pedal controls. The joystick is floor mounted. Main rotor controls are located within the main mast and travel up through the rotor shaft which gives the helicopter it’s clean appearance.

An inspection window is provided for preflight inspection of the swash plate. The collective is equipped with a throttle correlator to reduce the throttle control required by the pilot. The tail rotor is controlled through a push-pull cable from the foot pedals.

Mosquito Ultralight Helicopter Drive System

The drive system begins with the high powered Hirth 2706-2C two stroke engine, one of the highest power to weight ratio engines available today. The 65 HP produced by this engine provides more than adequate power for the 550 lb gross weight of the Mosquito leaving a significant amount of reserve power when required.

The primary reduction consists of a centrifugal clutch mounted directly on the engine for ease of starting and for idling without rotor movement. A cog belt transmits power to the reduction pulley. The reduction pulley contains the sprague clutch necessary for autorotation.

A floating drive shaft mounted on flexible couplings transmits power to the input of the splitter gear box. The gear box sends power to the tail rotor through the tail rotor drive shaft contained within the tail boom. A second floating drive shaft transmits power from the splitter gear box to the secondary reduction.

Two parallel high technology kevlar cog belts transmit power to the rotor shaft pulley. The driving cog belt pulley is mounted on heavy duty dual row ball bearings while the rotor shaft itself is mounted on extremely heavy duty tapered roller bearings.

Mosquito Ultralight Helicopter Rotor System

The main rotor system is of the semi-rigid configuration. The rotor head is constructed of 6061-T6 aluminum and the blade grips are composite. Composite grips have infinite life and are more flexible than the blades. This adds significant life and reliability to the rotor system.

The main rotor blades consist of aluminum sheet formed around an extruded aluminum spar and flush riveted at the spar and trailing edge. The tail rotor blades are also aluminum sheet formed around aluminum tubing.

Mosquito Ultralight Helicopter Instrumentation

Instrumentation provided with the Mosquito consists of a digital rotor tachometer which doubles as a rotor hour meter when not in use. Below this is a digital engine tachometer which also doubles as an engine hour meter when not in use. Next is a cylinder head temperature and exhaust gas temperature gauge. The final gauge is an air speed indicator.

Aluminum DIY helicopter Mosquito

Buyer Questions:

QUESTION: Do I have to have a license to fly the Mosquito?

ANSWER: The Mosquito is designed to be a US regulation ultralight and so no license is required to fly the Mosquito in the United States. Proper training however is absolutely essential prior to flying any aircraft. A pilot should have a student pilots license as a minimum. Other countries have different regulations for light helicopters. Consult your local aviation authorities.

QUESTION: Do I have to have a certificate of airworthiness to fly the Mosquito?

ANSWER: The Mosquito prototype has received an airworthiness certificate in Canada, however as a US ultralight no certificate is required in the US. Builders in other countries should consult their local aviation authorities.

QUESTION: Is the Mosquito a fixed pitch helicopter that can not autorotate like some other helicopters available now?

ANSWER: No! The Mosquito is a fully conventional helicopter in every way except that it is very small and light. It is capable of autorotation like any commercial helicopter.

QUESTION: What form does the Mosquito come in?

ANSWER: The Mosquito is provided in kit form. All materials are provided including the blades and the instruments. The engine is provided separately and is shipped directly from the distribution center.

QUESTION: What is required to construct the Mosquito?

ANSWER: The builder will be supplied with all the necessary materials to fabricate and assemble the frame and some of the simple control components. While the frame is being constructed all of the machined components and sub assemblies for the drive, rotor, and control systems will be shipped to you for assembly on to the frame.

QUESTION: Is there any construction assistance?

ANSWER: A comprehensive step by step construction manual is provided complete with assembly photos. There are 32 parts and assembly drawings provided along with 6 exploded view drawings to assist in assembly. Builder questions are welcome and can be sent either through email or by phone.

QUESTION: How long will it take?

ANSWER: Approximately 200 hours depending on skill level.

QUESTION: Is there any welding required?

ANSWER: The only welding required is on the exhaust system. No structural welding is required.

QUESTION: Is there any machining required?

ANSWER: No. All work is done using standard shop tools such as a drill, powered saws, vice, small press etc. All machined parts are provided.

QUESTION: Is there a video available?

ANSWER: While this information was from an early brochure, there is a massive online following of the Mosquito Helicopter brand through web sites, forums and social media. Search YouTube for endless information on Innovator Technologies and their range of kit helicopters.

Early mosquito kit helicopter

INNOVATOR TECHNOLOGIES

Web site: http://www.innovatortech.ca/

The post The Mosquito Ultralight Helicopter appeared first on Redback Aviation.

Rotorway Helicopters

$
0
0
Rotorway helicopter display airshow

Rotorway Kit Helicopter Range


DISCOVER EXCITEMENT!

A BRAND NEW WORLD AWAITS YOU…

From the moment you place the order for your RotorWay “EXEC” till the time you find yourself aloft on your first cross-country. Just ask any Exec builder/pilot and the next couple hours of animated discussion will completely convince you. The conversation will probably go something like this…

“When I first got the urge to build my own helicopter, my wife got this funny look on her face, and the first time my friends saw the airframe in our garage, their comments weren’t too positive. I didn’t let it bother me however, I just kept working”.

early rotorway exec 90 helicopter

In three months of part-time effort I had the controls installed and the tailboom ready to mount. Another month finished the pre-formed cabin enclosure. To make a long story short, I was ready to attend the RotorWay Phase I hover training school in less than a year from the time I began construction.

By then, instead of skeptics, I had all these people who kept asking me for a ride! I guess the fact that the boxes of parts turned into a helicopter so quickly was what made my friends a little envious. The satisfaction of completing my ship didn’t begin to compare to the thrill of learning to fly it.

Getting my solo endorsement at RotorWay and hovering my ship for the first time was my greatest feeling of accomplishment! The first power-off autorotation in a RotorWay ship with my instructor really got my attention, but it didn’t get my adrenaline pumping like the first time I tried it myself.

I’ve been flying for a year now and I’m really beginning to get the feel of the machine. Flying over and landing at a friends’ farm and some longer cross-country flights to weekend fly-ins are my next goals Would I do it over again?

Are you kidding… you’ve got three guesses, and the first two don’t count Dale Krog, pictured above flying his Exec, out to Castle Rock near Moab, Utah, is typical of the RotorWay Exec success stories. You’ll hear more about his adventures; meanwhile, why not discover some real excitement of your own!


VIDEO: Scorpion II – 152 complete restoration

A beautiful example of the first two seat helicopter kit range from Rotorway. A have a fond admiration for the Scorpion 2 kit helicopter and it’s strange but appealing duck-bill nose.


VIDEO: Rotorway Exec N111ZP

The newer version of the Rotorway two seat kit helicopter. This time with a much improved cabin and tail adding to improved airspeed and a sportier look.


FULL LOTUS HELICOPTER FLOATS FOR ROTORWAY EXECUTIVE

Rotorway Exec helicopter with floats

Full Lotus Manufacturing Inc., designers of inflatable floats for light fixed wing aircraft, have developed a unique new float system for the Rotorway Executive, a popular kitbuilt helicopter. Full Lotus designed the floats in response to the numerous requests from Rotorway Exec owners who wanted to equip their helicopters with floats.

The Rotorway Exec required a float with minimum aerodynamic drag and a low profile. To accomplish this, Full Lotus used a lengthy taper at the rear of the float and kept the diameter to a minimum. Full Lotus devised a very creative solution to achieve a low ship profile — they “buried” the standard Rotorway skids right in the float.

The skids are accessed through a zipper that runs the length of the float, allowing the float to be opened up like a giant hot dog bun. The resultant low profile of the float combined with over 200% flotation (1350 pounds buoyancy per float) makes the Rotorway Exec very stable on the water.

An important factor in aircraft safety is redundancy. In line with the configuration of traditional floats, Full Lotus designed the Rotorway Exec float with five separate compartments for extra security.

Full Lotus reports that extensive flight testing including autorotations has documented the floats to be very safe and predictable. They are also efficient, with cruise performance being only minimally affected.

Net total weight of the floats, including mounting hardware, is only 24 lbs. The floats are shipped complete with all mounting hardware, ballast pouch and paddles for U.S., $2795 factory direct (1998 prices).

Oshkosh 1994 – Rotorway Releases The New RW 162F

Rotorcraft—and especially helicopters—were out in force this year. Editor Dave Martin flew with RotorWay International’s chief pilot, Stretch Wolter, who demonstrated the company’s new model, the RW 162F.

Resembling an Exec 90, the new model incorporates significant improvements including a power monitoring/engine control system named FADEC that correlates (governs) the fuel-injected, altitude-compensated engine while keeping track of important data such as operation of both electronic ignition systems and the electrical supply.

Yellow and red lights warn of impending problems, and the system reverts to manual control if electrical power is lost.

Other new features include a completely new cockpit interior that provides more room for the pilot and passenger, larger doors and a sporty horizontal/vertical tail that improves yaw stability, especially at high altitude and in turbulence, according to General Manager Dale Krog.


France Approved the RotorWay Exec 162F

France approves Rotorway Exec 162F helicopter

FRANCE HAS officially approved the Exec 162F to fly. This milestone marks the first kit helicopter to be so approved in the country and is the culmination of a two-year process. It opens a marketplace that has shown tremendous interest in the kit helicopter manufactured by RotorWay International.

RotorWay representative Heli Diffusion France was largely responsible for this success. Its owner, Yves, Pearcy, said “I am certain that sales for this proven kit will soon follow. Many customers have been waiting for this development before going ahead with the purchase.”

Having been granted the CNSK-2, the permit to fly allows the owner to fly in France like any other helicopter with the exception of flying for compensation. However, instruction is allowed. The actual eligibility number is CNSK – 2E – 0001.


Rotorway 162 F Helicopter advertising

The post Rotorway Helicopters appeared first on Redback Aviation.

Rotorway Exec Helicopter Build Part 5

$
0
0
Rotorway exec helicopter build part 5

Building The Rotorway Kit Helicopter

Our construction series continues with the bare bones of RotorWay’s newest Exec helicopter homemade whirlybird

ARTICLE DATE: December 1985

Christmas isn’t too far down the road now, and visions of hover training are beginning to dance in our erstwhile builder Ray Sebastian’s head. In our series so far, we’ve taken close looks at the tailboom assembly, and tail rotor construction and installation. Best we not neglect the bones of the enterprise any longer.

RotorWay offers the Exec helicopter airframe package in two ways:

…all the tubing and parts needed for the builder to do the work, or the Airframe Special option which, for a cool $2,500. provides you with a finish-welded airframe ready for some minor attachments, prepping and painting. As an incentive to the builder, RotorWay offers the Airframe Special free if the entire kit is paid for at the outset.

Although Sebastian didn’t have the capital to go whole hog in the beginning and qualify for the free option, he reasoned that the Special was a worthwhile investment because it would save him 80 hours of work and around $500 of professional welding by an FAA-certified airframe welder.

“My time is more valuable than the $25 per hour I would have saved, and I’m not a welder and wasn’t particularly interested in learning on my own aircraft.” remembers Sebastian. “And when I heard RotorWay’s number one crackerjack welder was a woman. I figured I’d strike a note for equal opportunity employment.”

Brother Ray hauled the completed Exec helicopter airframe from the factory in Arizona to Los Angeles in “the largest covered trailer U-Haul makes” and set about readying the assembly for final preparation and painting.

The airframe is often the most distinctive part of any aircraft, and the flowing lines of the Exec helicopter are no exception. The welded 4130 chrome-moly frame is a relatively simple, sturdy structure, designed for straightforward building and extreme durability.

Ray Sebastian’s Exec and Sebastian himself will be on display at the Third Annual L.A. Expo Aircraft Show at the Los Angeles Convention Center. Show dates are November 29 and 30 and December 1, 1985. Press media day is at Whiteman Airport on November 27. There will be demonstration flights of the Exec by RotorWay factory personnel.

Photo 1

building your own helicopter kit

A few minor brackets and the battery box assembly must be assembled to the airframe before painting. Here, Sebastian clamps the crossover tubes to the Exec helicopter skids (which will be final assembled later), so that the frame and skids are properly aligned and leveled before welding the battery box in place.

Illustration 1

This detail from one of the planset diagrams shows the 11-degree forward sweep of the battery box brackets. The view is from the side, forward is to the left. The main horizontal tube shown in the drawing is part of the lower airframe. After leveling the frame with a bubble protractor, Sebastian went to a pro for help.

Photo 2

welding rotorway helicopter airframe

FAA certified airframe welder Bill Hitt of Abel Air at Los Angeles’ Whiteman Airport welds up the Exec helicopter battery box bracket. FAA inspectors encourage farming out professional skills, like welding, if the builder is in doubt of his own ability to do the job properly and safely.

Typical charges for such minor welding work run around $35 per hour. Welder Hitt had the battery box done in 15 minutes. The forward tilt of the box is required to conform with the configuration of the fiberglass fuselage skin.

rotorway exec kit helicopter plans build

Illustration 2

Planset detail of basic airframe before installation of fuselage skin or flight components. The drive shaft and rotor head will come In at the top of the Airframe. Horizontal “H” tubing is engine
mount frame.

Photo 3

Builder Sebastian became painter Vincent Van Sebastian for the finish work on the Exec helicopter airframe. Armed with a rented sandblaster and a compressor capable of supplying 60 pounds per square inch of pressure to the line, our builder applied a couple hundred pounds of fine grit silica sand (purchased from the local cement yard for $7 1985 price) to completely clean the chrome-moly tubing of rust and dirt.

Do it in a place where excess sand doesn’t pose a problem, or take it home for a couple of year’s supply for kitty’s litter box. The sand-blasting took just two hours. A Badger airbrush commonly used to paint model airplanes was Sebastian’s tool of choice for applying the black two-part epoxy paint.

“When you use the canned propellant,” Sebastian said, “It cools rapidly and pressure drops. So I rotated my three cans of propellant every three or four minutes to keep the job moving along. Putting the cans on a hot stove to warm them is definitely not recommended, by the way,” he said, smiling.

One advantage of using the hobbyist rig in favor of a commercial spray outfit is the savings in paint. Tubing is a fairly small target, perfect for the tighter spray pattern of the air-brush. Also, it’s easier to get into those little corners and comes in handy for the inevitable touch-up. The job was done in about one hour.

Photo 4

The Installation of Exec helicopter Cabin Fuselage, Floor Pan, Etc. instruction sheet offers 62 excellent step-by-step photos detailing the sequence.

From the preface to the sheet: “Attaching the cabin fuselage to the airframe is a relatively straight-forward and simple task if you understand the steps which we have taken in the design of the components to insure their proper alignment. It is important to understand that the body is designed to float on the frame; very little edge trimming of the fiberglass should be necessary to achieve a uniform even fit.”

The advantage of using clecos to preassemble the entire body prior to attaching any of the nut plates or dzus fasteners gives you the opportunity to shift or relocate components somewhat If there is any unacceptable mismatch.”

“Install the bottom tub on the airframe, which requires removal and reassembly of the front landing gear. Hold the seat panel down firmely and force it to the rear as far as possible against the rear airframe tube to which it will also be bolted. Cleco in place.”

rotorway building sequence

Photo 5

Complete the fuselage panel assemblies as shown, installing and clecoing the lower cowling panels and the doghouse (rotor hub shrouding on top) in place.

Photo 6

Detail of Exec helicopter doghouse from above and behind, looking forward. Note clecos holding the part in place.

Photo 7

The fuselage, sans windscreen, with floor panel, seats, control columns and rotor pedal posts installed.

Photo 8

Look Ma, no body!

A friend of Sebastian tries the “back door” before the passenger seat is finish-installed. Seat cushions and seat back panels have four snaps each.

The back rest should be located at the small of the pilot’s back for long-range comfort.

Photo 9

Sebastian adjusts the Exec helicopter tail rotor pedals and the fuselage is ready for painting.

The post Rotorway Exec Helicopter Build Part 5 appeared first on Redback Aviation.

Rotorway Talon 600 Helicopter Flight Review

$
0
0
Rotorway helicopters Talon helicopter

Rotorway Next Generation Kit Helicopter

ARTICLE DATE: February 2008

COURTESY: Kitplanes Magazine

Although it may resemble its predecessor, this new helicopter represents a significant evolutionary leap.

With a flourish, RotorWay announced a new helicopter last summer to replace the venerable — and consistently popular—Exec 162F that had been the company’s mainstay for years.

The new ship, called the A600 Talon, features a number of improvements to the basic 162F design—the short list includes a larger cabin, revised tailrotor power system, new instrumentation and a host of smaller changes to improve the ship’s utility. While the Talon looks much like the 162F, they can almost be called two different helicopters.

The Talon is the latest iteration in a series of helicopters that goes back to 1961, when B.J. Schram put a 40-horsepower motorcycle engine into a frame and got off the ground vertically…sort of. It took six years, but in 1967 the Scorpion became the company’s first production kit. It could be built by the owner, and it actually flew.

Over the years RotorWay has taken the basic design, improved it, simplified the building process and extended the life of all of the critical components. With more than 1600 kits sold, and more than 700 flying, RotorWay’s line is a genuine success story.

rotorway helicopter company history

LEFT: Grant Norwitz, the new majority stock owner and CEO, stands in front of RotorWay’s new 44,000 square foot factory. Along with making many improvements to the ship, the new management team has established overseas partnerships with an eye on certification.
RIGHT: One of the improvements made in the Talon isthe use of a shaft drive for the tailrotor. You can see the guides that the shaft will fit through in this unfinished tailboom.

Over the last 40-plus years, RotorWay has been at the forefront of many aviation advances. The company’s engineers incorporated elastomeric bearings in the main blades, which damped vibration and made the life of the blades much longer.

They gave up on the available engines and built their own, incorporating a FADEC (fully automatic digital electronic control) system in 1994, before NASA started the research for just such a system. The Talon’s FADEC is the latest improvement and is best described as a closed loop system.

The new engine — a very distant cousin of the venerable Volkswagen flat-four — has sensors that monitor all key engine parameters including the four EGTs and CHTs, coolant temperature, manifold and atmospheric pressures, oil pressure and temperature, and some others I forgot.

These data are input to the computer, which in turn controls the ignition dwell and timing as well as the amount of fuel inserted into the cylinders.

Unlike common aircraft fuel-injection systems, which squirt fuel into the intake ports even when the valve is closed, the RotorWays is more like a modern cars: Its electronic injectors are pulsed to meter fuel. The fuel-rail pressure remains constant, but the duration of injector opening determines fuel flow.

helicopter production factory

LEFT: The main-rotor blades are built, balanced and painted at the factory. Once installed, they should require only minimal on-ship tracking and a fine balancing.
RIGHT: The RotorWay engine comes with an optional supercharger, and isseen here being assembled by Carl Kelley. Horizontally opposed and liquid cooled, it contains one of the first FADECs in aviation.

Moreover, for extra safety, the Talon has two FADEC systems operating at all times—one is the main system, which is more “intelligent” and capable, and another “piggyback” system that is up to running the engine alone but has fewer inputs and creates a less fine load/flow map; the standby FADEC’s system also has fixed ignition timing.

This FADEC system is doubly important to RotorWay given that the company allows, recommends actually, that a high quality 92 octane automotive gas. Company president Grant Norwitz explained that auto fuels aren’t controlled like their aviation counterparts, so while the sign on the pump may say 92 octane, it could be much lower.

The company’s research has shown that some fuels can be as much as 10 points below their advertised rating, which can cause various levels of detonation. Detonation, we all know, is bad news for any engine. With RotorWay’s FADEC system, the CPU will alter the timing to accommodate low-octane fuel.

The pilot will note a decrease in performance, but there will be no catastrophic failure. Power from the engine gets to the blades through a transmission, via a set of belts, and thence to the main-rotor shaft.

In this secondary drive, the Talon uses a cog belt instead of the oil-bath enclosed chain on previous models. While were talking about the transmission, the clutch assembly is now activated by a hydraulic ram that gets its power from the engine oil pressure.

However, there’s sufficient tension for the clutch to stay engaged without any oil pressure. The main rotor can be easily disconnected for engine work, and there’s a mechanical complement in the clutch for autorotations. There is also a shaft drive for the tailrotor instead of the series of belts on previous models.

Talon 600 Helicopter Revised On the Outside, Too

As one approaches the Talon, the most striking exterior change is apparent. The ship stands 4 inches higher, with skids that are further apart and longer. This wider and longer coupling will make for safer landings, with much less of a chance of excessive rolling.

It’s subtle, but the stance of the ship on the ground now makes the angle of the main-rotor mast much closer to vertical. As the instructors and their students departed RotorWay’s school, the Talon lifted off in a noticeably flatter attitude without the rocking we’ve seen.

Climbing in through the wide doors (no changes there), two things are striking, especially to those with experience in RotorWays. One, your butt will love the new leather-covered seats; two, your eyes will be drawn to the instrument panel.

talon helicopter rotor system flying

RIGHT: The part that makes the ship go in the correct direction is the swash plate. It can be seen here with the two rods going from it to the blades.

No longer is it covered with steam gauges; the Talon has entered the 21st century with a glass display manufactured by MGL Avionics of South Africa. The pilot can set the screen to many different scenarios, showing the engine and flight parameters desired as well as the GPS output.

Also, perhaps a small thing, they’ve installed inertial seat belts, which will contribute to comfort and safety. The instrument display is coupled to the FADEC, so any difficulty noted by the computer will automatically show up, giving the pilot definitive data to make the land/continue decision.

Later, if the pilot desires more information and/or assistance, the last 900 hours of flight data can be downloaded to a PC and transmitted to the RotorWay factory. There, the experts will diagnose and, if the computer is hooked up to the engine, adjust the CPU via the Internet—just what you need when you’re stuck in the Australian outback.

Building The Rotorway Talon 600 Helicopter

The documentation supplied with any aircraft kit is of vital importance. RotorWay provides builder’s books, blueprints and DVD s (a little over 10 hours total for the series) to make the project about as easy as possible to build.

We read the books, examined the prints and watched the DVDs. They are all correlated to each other, and the DVD tells you what to assemble for the segment under construction. Having a DVD, in lieu of just written documentation, is a real plus.

It’s one thing to say, “File the bushing and make sure it’s square to the fuselage” and quite another to read that and then watch the DVD, where the bushing is filed and then checked for square by installing a bolt and examining for a gap between the bolt’s head and the filed bushing’s side.

We also liked having a video to assist in the visual identification of the various components. A part may have the most distinctive name imaginable, such as “left engine cover,” but a picture of it makes for a lot more peace of mind.

Given that many, if not most, of RotorWay’s customers are new to the building process, some of the videos may be a little overdone in their detail and simplicity for the accomplished builder.

What’s in the Box?

The kit can be purchased as a unit, but many customers prefer RotorWay’s four-step program. This allows the builder to save space, and not have to find room for all the crates. The first shipment includes all the documentation, i.e., manuals, blueprints and templates, and the videos.

Hardware-wise there’s the airframe, tailboom, landing gear, ground handling wheels, engine mount, fins, cyclic, collective, pedals, fuel tanks and heat shields. The second group has the rotor system, main shaft assembly, and most of the fuselage components.

The third shipment comprises the main and tailrotor drive assemblies, the fan, oil and water cooling systems, hydraulic tensioner, fuel pumps, tailrotor, digital display, engine and flight instruments. Lastly, there are the rotor blades, engine and FADEC system.

But the engineers know there are a lot of non-pilot customers who won’t have much of a background in aviation, building or even mechanical aptitude. Thus little things like a demonstration of hitting a piece of wood with a hammer to drive in the landing-gear plugs seem pretty basic. Better too much information than not enough, we always say.

Prior to shipment, the engine is run-in on a dynamometer, the main blades are balanced, the tailboom is finished except for inspection panels, and the fuselage frame is completely welded. What the builder is doing is assembling the components. Even the fiberglass body panels, which are laid up by hand, are complete and need only be assembled to the fuselage.

Nuts, bolts and sundry items are packaged in transparent shrink-wrapped packages to be opened only when needed for the specific sub-assembly being built. Aircraft-specific tools, such as Cleco pliers (and sufficient Clecoes) are supplied. They say the only things not supplied are the paint and avionics.

Even with all this, the ship still qualifies under the “51% rule” for builder maintenance, and as with any helicopter, periodic maintenance is vitally important. Incidentally, the company estimates the average build time to run between 450 and 600 hours.

Learning to Fly The Talon 600 Helicopter

I recall a fellow at my home airport trying to teach himself how to fly his RotorWay. At the time I was flying a Hughes 269 some 5 hours a day, so I was fairly proficient.

The maneuverings of his ship made me hide behind a thick concrete wall. To avoid these problems, RotorWay has developed a three-phase training program, which is conducted at the company’s flight school, located at Stellar Airpark, in Chandler, Arizona.

The first phase is attended when the customers helicopter is about 90% complete, and it covers hovering and ground operations as well as what to look for during the final rigging of the aircraft. This brought up the dreadful thought of a new engine being pounded at high power settings for hours at a time — especially in Arizona.

Norwitz said that wasn’t a problem, because the engine is liquid cooled and engineered for just that operating environment. He went on to say that he had been assisting in some engine research and hovered the ship for about 2 hours nonstop with an air temperature of 107° F.

The second phase of training comes alter the student is proficient at hovering and introduces him/her to landings, takeoffs, cross-country and pattern work. The last phase is a final check-ride for the Private Rotorcraft license. If desired, supplemental training can take the student to the Commercial rating.

The Rotorway Company

RotorWay has gone through a series of owners in its history. It started with B.J. Schram, was improved under Stretch Wolter and John Netherwood, and became an employee-owned company in 1996. In 2007, the company was sold to Norwitz and a group of deep-pocket international associates.

This wasn’t an impulse buy; Norwitz had run the company tor a year prior to purchase, had been associated with it for two years prior to that, and he built his own RotorWay in 2003. The intent of this group is to take the company to the next level, as its members are fond of saying.

Immediately, this would mean an increase in production from its present two ships a week and more sales overseas. A plant has been established in Cape Town, South Africa, where kits will be assembled and the helicopters sold that way.

Rotorway Talon 600 helicopter specifications

1. The Talon’s proprietary four-cylinder engine is well cooled. The white tube under the tailboom is movable ballast, which can be placed on the nose of the landing skids.

The countries that allow the sale of a pre-built Experimental aircraft include India, China, Brazil, Peru and others. International trade is not for the faint of heart, so RotorWay has established development partners who are assisting in the process.

Augusta Westland is cooperating, and has provided a great deal of assistance in development, partnering, quality control, R &D and establishing the South African subsidiary. Also on board is the Denel Company, a major manufacturer of helicopters for the South African military.

The owners have already made some large steps in expanding the company. The factory has moved about 3 miles away from its former location into an environmentally controlled, 44,000 square foot building.

A nationwide dealership network is being established, which will provide parts, builder assistance and sales. The first dealership has been given to Ed DeRossi in upstate New York. DeRossi is enthused about the possibilities. He has his own RotorWay and does builder assistance for those who live in his area.

new-rotorway helicopter drive system

2. RotorWay’s original main-rotor drive was a chain in an oil bath. This has been changed to a cog belt, i.e., one with teeth.
3. A concession to the pilot’s comfort, the seats in the Talon have been redesigned to look and feel like a race car’s.
4. Gone are the steam gauges of yesterday. There’s now a glass display that can be set by the pilot to show the engine data, flight parameters and GPS output.

As for media reports on the certification of the helicopter, Norwitz, and those of you who followed the travails of Cirrus’ and Lancair’s certification process, know this is a number of years away. In the meantime, the company focuses on the Talon, which has seen a modest price increase from the 162F.

The complete kit—less radios, paint, freight and flight training—costs $94,700 including the engine and FADEC. Options include a cargo container, lights and something called AICS (altitude induction compensation system, a supercharger) for $5000.

Our Flight In Rotorway Talon 600 Helicopter

For comic relief, one of the pilots, John O’Neill, opted to see if I had improved any in the last few years since I had been at RotorWay. We lifted off and flew to an abandoned military field just a few miles to the south. The visibility in the Talon is excellent, and with the doors off you have the feeling of flight without any support.

Rotorway A600 Talon Helicopter Specifications
Price with engine $94,70
Estimated completed price $96,000-$110,000
Estimated build time 450 – 600 hours
Number flying (at press time) 1 (plus 700 – 162Fs)
Power plant RotorWay Rl 600N, 147 hp
Powerplant options RotorWay Rl 600S supercharged

The trick is to use the spinning rotor disk, which appears as a blur ahead, as your reference mark for turns and level flight. The controls are quick and, like most, I overcorrected, though I didn’t think a 60° bank was too bad. O’Neill did an autorotation, and the descent rate was brisk but certainly nothing that would upset a passenger.

Trying to hover, I immediately remembered how old and slow I was becoming. Flying a helicopter is primarily balance and feel, so I was all over the place for the first few minutes. Once I stopped manhandling the cyclic, the ship stayed in one place, though admittedly a fairly large place.

Rotorway A600 Talon Helicopter Airframes
Disk span 25 ft
Disk area 491 sq ft
Fuel capacity 1500 lb
Typical empty weights 965 lb
Typical useful load 535 1b
Full-fuel payload 436 1b
Seating capacity 2
Cabin width 44 in

The throttle is mechanically coupled to the collective, so raising the collective increases the throttle and vice versa. Some small input was required, but for the most part it was minimal. The tailrotor controls were sharp and definite. Because most of my time was in a Hughes 269, I consciously compared the two.

The only real difference I noted was the lightness of the RotorWay, something like the difference between a sports car and a minivan. Payload and range have always been an issue with helicopters. Their less than stellar miles-per-gallon numbers make for a regular trade-off between what you can carry and how far you can go.

Rotorway A600 Talon Helicopter Performance
Cruise speed 100 mph (87kt) TAS, 8.0 gph
Maximum rate of climb 1000 fpm
Hover in ground effect 6000 ft
Hover out of ground effect 4000 ft
Service celling 10,000 ft
Specifications are manufacturer’s estimates and are based on the configuration of the demonstrator aircraft. As they say, your mileage may vary.em>

As for the Talon’s performance, it will haul a couple of 200-pounders, plus about 30 pounds of baggage and will stay in the air for almost 2 hours, providing you’re at cruise speed. How fast? Normal cruise is listed as 87 knots true, with 100 KTAS as the top speed. That’s within 10 knots of the Robinson R-22, which will burn more fuel per hour.

So it seems as though RotorWay is on a strong forward march, improving the ship, expanding production capability and looking ahead to enticing more fixed-wing pilots into the fold.

Rotorway Talon 600 helicopter flight review

Reprined for Kitplanes Magazine – February 2008. SUBSCRIBE to Kitplanes Magazines for further information.

The post Rotorway Talon 600 Helicopter Flight Review appeared first on Redback Aviation.

RotorWay Exec 90 Kit Helicopter

$
0
0
Rotorway Exec 90 helicopter award winner

Classic RotorWay Exec 90 Helicopter

Ed DeRossi says he likes a challenge.

COURTESY: EAA Sport Aviation July 2002

That may be an understatement. With a lifelong passion for helicopters, he was among the first to build and fly radio control (RC) helicopter models—no small challenge. Then he built a RotorWay Exec 90 kit helicopter, finishing it in 1994 and earning Reserve Grand Champion Rotorcraft at EAA Oshkosh in 1995 and Grand Champion in 1996.

Today, Ed is EAA AirVenture Oshkosh’s chief rotorcraft judge. He demonstrates his Exec 90 Kit Helicopter at local air shows, and he travels around the world helping others to complete and fly their RotorWay helicopter kits.

He probably knows more about RotorWay helicopters than anyone else outside of RotorWay International. Ed’s interest in flying machines ignited at 5 years old when his father, an RC enthusiast, got him started building simple flying models.

Five years later he was building and flying RC airplanes, and when RC helicopters came on the market in the early 1970s, Ed was among the first to build and fly one. “I’d always wanted to fly, especially helicopters,” DeRossi says.

“I flew model helicopters because I didn’t think I’d ever be able to afford a real one. There were no kit-built or homebuilt helicopters then, just factory-built helicopters. All the kits and homebuilts were gyrocopters, and I wanted to hover.”

DeRossi logged an hour of dual instruction in a Robinson R-22 — “just enough to learn to hover” — and considered joining the Army National Guard. “But they couldn’t guarantee me that I’d be able to fly helicopters, so I gave up on that.” He continued to fly RC helicopters and dream.

In 1967, B.J. Schramm, homebuilt helicopter designer and founder of RotorWay, introduced his kit helicopter — the Scorpion helicopter. RotorWay’s company history says the Scorpion helicopter was “the first real kit helicopter on the market that actually flew.” Underpowered, the Scorpion helicopter suffered its share of teething problems, like any new design.

Using the Scorpion’s lessons, in 1980 Schramm introduced a new two-place kit helicopter, the RotorWay Exec 90 Kit Helicopter. Inevitably, the kit caught Ed DeRossi’s attention, and for 10 years he studied it every year at EAA Oshkosh and Sun ‘n Fun.

After high school DeRossi went to work as an automobile and truck mechanic for Goodyear. After a few years there, he worked for 10 years at motorcycle shop, repairing and maintaining bikes and snowmobiles.

Then he opened his own auto repair shop. He continued to fly RC models (a hobby he still pursues). With a passion to fly, but little time and money for flying full-sized airplanes, he bought an ultralight—a 15-hp weight-shift Quicksilver.

Birthday Building Project – Exec 90 Kit Helicopter

Through the 1980s, Ed was a dealer for Cobra and King Cobra ultralights. He ran a sky diving school for a few years and earned his fixed-wing private pilot certificate in 1988. Still, every time he went to EAA Oshkosh or Sun ‘n Fun, the RotorWay Exec helicopter beckoned to him.

“When my 40th birthday rolled around,” DeRossi says, “I said to myself, I’ve got to do this. I went to Oshkosh and put down the deposit on an Exec 90 kit helicopter as a present to myself on my 40th birthday, July 27, 1993.”

While waiting for his Exec 90 Kit Helicopter to arrive, Ed sold his ultralight dealership and took a full-time job as a mechanic for the local power company. That would give him the time, money, and freedom to work on his RotorWay helicopter.

It arrived in September 1993, and over the winter Ed worked on it like a man on a mission. He still had the building that had housed his auto repair business, and it was perfect for building the Exec 90 helicopter. “I had the shop and most of the tools, and whatever else I needed, I bought as I went along.”

Two seat Rotorway Exec 90 helicopter kit build

DeRossi ready for takeoff.

His years of experience as a mechanic helped Ed complete his Exec helicopter in near-record time, and he also credits the kit’s design and the people at RotorWay. The company’s builder support is excellent, he says. Tom Smith was his main RotorWay contact, and “I probably called Tom a dozen times with questions, and he was right there with the answers.”

“The whole company was really great.” Working the night shift at the power company garage left Ed’s days free for building and flying. He’d come home from work and spend every available minute on the project.

“I didn’t get a lot of sleep that winter,” he adds, “but I wanted to get it done.” “I only took time off for two things,” Ed says.

“A week at Sun ‘n Fun, and to snow blow the apron outside the shop. When I finished the project, I wanted to be able to hover it, so I kept the apron clear of snow.” Every other spare moment was spent on the kit.

By June of 1994, just nine months after the kit arrived, Ed had put more than 1,000 hours into the project, doing all of the work himself, except the chrome plating. His Exec 90 Kit Helicopter was ready for its first hover test, and he rolled it out of the shop. “As it turned out, that first day, I didn’t hover it,” he says.

“I started it up and spun the rotors, but it just didn’t feel quite right.” Ed may have been in a hurry to finish the kit and fly it, but he wanted it done properly. That was part of the challenge. He pulled the ship back into the shop and checked everything one more time.

DeRossi working on Exec 90 helicopter

DeRossi working on his Exec’s rotor head.

The next morning, he rolled it out again, started the engine, and lifted the ship into a hover. “It worked just the way it was supposed to.” Challenge met. Mission accomplished. It was time to set the project aside and head for Tempe, Arizona, for Phase One of RotorWay’s factory flight school.

Because many of its customers are new to helicopters, RotorWay began training its customers in the 1970s, when it introduced the two-place Scorpion II helicopter kit. For students like Ed, who are certificated fixed-wing pilots, the FAA requires a minimum of 15 hours of dual instruction and 15 hours of solo flight to earn a rotorcraft rating.

All students in the RotorWay helicopter program must have at least a third-class medical certificate and a student or private pilot certificate. RotorWay divides its training program into three phases. Exec 90 Kit Helicopter Phase One reviews building, rigging, and maintaining the Exec and includes 10 hours of dual instruction.

Phase Two consists of more ground school, more dual instruction, and cross-country flights. Phase Three concludes with the FAA checkride. The training program is open to owners of any RotorWay model.

Students typically finish each phase and then return to Arizona several weeks or months later for the next phase. DeRossi finished the first two phases in the five days normally allotted for Phase One, and he credits his fixed-wing — and RC helicopter — experience for his progress.

Ed doesn’t like to brag about it, but RotorWay was impressed, and it named him 1994’s “RotorWay Student of the Year,” and he gives a lot of credit to the Exec 90 helicopter. “It’s a really stable helicopter,” he says. “It’s small compared to a Jet Ranger, and because it’s small you expect it to be kind of twitchy. But it’s not. The RotorWay helicopter is very stable and very pilot-friendly.”

Upon completing the first two phases of training, RotorWay gave Ed a 90-day endorsement for solo hovering and sent him home. His total time in helicopters at that point: 1 hour in a Robinson R-22 and 7.5 hours in a RotorWay Exec 90 Kit Helicopter.

With EAA Oshkosh a month away, Ed intended to pack up his Exec 90 and trailer it to Wisconsin. Starting with a trailer built for sprint cars, he added clamps to secure the skids to the deck and a winch to pull the Exec 90 Kit Helicopter up the trailer’s drop-down ramp.

Then he added one of the few custom touches to his helicopter, a special fitting for attaching the winch’s cable. It takes Ed about an hour to remove the main rotor blades, attach ground-handling wheels to the skids, winch the Exec onto the trailer, and clamp it out. (Reversing the process also takes an hour.)

Rotorway Exec 90 helicopter panel

DeRossi’s Rotorway Exec panel is simple but supremely functional and uncluttered.

To stabilize the Exec helicopter on the road Ed designed and built two tail boom supports using aluminum tubing with a motorcycle shock absorber on one end. The tubes fasten to fittings on the trailer wall or deck, and the shock absorber attaches, through a small spring, to the tail rotor.

The vertical support lifts the tail just enough to take the strain off the fuselage, and the shock absorber cushions bumps in the road. The horizontal support keeps the tail boom centered and from banging against the trailer’s walls, and the shock absorbs the bumps and vibrations.

At Oshkosh, RotorWay gave Ed another 90-day endorsement, allowing him to continue hovering his Exec 90 helicopter until he could return to Tempe for the third phase of training and his FAA checkride. At that point, he had 13 hours of hover time in the Exec. Ed earned his helicopter rating that fall and put the finishing touches on his project over the winter.

He returned to Oshkosh in 1995, where the judges named his Exec 90 helicopter Reserve Grand Champion Rotorcraft. After receiving the award Ed learned from one of the judges that he’d missed the top spot by just a few points and that a better interior probably would have earned him the top award.

“I told him I didn’t build a fancy interior because I wanted it light and functional,” Ed explains. “I told him it was the best interior I could build with the materials I had; it’s not fancy, but it was done with precision.”

DeRossi returned to Oshkosh in 1996, and that year the judges named his Exec 90 the Grand Champion Rotorcraft. “I didn’t change anything,” Ed says. “And in 1996, the same judge told me mine was the nicest RotorWay he’d ever seen. I think the second year, he looked more closely at the details and the finish.”


EXEC 90 KIT HELICOPTER – JUDGE ME

Bob Reece has been involved in aircraft judging since the 1970s and has directed the judging at EAA AirVenture Oshkosh for the last 10 years. Most of the more than 160 EAA AirVenture judges are experienced homebuilders and/or restorers, but, he says, this isn’t a firm prerequisite.

In-depth knowledge of aircraft systems and materials is important, he says. Bob stresses that being an aircraft judge is “a big commitment.” Judges are volunteers who must attend the convention from start to finish and agree to be at EAA AirVenture for several years running.

Judge candidates undergo an intensive interview and screening process, and new judges are chosen carefully. It takes “two to three years to get a judge trained well enough to where I can confidently send him out on his own—if I have to—and he can judge any homebuilt on that field.”

They have to be. says Reece. because “if you get an award at Oshkosh, that’s the epitome of judging.” Judges examine 10 categories on each homebuilt aircraft, awarding up to 10 points in each one. Each category has equal weight in the cumulative score.

Bruce Reece EAA helicopter judge

“It’s up to each judge to apply his or her expertise in looking and probing and whatever,” Reece explains. “I don’t expect three judges to go out there and look at that airplane and all come back with the same score.”

To be eligible for an EAA AirVenture award, at least three judges must examine an aircraft. Reece sends his homebuilt judges out in groups of three, with each group starting in a different area. Over the week, the groups will criss-cross, and more than three judges will look at most aircraft.

The more judges who look at an aircraft, the more accurate and objective the judging becomes, Reece says, but many airplanes don’t stay the whole week. Some fly in for a few days, or a few hours—long enough for three judges to look at the aircraft—and then fly out.

Each airplane is judged on its own merits. “We don’t judge this airplane against that airplane,” says Reece. “It may look like that’s what happens, but it doesn’t.” Judging is subjective, “but we make it objective by having an open point scoring system” and by using multiple judges who have been carefully selected and trained.

“We have judges who have been working with us for 20 or 30 years,” says Reece, and collectively, they possess a huge body of expertise. “They know how important the judging is and how meaningful the results are,” Reece adds. “They work very hard, they take it very seriously, and they are all very dedicated to doing it right.”


Rotorcraft judge

After earning the top honor in 1996 with his Exec 90 Kit Helicopter, DeRossi was recruited as a rotorcraft judge. All EAA aircraft judges are volunteers.

Carefully chosen, they serve as apprentices to the veteran judges for two or three years before going “solo.” All the rotorcraft judges are devoted to rotating-wing machines, and Ed and his three other judges arrive in Oshkosh early each year, to see what’s there before the crowds arrive.

If they discover a new kit, prototype, or one-of-a-kind design, they’ll spend time studying it before the judging begins. To determine the championship rotorcraft the judges “start by looking at its overall appearance from a distance—about 150 feet away,” says DeRossi. Then they move in for closer scrutiny.

They divide each ship into sections—cockpit, engine, tail boom, and so on — and examine each in detail, looking for evidence of the time, detailing, and workmanship that the builder has put into the project. “The finish, the hardware, uniformity from one side to the other, paint job—all these are important,” DeRossi says.

“We also want to know how much of the project did the owner do himself.” All other things being equal, work performed by the owner will get higher marks. These days most people who have their aircraft judged have professionals paint their homebuilt.

“For the builder, it’s a dilemma, because a great paint job can cut both ways.” “If you hire out the painting, it looks great. If you do it yourself, and do a less-than-perfect job, it’s your own work but it doesn’t look as good.”

“[The judges] sometimes end up deducting points for a less-than-perfect paint job and giving back points because the owner did his own painting.” Occasionally, a builder tries to pass off professional work—work he has hired someone to do for him — as his own.

“When that happens, and it’s not often, it’s pretty easy to figure it out by talking with the owner,” DeRossi says. “If you’ve done the work, you know every inch of that aircraft.” An owner who didn’t do the work isn’t going to know the project as intimately.

During his five years as a judge, Ed says workmanship has been improving — “most of the time.” Personal touches he’s seen on the RotorWay Exec helicopters include electric clutches, instruments, fancy interiors, storage compartments, and paint schemes. “Each year, we see more detail in the paint jobs.”

With his helicopter finished and flying, DeRossi spends a lot of time helping others with their RotorWay projects. “After the FAA has signed off on it, but before its first flight, I’ll go out, look it over, and fly it for the first time.”

“I spend about two days with each owner, making sure the ship is safe and that it flies the same as any other RotorWay helicopter.” DeRossi has worked with nearly 50 Exec builders in the last two-and-a-half years, traveling all over the United States and to Brazil, El Salvador, Mexico, Costa Rica, and Africa.

RotorWay builders find him at EAA AirVenture or Sun ‘n Fun, through the RotorWay factory, or through informal builder networks. “I get phone calls every week from RotorWay owners,” he says. And the number of owners is growing steadily.

Ed DeRossi radio control helicopter

A hobbyist at heart. DeRossi’s Exec perched atop his R/C shop.

RotorWay sells 70 to 90 kits a year worldwide. RotorWay’s Susie Bell says Ed is “definitely one of our most knowledgeable customers.” From his experience as a builder and EAA judge, “he really knows his stuff.”

For Ed, sharing his knowledge and helping homebuilders like himself to achieve their dreams has been one of the unexpected rewards of building his own helicopter. Though he’s a regular at EAA AirVenture and at Sun ‘n Fun, DeRossi has never flown his Exec 90 Kit Helicopter to either gathering.

This year, as in the past, he’ll trailer it in from his home in Johnstown, New York. He only flies it in the summertime, and the farthest he’s ever flown the Exec 90 helicopter was just 160 miles, round trip.

“I like flying around home and landing where an airplane can’t,” he says. “I’ve flown to Wal-Mart and to lots of restaurants, landing in a corner of the parking lot or on the grass nearby.” He also flies to local events—including air shows. Last year Ed flew to the Schenectady air show, and the organizers asked him to be Saturday’s pre-air show act.

“I did some basic maneuvers—hovering, sideways and backwards flight, and a fly-by—just to show what a Exec 90 Kit Helicopter can do. With a skid I knocked over an orange rubber traffic cone—and set it back up.”

“Then I went up and did a couple of autorotations, each time landing right in front of the cone,” Ed says. “I didn’t want to bore anybody, so I kept the presentation short—about 15 minutes. Everybody liked it so much that they asked me to do it again as part of the regular air show on Sunday.”

He’s been invited back to the Schenectady air show in 2002, and he and his Exec 90 helicopter appeared at a local balloon festival in June. Most of the time, Ed says he flies his Exec 90 for the simple joy of it.

So far, he’s logged roughly 650 hours of good, clean fun. “There is an ice cream parlor near here, and I love to fly there.” He also mentions a favorite restaurant: “Whenever I land there for dinner, the owner gives me a free dessert.” Another unexpected reward.

Ed DeRossi Rotorway Exec 90 helicopter kit

The post RotorWay Exec 90 Kit Helicopter appeared first on Redback Aviation.

Viewing all 50 articles
Browse latest View live